 Android dropbox app allows you to download and view your files in your Dropbox folder and also upload files to the server. Dropbox android apps is best suited for people who like to work on with the phone. If there is anything that we are unsatisfied with, it have to be the inability to sync your local files (in SD card) back to the server. When you open a file from your Dropbox folder in Android, the file will be downloaded to your SD card and you can then view/edit the file with a file manager. However, after you have made changes to the file, the Dropbox app does not automatically sync it back to the server. The only solution is to manually upload the file. This is definitely a bad file sync problem in android. A good solution to overcome this file sync problem is using an additional dropbox app, that is Dropspace. DropSpace is another great apps for Android Dropbox. DropSpace will allows you to create a link between a folder in SD card and a sub-directory in Dropbox. Once the link is created, it will auto sync the files from/to your Dropbox. Dropspace is free, just download it via android market.
Download Dropspace Android App
Step by Step
Connect your Dropbox account to DropSpace.

Tap the “Manage Sync List” button to set up the sync.

Navigate to the directory on your SD card that you want to link and long tap on it to add to the sync list.

Next, it will show your Dropbox folder and you can do the same thing (long tap on the folder) to complete the sync configuration.
Lastly, go back to its main screen and tap the “Sync Now” to start the sync.

By default, you have to manually tap the “Sync Now” button everytime you want it to perform a sync. However, you can set it as a service and get it to run at a regular interval. You can also configure whether to remove the remote files when the local files are deleted.

Syncing notes to Dropbox
If you want to create notes on your Android phone and have them synced to your Dropbox, You can use another additional dropbox app, Epistle. With Epistle, you can create simple notes and it will automatically synced to the Epistle folder in Dropbox. I have found this to be extremely handy, especially when I need to jot down some ideas while on the move.
Download Epistle Android App

Epistle also supports two-way file sync. That means, if you create a text file on your desktop and drop it into the Dropbox Epistle folder, it will show up in your Android phone as well. Until the android dropbox team implements the synchronization feature in their mobile apps, we will have to make use of the above android dropbox file sync method to get things done. They might not be the most complete feature of android dropbox app, but it will help you little.
Just let me know if still have a problem :)
 Create a good logos is an important thing for your blog design. Especially if you have a popular blog. You can increase blog traffic by making a good logo. Make a good logo can attract your visitor to visit your blog/website again. Beside that, logo is the most important thing for you that have a company. A great company logo will make your company impression look great too. A suitable brilliant logo will increase a good looking of your theme. So, pay attention to your blog logo everytime you post it in your template.
This post is not about making a logo for your blog only, but you can use this trick for designing company logo too. Make a good logo will carves a good impression of your blog. For example, logo with extreme graphics and colors will not matching your blog design, it will leaves a bad impression on the readers. Here are few things to keep in mind while designing your logo to make it the best.
1. Simple Design Looks The Best
Simple logos look the best. Just the blog name and a short line describing your blog in the logo, occupying the minimum space can considered as a good logo. So keep your logo simple.
2. Use Easily Readable Fonts
Do not use cartoonistic fonts unless your blog belongs to that niche. I suggest using simple bold fonts which can be read easily. Some of those fonts are Impact, Arial, etc. They are the basic ones available. You can alternatively download other fonts from various font sites.
3. Search For Ideas
Before starting to design your blog logo always make sure you visit some other blogs for ideas. You may thus get many excellent design ideas.
4. Use .PNG Format
I always use .PNG format for all my logos. They not look the best, but have many benefits too. When you keep the background transparent and store your logo in .GIF or .JPG format, the background in the image becomes black, but in .PNG format it doesn’t. Also I’ve noticed that .PNG images have a better shine and finishing. So I suggest you to use .PNG logos.
5. Make The Logo Stand Out
Suppose you use Arial font in your blog, then don’t design your logo in the same font because there is a chance that your text, headings will look similar to your logo. This will reduce attraction. Choose a different font.
I thing this is enough for the trick of how to make a good logo, i hope you can understand and implement it. I will post the next trick about making a good logo later. Just feel free to ask if you have some questions about this post :)
 Long ago, we got USB 1.1, then now we got USB 2.0 and the next we will get the USB 3.0. What is USB 3.0? and how fast is USB 3.0 SuperSpeed actually? what's the difference between them? Now, we will know it. All about USB 3.0. But, first we need to know the history of the USB(Universal Serial Bus).
The History of the Universal Serial Bus (USB)
The specification of the USB standard was started by 7 companies back in 1994: Compaq, DEC, IBM, Intel, Microsoft, NEC and Nortel. They wanted it to be easier to connect devices to PC’s and agreed that the industry need a common standard. There have been multple releases of the standard over the years, but I will focus my review on the 3 most common used:- USB 1.1 Full-speed (1998)
- USB 2.0 Hi-Speed (2000)
- USB 3.0 SuperSpeed (2008)
You might think that USB 3.0 is kind of old since the standard was completed already back in 2008, but according to Wikipedia the first devices for USB 3.0 was presented in January 2010 and just like with USB 2.0 it took a while before supported devices was available for consumers.
How fast is USB 3.0 SuperSpeed?
According to the specification this is the maximum speed of the different versions of USB.USB 1.1 Full-speed - (12 Mbit/s or 1.8 MB/s)
USB 2.0 Hi-speed – (480 Mbit/s, or 60 MB/s),
USB 3.0 Superspeed – (5 Gbit/s or 625 MB/s)
is USB 3.0 it really that fast in practice?
Actually no. You are not going to copy files to an USB stick with 625 MB/s. The first reason is that the disk you would be copying from is most likely not able to read the data that quick and your USB stick is properly not able to write the data with that speed either. If you think about it you have properly never seen a USB 2.0 device being even close to a transfer of 60 MB/s.USB 3.0 is not as fast as the specification. It might let you think, but it is for sure a lot faster than USB 2.0 and you have something to keep in mind when buying new devices or a new motherboard. Just look after your friend that have bought it and try it yourself. This is the general transfer rate of USB 2.0 and USB 3.0 :
USB 2.0 HiSpeed – 28 MB/sec.
USB 3.0 SuperSpeed – 76 MB/sec
That's it about the USB 3.0 super speed. Next, you may be interest with our previous article about how to make USB Power Injector Modem. Just feel free to ask us if you have some question, just contact or comment below :)
 You ever felt disappointed after downloading an e-book as the e-book you've downloaded have password attached and you can't modify it? We must be annoyed when we have to type the password first before we open the PDF file. Sometimes we must use the bad ways to remove the PDF password. And there are a few PDF Password Remover Tool that can help use to remove PDF password. First, we must know the password protection that attached, so we don't get me wrong.
There are two types of protections in PDF which is,
- User password – Password to open the PDF file
- Owner Password – Password to print, copy, modify the PDF file
However if the PDF file is using Owner Password, this tool will decrypt and remove the password so you can print, copy, and make changes to the document.
PDF Password Remover Tool
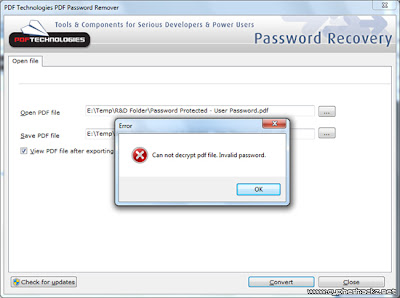
PDF Password Remover Tool is a freeware PDF password recovery that will decrypt the Owner Password and remove it from the PDF file. I’ve tested this software and it works perfectly.If you want to remove the User Password, this tool will popup an alert saying ‘Cannot decrypt pdf file. Incorrect password.’ as shown in the image below.
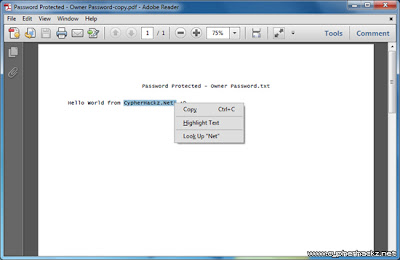
But if the e-book PDF file is using Owner Password, the password removal software will able to remove it, and save a new copy which allows you to print, copy and modify the document content.
PDF Password Remover Tool is free for personal use. Please use this software to remove passwords from PDF files of yours. It was developed to help you recover PDF files in cases where you forget the owner passwords you once set and can no longer remember. Don't use this removal tool to infringe the PDF ebook copyright or etc. Read our other similar article about how to convert word doc to PDF file. Hope this tutorial can solve your problem :)

The main risk about internet browsing is whether our machine is getting affected by virus or not. To stop this unwanted intrusion by any malware, all of us rely on installed anti-virus software. But unfortunately, some of this antivirus software might not work on your computer because some malware have attack your machine and you did not updated it regularly.
To get around of this, you can scan your computer online with online antivirus scanner. Beside that, Online virus scanner can be a wise option if you don't trust your installed antivirus. Possibilities of missing some threats are always
there by standalone antivirus software and somehow enough to make you jump on second opinion. But you must be careful because they can turn out themselves to be some kind of malware. To help you in choosing your online antivirus scanner, we have some list of a trusted online antivirus scanner you can use. Some of them have a big name in security world.
Here is the top 10 Online AntiVirus Scanner To Try :
1. TrendMicro Housecall
 HouseCall is Trend Micro’s highly popular and capable on-demand scanner for identifying and removing viruses, Trojans, worms, unwanted browser plugins, and other malware. HouseCall 7 features an intuitive interface and the ability to perform fast scans that target critical system areas and active malware. It also leverages the Trend Micro Smart Protection Network to help ensure that scans catch the latest threats.
FREE-Online-Virus-Scan-housecall1
2. ESET Online Scanner
 ESET Online Scanner is a user friendly, free and powerful tool which you can use to remove malware from any PC utilizing only your web browser without having to install anti-virus software. ESET Online Scanner uses the same ThreatSense technology and signatures as ESET Smart Security/ESET NOD32 Antivirus, and is always up-to-date. Do not forget to take admin privileges to run ESET Online Scanner.
3. Panda ActiveScan
 Panda ActiveScan allows both quick scan and full scan just on click. Hit scan now and follow up the instruction as given. This is the first time that you use ActiveScan 2.0 with Mozilla Firefox. For ActiveScan 2.0 to work you must download and install a plug-in.
4. BitDefender QuickScan
 BitDefender is based on anti-malware technologies that doesn’t slow down your PC while scanning. Less than 60 seconds it provide you very fast scanning if your computer is infected. You can runs online from any Internet connected PC.
Notice the browser confirmation message and accept the plug-in installation by clicking ‘Allow’ on the bar above.
5. F-Secure Online Scanner
 Online Scanner can help get rid of viruses and spyware causing problems on your PC. After running Online Scanner, you should make sure that you have an up-to-date security solution keeping your computer free of problems in the future.
6. Kaspersky Online Scanner 7.0
 Kaspersky Online Scanner 7.0 does not require installation on your computer. It starts from the web site of Kaspersky Lab and runs in a browser window on your computer. You should notice the ’system information’ before start scanning.
Individual File Scanners
7. VirusTotal
 Virustotal is a service that analyzes suspicious files and URLs and facilitates the quick detection of viruses, worms, trojans, and all kinds of malware detected by antivirus engines
8. Kaspersky File Scanner
 If you discover a suspicious file on your machine, or suspect that a program you downloaded from the Internet might be malicious, you can check the files here.
Only one file or archive file (in zip, arj or similar format) of up to 1 MB can be checked at any one time. If the file is too large, a window with an error message will be displayed. Type the name of the file in the window at the top of this page, or find the file using ‘Browse’. Then click on ‘Submit’.
9. Jotti
 Jotti’s malware scan is a free online service that enables you to scan suspicious files with several anti-virus programs. Scanners used are Linux versions; detection differences with Windows versions of the same scanners may occur due to implementation differences. There is a 20MB limit per file.
10. VirScan
 VirSCAN.org is a FREE on-line scan service, which checks uploaded files for malware, using antivirus engines, indicated in the VirSCAN list. On uploading files you want to be checked, you can see the result of scanning and how dangerous and harmful/harmless for your computer those files are. It allows 20MB of any files or 20 files after Rar/Zip decompression files as well. VirSCAN can scan compressed files with password ‘infected’ or ‘virus’.
That's the top 10 option you can use to scan your computer online. Whatever you use, make sure your computer performance is good enough to scan. And for you that using gmail, you can read my previous article about email security. Please, if you have some questions, just let me now :)

Cracking Wifi network is difficult for some peoples because now almost all of wifi network is well protected. Especially that protected with password. But, it doesn't mean cracking a wifi network is impossible. Now, i will show you how to crack wifi network WEP Password by using backtrack linux which is a popular for hacking tool. What will you need to do this? Check this out.
Unless you’re a computer security and networking ninja, chances are you don’t have all the tools on hand to get this job done.
Requirements
- A compatible wireless adapter :This is the biggest requirement. You’ll need a wireless adapter that’s capable of packet injection, and chances are the one in your computer is not.- A BackTrack 3 Live CD : We already took you on a full screenshot tour of how to install and use BackTrack 3, the Linux Live CD that lets you do all sorts of security testing and tasks. Download yourself a copy of the CD and burn it, or load it up in VMware to get started. (I tried the BackTrack 4 pre-release, and it didn’t work as well as BT3. Do yourself a favor and stick with BackTrack 3 for now.)
- A nearby WEP-enabled Wi-Fi network : The signal should be strong and ideally people are using it, connecting and disconnecting their devices from it. The more use it gets while you collect the data you need to run your crack, the better your chances of success.
- Patience with the command line: This is an ten-step process that requires typing in long, arcane commands and waiting around for your Wi-Fi card to collect data in order to crack the pasrword. Like the doctor said to the short person, be a little patient.
Cracking The WEP
To crack WEP, you’ll need to launch Konsole, BackTrack’s built-in command line. It’s right there on the taskbar in the lower left corner, second button to the right. Now, the commands.First run the following to get a list of your network interfaces:
airmon-ng
The only one I’ve got there is labeled ra0. Yours may be different; take note of the label and write it down. From here on in, substitute it in everywhere a command includes (interface).
Now, run the following four commands. See the output that I got for them in the screenshot below.
airmon-ng stop (interface)
ifconfig (interface) down
macchanger --mac 00:11:22:33:44:55 (interface)
airmon-ng start (interface)

If you don’t get the same results from these commands as pictured here, most likely your network adapter won’t work with this particular crack. If you do, you’ve successfully “faked” a new MAC address on your network interface, 00:11:22:33:44:55.
Now it’s time to pick your network. Run:
airodump-ng (interface)
To see a list of wireless networks around you. When you see the one you want, hit Ctrl+C to stop the list. Highlight the row pertaining to the network of interest, and take note of two things: its BSSID and its channel (in the column labeled CH), as pictured below. Obviously the network you want to crack should have WEP encryption (in the ENC) column, not WPA or anything else.

Like I said, hit Ctrl+C to stop this listing. (I had to do this once or twice to find the network I was looking for.) Once you’ve got it, highlight the BSSID and copy it to your clipboard for reuse in the upcoming commands.
Now we’re going to watch what’s going on with that network you chose and capture that information to a file. Run:
airodump-ng -c (channel) -w (file name) --bssid (bssid) (interface)
Where (channel) is your network’s channel, and (bssid) is the BSSID you just copied to clipboard. You can use the Shift+Insert key combination to paste it into the command. Enter anything descriptive for (file name). I chose “yoyo,” which is the network’s name I$E2��m cracking.

You’ll get output like what’s in the window in the background pictured below. Leave that one be. Open a new Konsole window in the foreground, and enter this command:
aireplay-ng -1 0 -a (bssid) -h 00:11:22:33:44:55 -e (essid) (interface)
Here the ESSID is the access point’s SSID name, which in my case is yoyo. What you want to get after this command is the reassuring “Association successful” message with that smiley face.

You’re almost there. Now it’s time for:
aireplay-ng -3 -b (bssid) -h 00:11:22:33:44:55 (interface)
Here we’re creating router traffic to capture more throughput faster to speed up our crack. After a few minutes, that front window will start going crazy with read/write packets. (Also, I was unable to surf the web with the yoyo network on a separate computer while this was going on.) Here’s the part where you might have to grab yourself a cup of coffee or take a walk. Basically you want to wait until enough data has been collected to run your crack. Watch the number in the “#Data” column you want it to go above 10,000. (Pictured below it’s only at 854.)
Depending on the power of your network (mine is inexplicably low at -32 in that screenshot, even though the yoyo AP was in the same room as my adapter), this process could take some time. Wait until that #Data goes over 10k, though because the crack won’t work if it doesn’t. In fact, you may need more than 10k, though that seems to be a working threshold for many.

Once you’ve collected enough data, it’s the moment of truth. Launch a third Konsole window and run the following to crack that data you’ve collected:
aircrack-ng -b (bssid) (file name-01.cap)
Here the filename should be whatever you entered above for (file name). You can browse to your Home directory to see it; it’s the one with .cap as the extension.
If you didn’t get enough data, aircrack will fail and tell you to try again with more. If it succeeds, it will look like this:

The WEP key appears next to “KEY FOUND.” Drop the colons and enter it to log onto the network.
I hope this trick about cracking wifi network will be useful for you. But don't use it too often, this is an illegal activities that harm each others. Just contact us if you have some questions to ask :)
Access your data Anytime, Anywhere and from any device. That's something we want if we need our files in unexpected time. For example when we're traveling out of town or when we're on vacation. It can be done through Online Backup. Or usually called cloud storage. Cloud is something we can see anywhere and anytime. Just like the online backup works. There are a lot of online storage services that offer you many different features. Here are top cloud storage according to the famous WPDesigner. We may believe it or not.
The best 3 cloud providers this time is myPCBackup.com, Justcloud.com and zipcloud. The three of them are rated by their price,security, reliability, eaze-of-use, control panel and customer support. There is no doubt about how they work. It’ quite easy to use it. You just have to choose the files and folders you want to back up, and then they will work automatically for you. A lot of people have prove this. They lost their files and emails. But, because they use an online backup service, the data they are looking for has been restored in perfectly.
Yes, there are also online backup services that available for free of charge. But this is not the rwise choice. The money we spend is nothing compared to our need for ease data access.
READ MORE
The best 3 cloud providers this time is myPCBackup.com, Justcloud.com and zipcloud. The three of them are rated by their price,security, reliability, eaze-of-use, control panel and customer support. There is no doubt about how they work. It’ quite easy to use it. You just have to choose the files and folders you want to back up, and then they will work automatically for you. A lot of people have prove this. They lost their files and emails. But, because they use an online backup service, the data they are looking for has been restored in perfectly.
Yes, there are also online backup services that available for free of charge. But this is not the rwise choice. The money we spend is nothing compared to our need for ease data access.


