Tampilkan postingan dengan label Tips Komputer. Tampilkan semua postingan
Tampilkan postingan dengan label Tips Komputer. Tampilkan semua postingan
 You ever felt disappointed after downloading an e-book as the e-book you've downloaded have password attached and you can't modify it? We must be annoyed when we have to type the password first before we open the PDF file. Sometimes we must use the bad ways to remove the PDF password. And there are a few PDF Password Remover Tool that can help use to remove PDF password. First, we must know the password protection that attached, so we don't get me wrong.
There are two types of protections in PDF which is,
- User password – Password to open the PDF file
- Owner Password – Password to print, copy, modify the PDF file
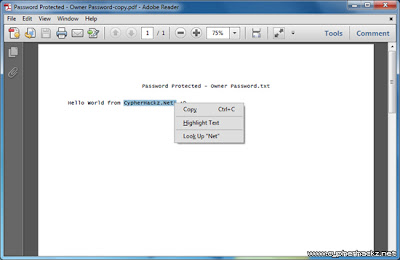
However if the PDF file is using Owner Password, this tool will decrypt and remove the password so you can print, copy, and make changes to the document.
PDF Password Remover Tool
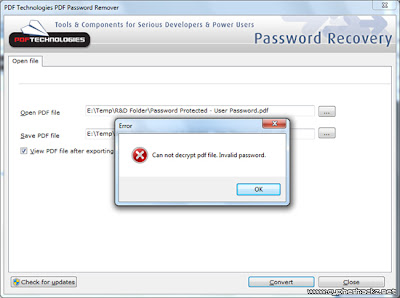
PDF Password Remover Tool is a freeware PDF password recovery that will decrypt the Owner Password and remove it from the PDF file. I’ve tested this software and it works perfectly.If you want to remove the User Password, this tool will popup an alert saying ‘Cannot decrypt pdf file. Incorrect password.’ as shown in the image below.
But if the e-book PDF file is using Owner Password, the password removal software will able to remove it, and save a new copy which allows you to print, copy and modify the document content.
PDF Password Remover Tool is free for personal use. Please use this software to remove passwords from PDF files of yours. It was developed to help you recover PDF files in cases where you forget the owner passwords you once set and can no longer remember. Don't use this removal tool to infringe the PDF ebook copyright or etc. Read our other similar article about how to convert word doc to PDF file. Hope this tutorial can solve your problem :)
longtime kartolocyber wasnot update the article, some of us so busy in our study. okey, i'll write about virtual machine in Windows. Sometimes, there is a particular program that we want to run but is plagued with compatibility Operating System (OS). For example there are applications that we know first run on WinXP but now after a try again in Win7 not be opened (crash). Or even it could also have a special application we need to work, but teryata application can only run on Windows while Linux-based computer.

Of course, we can use the system to plant two Dual Booting OS in one computer. But sometimes this method is less practical because more needs to be prepared such as set partitioning, manage files, etc.. In addition, if one day we already do not need a second OS, then the uninstall process was not easy. All too often ended up reformatting, and that means set the partitions and file again.
Actually, there is one practical solution to this, that is by using VirtualBox. With VirtualBox, you can as if making a new computer ( virtual machine ) and install it with the OS you want (Guest OS). More great again, you can run both at the same time, moving from guest to host and vice versa with ease. If it does not need anymore, you just delete it (remove) the virtual machine without a complex process.
Well, in this article I will explain about how to create a virtual machine using VirtualBox. Because many things to be explained, for convenience, so I split them up into several sections, namely: Download & installl Virtual Box, Virtual Machine http://www.blogger.com/img/blank.gifSetup & Guest OS, and the last is the setting. In this example, I will install WinXP in a virtual machine that will be created. As for his own VirtualBox I run across operating systems Win7. So, the Guest OS and Host OS = WinXP = Win7. Here are the steps:
DOWNLOAD & INSTALL VirtualBox
First download the installer once its in here . Select according to the type of OS you use.

1. After that run its installer file. Click Next> when VirtualBox Setup Wizard appears.
2. Then you can choose the installation location. Click Next> to continue.
3.Choose anywhere you want a shortcut is created, then click Next>
4. Usually will appear warning that the connection to the network is disconnected while on during the installation process. Just click Next>.
5. Click Install to begin the installation process.
6. If UAC appears, click Yes.
7. Up here you've managed to install VirtualBox. Click Finish to run the VirtualBox program
VIRTUAL MACHINE SETUP
Next you need to do is make her a virtual machine. Click New on VirtualBox Manager to get started. You will be greeted by the New Virtual Machine Wizard. Click Next to continue. Here you will choose what type of OS you want to install as guest OS. In this example we will install WinXP. Click Next when done select the type of OS. You can determine how much memory (RAM) for the virtual machine later. Move the slider to the desired number, then click Next.For the first time, make sure you men-centang/contreng Boot Hard Disk and also select Create new hard disk, If so, click Next. Next you will go to the Create New Virtual Disk Wizard. Click Next to continue. You can choose whether the size of virtual hard disk later this magnitude can change or always remain. For savings should you choose a dynamically expanding storage. Click Next if you have selected. Here you can choose the location where the virtual hard disk will be created, it also determines the maximum size hard disk (hard disk maximum size). VirtualBox by default suggested size is 10 G. But you also can set smaller as long as you believe that size is sufficient for your needs later. Click Next. This is a Summary of the Create New Virtual Disk Wizard. Click Finish. It appears that you already have a virtual machine called WinXP, although it is still empty. Now the next task is to fill this virtual machine with the Guest OS. Double-click on the entry to start WinXP.
You will be greeted by First Run Wizard. Just click Next.Here you will select the media you will use as a source installation. In this example I use WinXP CD (bootable of course), which I enter into Drive E (DVD ROM). If so, click Next. This is a Summary of the First Run Wizard. It's good here you have prepared her to drive installer that you selected earlier. Click Finish to begin the installation process. Display WinXP installation will start out. Press Enter to continue. Select Format the partition using the NTFS file system, then press Enter. Please wait until the WinXP installation process is complete.
Congratulations, you now have a WinXP Guest OS on your virtual machine! Before you start "playing around" with this new virtual machine it's good to do some changes to the settings used to make you more comfortable in using it later. Some settings require the virtual machine in a non-active, some can only be done in the Guest OS Safe Mode. Thus, to present first shutdown the Guest OS you.
SETTING UP PROCCESS
This time will discuss about some important settings of your order the more comfortable in using your virtual machine. Make sure your virtual machine is turned off (powered off), then double-click to turn on and be prepared to press F8 as we will go into Safe Mode.

Choose Safe Mode, then Enter twice.
After entering Safe Mode, click Yes to close the window notification.
In the VirtualBox menu, select Devices -> Install Guest Additions.
It would appear the Windows Explorer . Double-click VBoxWindowsAdditions.
You will be greeted by the VirtualBox Guest Additions Setup Wizard. Click Next> to continue.
Select the installation location and click Next>.
If you plan to run an application in the Guest OS that require Direct3D (games for example), then make sure the Direct3D Support selected. If you already click Install.
Guest Additions installation process was completed. Click OK.
Click Finish to restart and get into WinXP as normal.
Next we'll create a Shared Folders. Usefulness is as a place to exchange (transfer) files between Guest and Host. The trick is to select Devices -> Shared Folders.
Click the Add button on the right side of the window.
In the Folder Path, select Other.
Specify the folder where you want shared.
Then select Auto-mount that folder directly at-shared automatically at startup.
Rekapnya be seen here. You also can create more than one Shared Folders if you wish. Click OK to finish.
Shared Folders will only begin to be used if you have to restart. But for now the Guest OS shutdown before you because we will make changes in the last settings via VirtualBox Manager.
Click Settings on the menu VirtualBox Manager.
Select the System tab on the left. Well here you can make settings memory (RAM) and also the Boot Order. In order for fast booting, select Hard Disk as the Boot Order first priority.
Select the Display tab and you can change the amount of Video Memory (VGA Card) and also activate the Enable 3D Acceleration feature. Click OK if it is.
Next run the virtual machine again. After entering Windows, try running Explorer. It appears that the Shared Folders now can be accessed.
Applications that can not be opened in Win7 are now able to run.
an explanation of the technical steps to create a virtual machine and its installation with the Guest OS using VirtualBox. In this way, we seemed to have a "new computer" is ready to run. In the world of IT, many benefits to be gained by using this VirtualBox. A Java programmer who want to create a multi-platform applications, can use VirtualBox to test programs in various OS (Windows, Mac, Linux, FreeBSD, etc.).
Or someone who is studying to be a hacker, usually also will create a virtual machine to test the efficacy of scripts or artificial virus, without having to worry about major OS that is being used also infected. You can also experiment with VirtualBox it suits your needs.
READ MORE
Of course, we can use the system to plant two Dual Booting OS in one computer. But sometimes this method is less practical because more needs to be prepared such as set partitioning, manage files, etc.. In addition, if one day we already do not need a second OS, then the uninstall process was not easy. All too often ended up reformatting, and that means set the partitions and file again.
Actually, there is one practical solution to this, that is by using VirtualBox. With VirtualBox, you can as if making a new computer ( virtual machine ) and install it with the OS you want (Guest OS). More great again, you can run both at the same time, moving from guest to host and vice versa with ease. If it does not need anymore, you just delete it (remove) the virtual machine without a complex process.
Well, in this article I will explain about how to create a virtual machine using VirtualBox. Because many things to be explained, for convenience, so I split them up into several sections, namely: Download & installl Virtual Box, Virtual Machine http://www.blogger.com/img/blank.gifSetup & Guest OS, and the last is the setting. In this example, I will install WinXP in a virtual machine that will be created. As for his own VirtualBox I run across operating systems Win7. So, the Guest OS and Host OS = WinXP = Win7. Here are the steps:
DOWNLOAD & INSTALL VirtualBox
First download the installer once its in here . Select according to the type of OS you use.

1. After that run its installer file. Click Next> when VirtualBox Setup Wizard appears.
2. Then you can choose the installation location. Click Next> to continue.
3.Choose anywhere you want a shortcut is created, then click Next>
4. Usually will appear warning that the connection to the network is disconnected while on during the installation process. Just click Next>.
5. Click Install to begin the installation process.
6. If UAC appears, click Yes.
7. Up here you've managed to install VirtualBox. Click Finish to run the VirtualBox program
VIRTUAL MACHINE SETUP
Next you need to do is make her a virtual machine. Click New on VirtualBox Manager to get started. You will be greeted by the New Virtual Machine Wizard. Click Next to continue. Here you will choose what type of OS you want to install as guest OS. In this example we will install WinXP. Click Next when done select the type of OS. You can determine how much memory (RAM) for the virtual machine later. Move the slider to the desired number, then click Next.For the first time, make sure you men-centang/contreng Boot Hard Disk and also select Create new hard disk, If so, click Next. Next you will go to the Create New Virtual Disk Wizard. Click Next to continue. You can choose whether the size of virtual hard disk later this magnitude can change or always remain. For savings should you choose a dynamically expanding storage. Click Next if you have selected. Here you can choose the location where the virtual hard disk will be created, it also determines the maximum size hard disk (hard disk maximum size). VirtualBox by default suggested size is 10 G. But you also can set smaller as long as you believe that size is sufficient for your needs later. Click Next. This is a Summary of the Create New Virtual Disk Wizard. Click Finish. It appears that you already have a virtual machine called WinXP, although it is still empty. Now the next task is to fill this virtual machine with the Guest OS. Double-click on the entry to start WinXP.
You will be greeted by First Run Wizard. Just click Next.Here you will select the media you will use as a source installation. In this example I use WinXP CD (bootable of course), which I enter into Drive E (DVD ROM). If so, click Next. This is a Summary of the First Run Wizard. It's good here you have prepared her to drive installer that you selected earlier. Click Finish to begin the installation process. Display WinXP installation will start out. Press Enter to continue. Select Format the partition using the NTFS file system, then press Enter. Please wait until the WinXP installation process is complete.
Congratulations, you now have a WinXP Guest OS on your virtual machine! Before you start "playing around" with this new virtual machine it's good to do some changes to the settings used to make you more comfortable in using it later. Some settings require the virtual machine in a non-active, some can only be done in the Guest OS Safe Mode. Thus, to present first shutdown the Guest OS you.
SETTING UP PROCCESS
This time will discuss about some important settings of your order the more comfortable in using your virtual machine. Make sure your virtual machine is turned off (powered off), then double-click to turn on and be prepared to press F8 as we will go into Safe Mode.

Choose Safe Mode, then Enter twice.
After entering Safe Mode, click Yes to close the window notification.
In the VirtualBox menu, select Devices -> Install Guest Additions.
It would appear the Windows Explorer . Double-click VBoxWindowsAdditions.
You will be greeted by the VirtualBox Guest Additions Setup Wizard. Click Next> to continue.
Select the installation location and click Next>.
If you plan to run an application in the Guest OS that require Direct3D (games for example), then make sure the Direct3D Support selected. If you already click Install.
Guest Additions installation process was completed. Click OK.
Click Finish to restart and get into WinXP as normal.
Next we'll create a Shared Folders. Usefulness is as a place to exchange (transfer) files between Guest and Host. The trick is to select Devices -> Shared Folders.
Click the Add button on the right side of the window.
In the Folder Path, select Other.
Specify the folder where you want shared.
Then select Auto-mount that folder directly at-shared automatically at startup.
Rekapnya be seen here. You also can create more than one Shared Folders if you wish. Click OK to finish.
Shared Folders will only begin to be used if you have to restart. But for now the Guest OS shutdown before you because we will make changes in the last settings via VirtualBox Manager.
Click Settings on the menu VirtualBox Manager.
Select the System tab on the left. Well here you can make settings memory (RAM) and also the Boot Order. In order for fast booting, select Hard Disk as the Boot Order first priority.
Select the Display tab and you can change the amount of Video Memory (VGA Card) and also activate the Enable 3D Acceleration feature. Click OK if it is.
Next run the virtual machine again. After entering Windows, try running Explorer. It appears that the Shared Folders now can be accessed.
Applications that can not be opened in Win7 are now able to run.
an explanation of the technical steps to create a virtual machine and its installation with the Guest OS using VirtualBox. In this way, we seemed to have a "new computer" is ready to run. In the world of IT, many benefits to be gained by using this VirtualBox. A Java programmer who want to create a multi-platform applications, can use VirtualBox to test programs in various OS (Windows, Mac, Linux, FreeBSD, etc.).
Or someone who is studying to be a hacker, usually also will create a virtual machine to test the efficacy of scripts or artificial virus, without having to worry about major OS that is being used also infected. You can also experiment with VirtualBox it suits your needs.

W32.Ramnit is a worm that infects .exe, .dll and .html files to reproduce and infect other systems. After infection, W32.Ramnit will hijack your browser to redirect you to a malicious domain. W32.Ramnit may also make contact with an anonymous third party through Internet Explorer exploits, allowing the remote attacker to violate your privacy and exert control over your computer. Many anti-malware programs have been unable to detect W32.Ramnit in some instances; severe infections can necessitate a complete system wipe to remedy the situation. Be cautious about worms like W32.Ramnit when on large networks or using removable media, and strive to delete W32.Ramnit quickly before it becomes too difficult to remove.
first things W32.Ramnit does is infect any .exe, .dll, or .html files W32.Ramnit can find. If you open these infected files, congratulations - now you've got W32.Ramnit, too! W32.Ramnit may also create concealed Autorun.inf files that are placed on various drives, including removable ones. Any computer that then accesses these drives will also get the W32.Ramnit worm.
Different versions of W32.Ramnit have been identified as a threat since January of 2010, and the worm is far from exterminated yet. Fortunately, indicators of W32.Ramnit's presence are sufficiently plain that you ought to see W32.Ramnit before it's been on your system too long. Deleting W32.Ramnit with sufficient quickness can mean the difference between your computer surviving without damage and your computer needing a complete hard drive wipe.
W32.Ramnit may also be detected under the slight variant names of W32.Ramnit.A and W32.Ramnit.B.
Backup Reminder: Always be sure to back up your PC before making any changes.
To remove W32.Ramnit, you must first stop any W32.Ramnit processes that are running in your computer'ds memory. To stop all W32.Ramnit processes, press CTRL+ALT+DELETE to open the Windows Task Manager. Click on the "Processes" tab, search for W32.Ramnit, then right-click it and select "End Process" key.
To delete W32.Ramnit registry keys, open the Windows Registry Editor by clicking on the Windows "Start" button and selecting "Run." Type "regedit" into the box and click "OK." Once the Registry Editor is open, search for the registry key "HKEY_LOCAL_MACHINE\Software\W32.Ramnit." Right-click this registry key and select "Delete."
Finally, to completely get rid of W32.Ramnit, you must manually remove other W32.Ramnit files. These W32.Ramnit files can be in the form of EXE, DLL, LSP, TOOLBAR, BROWSER HIJACK, and/or BROWSER PLUGIN. For example, W32.Ramnit might create a file like
%PROGRAM_FILES%\W32.Ramnit\W32.Ramnit.exe. Locate and remove these files.

Motherboard won't work properly problem is most likely a software one and NOT a hardware problem. You should, of course, check that all the cooling fans are working (especially the ones on the processor and the video card) in case overheating is a problem. If you have two or more sticks of RAM which are from different manufacturers you could try using them one at a time in case a RAM mismatch is causing the problem. But other than that the only real way to see if it's a software or a hardware problem is to try running it with a fresh, clean installation of Windows.
Extra storage space is always worth having and they're quite inexpensive. Swap your current drive out, put the new one in, and load Windows onto it. If all runs fine you know for certain that the problem is in your original Windows installation. If not you've got a second hard drive to use once you track down the hardware problem and fix it!
if the machine won't start afterwards you've got clues to where the problem lies. Remove the recently added device or component and try again. If it still won't start have a good look inside to ensure you haven't dislodged or damaged some other component while you were working in there. Make sure everything is firmly in place.
When you make changes to the hardware of a PC you need to physically reset the CMOS memory, either by 'shorting' a jumper on the mainboard or by removing the CMOS battery and waiting several minutes at least before replacing it. A vast number of instances where machines won't start up are simply the result of changes made without resetting CMOS afterwards.
Modern ATX motherboards still have power running through them after Windows has been shut down! You must either switch off at the wall outlet or remove the power cord before opening it up to perform internal work. Damage to components can ensue if you make hardware changes when the motherboard is still receiving power.
Even without a hard drive fitted, your machine should run the Power On Self Test. If it doesn't, then it is either incorrectly assembled or it contains a faulty component. You should be getting the memory check, the device detection information, and perhaps an 'Operating System not found" message.
although PCs are quite easy to assemble, putting the whole thing together before trying it to see if it works is far from the ideal approach. If the entire PC is fully assembled, tracking down the reason for the failure can become a nightmare. The 'bare bones' approach is far better when assembling, and far better when troubleshooting. If your system is already fully assembled, go back several steps and try again.
The 'bare bones' PC contains only the following components:
- Motherboard
- Processor
- Processor heatsink/fan unit, connected to power
- A video card if there is no onboard video available
- One RAM module (unless the RAM is of a type which requires installing in pairs. 'Dual channel' RAM is NOT such a type!)
- The front panel connectors for Power Switch, Power LED and case speaker attached to the motherboard
- The ATX connector connected and supplying power to the motherboard. - The P4 power connector attached also if required. A molex connector attached to the display card if required.
That's it. Attach monitor and keyboard and see if it'll POST. Reset CMOS and try again if it doesn't. If you are building a new system stop at this point and try it out. If you're troubleshooting a fully assembled PC strip it back to this point and try!
If the PC won't POST in this configuration you need to determine why before proceeding:
*check power switch and LED connectors. If they are reversed the system won't start
* check that the processor is correctly fitted
* try a different RAM module
* ensure that the display card is correcxtly seated.
* get a technician to check it over if you can't locate the cause
Once the 'bare bones' system is operational, add other components one by one. Try starting the machine after every addition to check that it will still POST. This is the ONLY procedure by which you can adequately and effectively troubleshoot where a hardware problem lies.
'Other components' includes additional RAM modules, add in cards, drives, etc.
If your are troubleshooting a system which has already had Windows installed to a hard drive, add that drive last so that the system doesn't continually try to boot into Windows.
If you strike problems and need to post a new thread about your problem, include the following information:
* Identification details (make and model) of all components
* Full details of any onscreen error messages
* Full description of any BIOS 'beep' codes emitted through the internal speaker.
computers as exhibiting the same slow connectivity, chances are good it has something to do with the WiFi. For example, perhaps the router got moved to a location that's blocking some of the signal.
It could also be that the router is failing, or that more library patrons are sharing a fixed amount of bandwidth (like more cars on a highway leading to slow-moving traffic). Without having more information, it can be tricky to troubleshoot a problem like this.
However, there's one step worth trying for anyone vexed by sluggish WiFi: try a direct connection to the router. (Actually, that should be your second step; the first is to reset both the modem and router.)
In other words, disable your PC's WiFi, then connect it directly to the router using an Ethernet cable. Windows should automatically detect the new connection and get you online accordingly, though you may have to reboot.
Problem solved? If so, you know there's some kind of WiFi issue to blame. If not, the culprit is probably a bad router, bad router settings, or the Internet connection itself (check with your service provider). Space doesn't permit me to address all these possibilities here, but at least you'll have narrowed down the problem.
READ MORE
It could also be that the router is failing, or that more library patrons are sharing a fixed amount of bandwidth (like more cars on a highway leading to slow-moving traffic). Without having more information, it can be tricky to troubleshoot a problem like this.
However, there's one step worth trying for anyone vexed by sluggish WiFi: try a direct connection to the router. (Actually, that should be your second step; the first is to reset both the modem and router.)
In other words, disable your PC's WiFi, then connect it directly to the router using an Ethernet cable. Windows should automatically detect the new connection and get you online accordingly, though you may have to reboot.
Problem solved? If so, you know there's some kind of WiFi issue to blame. If not, the culprit is probably a bad router, bad router settings, or the Internet connection itself (check with your service provider). Space doesn't permit me to address all these possibilities here, but at least you'll have narrowed down the problem.
Wireless LANs whole point is is the convenience of the mobility you get being able to wander from one part of the office to the other. Users expect the same completely transparent service they get as their mobile phones move from one cell to another, but in the world of 802.11 it’s not actually that easy. There’s a lot of publicity about roaming in Wi-Fi just now, for instance a new IEEE group on testing Wi-Fi has found that it is impossible to compare roaming times without a definition of roaming. While many wireless switch vendors make a point of roaming at Layer 3 (a technology we’ll cover the technicalities of in a later article), several other vendors (such as Bluesocket and Vernier, reviewed here under its HP badge) solve the problem by keeping all access points on a single subnet, so the roaming only happens at Layer 2 and the roaming device keeps the same IP address. What most people miss is that even roaming within a subnet, at Layer 2, has its challenges. What’s involved?
When a WLAN client moves from the range of one Access Point (AP) to another in the same subnet, it needs to find the best AP, decide when to roam onto it, associate with it and do any authentication required, as per your security policies. Then the wired network has to relearn the location of the client, so that data can be sent to it. All of this takes time and this is without the client having to worry about getting a new IP address! The scanning and decision making part of the roaming process (see How to Make your WLAN roam faster) allows the client to find a new AP on an appropriate channel as the user moves. When this happens, the client must associate with the new AP. It must then, assuming that it is an 802.1x supplicant (see The EAP Heap), reauthenticate with the RADIUS server. This is transparent to the user - but the delay in this happening may not be. It can take up to a second for association and authentication to occur (see below for implications and solutions). IAPP
The next part of the process is for the rest of the network to be made aware that the client has shifted. This calls for AP to AP communication, which was never catered for in the original 802.11 spec. Vendors had their own way of passing updates; however 802.11f, the Inter-Access Point Protocol, has now been now published by the IEEE as a trial-use standard - it sits in this state for two years before being submitted as a full-use standard - to facilitate multi-vendor AP interoperability. IAPP calls for the new servicing AP to send out two packets onto the wired LAN. One of these is actually set with the source address of the client (the standard says this should be a broadcast, however some implementations still use unicast to the previous AP or a multicast) and is used by intervening switches to update their MAC address tables with the client’s new location. The other is an IAPP ADD-notify packet from the new AP to an IAPP multicast address that all APs subscribe to, which contains the MAC address of the station it has just associated. All APs will receive this packet, and the one that had been associated with that station will use the sequence number included to determine that this is newer information and remove the stale association from its internal table. IAPP provides for the sharing of information between APs. The format of this information is specified, as "contexts" but the actual content is not defined, so it’s not yet hugely useful as far as vendor interoperability is concerned. Also IAPP has no specific provision for security. Who Cares?
So, worst case, you’re probably looking at about one second where your client can’t be reached over the network. For a lot of clients and applications, this isn’t an issue. If you’re walking from one room to another carrying your laptop, and you want to use email or a web browser, it’s not a problem. In fact, most TCP-based applications will be able to handle this sort of hiccup (remember that in this instance there’s no address change). UDP applications are less able to handle interruptions, and unfortunately, these are the ones where a break would be most noticed by the user. The killer? Voice. Not only is VoWLAN UDP-based for the bearer traffic, but it’s also the one application where you are likely to be using it as you move between APs. And you are definitely going to notice a one second hit. Which is presumably why the vendors that are pushing fast roaming for 802.11 are the ones squarely behind the use of wireless handsets in an IP Telephony environment, such as Cisco, SpectraLink and Symbol. Related standards
In fact these are three of the companies behind the drive for a new IEEE Working Group to create a standard to handle faster Layer 2 roaming. There are several related standards and works-in-progress, but none that actually cover this specific aspect:
* As already discussed, IAPP—802.11f—isn’t designed for speed.
* 802.11i, the security standard (not yet ratified) has provision for secure fast handoff, but it’s too security specific for this requirement.
* 802.11k—Radio Resource Management—might help in that it should cater for faster discovery of APs. Again, not yet finalised.
* 802.21 isn’t specifically for wireless LANs at all. It’s aimed at the handoff between heterogeneous networks (wired, 802.11, Bluetooth) and while it will deal with inter-ESS roaming (ie subnet to subnet in a WLAN), it won’t speed up the Layer 2 process which is needed prior to any Layer 3 interaction. This was the P802 Handoff Study Group, and is just in the process of kicking off now.
Fast roaming now
In the meantime of course, there are proprietary solutions. The two parts that need to be speeded up to cut down outage times are the scanning process (to allow clients to find new suitable APs to associate to), and, specifically for security, a faster way of reauthenicating to cut out the RADIUS request/response process. There are things that can be done to speed up the time it takes for a client to find another suitable AP. An AP can maintain information on its adjacent APs, which it can pass to a client on request—this will give the client a better indication of usable channels to scan, for example. The biggest time saver, however, is reckoned to be in localising the 802.1x authentication process. Cisco has incorporated Fast Secure Roaming into its Wireless Domain Services (WDS) portfolio as part of its Structured Wireless Aware Networking offering, which in effect allows an AP on each local subnet to act as the authenticator for clients. When a client (or other AP) goes through the initial RADIUS authentication, it does it via one AP running WDS. This lets that AP establish shared keys between itself and every other entity in the L2 domain, and allows for quicker reauthentication. Plans are for this capability to be included in Cisco’s router/switch platforms later this year as part of its SWAN development. Symbol provides similar functionality in its hardware, while Airespace) also caters for fast roaming in its wireless switches and appliances, and companies such as Bluesocket, which use gateways to control pretty dumb APs, manage everything centrally. Proxim handles things differently, pre-authenticating clients to nearby APs as well as the one currently in use in preparation for the client moving. So before you get excited about Layer 3 roaming, make sure you understand how your vendor of choice implements it at Layer 2. If that bit’s not fast enough to stop you losing traffic, you’ll never be able to move across subnets. It’s likely to be years before there’s a usable standard in place and in the meantime while you can probably get APs from different vendors to work together, there’s no guarantee of interoperability if you want to turn on their various fast roaming options.
READ MORE
When a WLAN client moves from the range of one Access Point (AP) to another in the same subnet, it needs to find the best AP, decide when to roam onto it, associate with it and do any authentication required, as per your security policies. Then the wired network has to relearn the location of the client, so that data can be sent to it. All of this takes time and this is without the client having to worry about getting a new IP address! The scanning and decision making part of the roaming process (see How to Make your WLAN roam faster) allows the client to find a new AP on an appropriate channel as the user moves. When this happens, the client must associate with the new AP. It must then, assuming that it is an 802.1x supplicant (see The EAP Heap), reauthenticate with the RADIUS server. This is transparent to the user - but the delay in this happening may not be. It can take up to a second for association and authentication to occur (see below for implications and solutions). IAPP
The next part of the process is for the rest of the network to be made aware that the client has shifted. This calls for AP to AP communication, which was never catered for in the original 802.11 spec. Vendors had their own way of passing updates; however 802.11f, the Inter-Access Point Protocol, has now been now published by the IEEE as a trial-use standard - it sits in this state for two years before being submitted as a full-use standard - to facilitate multi-vendor AP interoperability. IAPP calls for the new servicing AP to send out two packets onto the wired LAN. One of these is actually set with the source address of the client (the standard says this should be a broadcast, however some implementations still use unicast to the previous AP or a multicast) and is used by intervening switches to update their MAC address tables with the client’s new location. The other is an IAPP ADD-notify packet from the new AP to an IAPP multicast address that all APs subscribe to, which contains the MAC address of the station it has just associated. All APs will receive this packet, and the one that had been associated with that station will use the sequence number included to determine that this is newer information and remove the stale association from its internal table. IAPP provides for the sharing of information between APs. The format of this information is specified, as "contexts" but the actual content is not defined, so it’s not yet hugely useful as far as vendor interoperability is concerned. Also IAPP has no specific provision for security. Who Cares?
So, worst case, you’re probably looking at about one second where your client can’t be reached over the network. For a lot of clients and applications, this isn’t an issue. If you’re walking from one room to another carrying your laptop, and you want to use email or a web browser, it’s not a problem. In fact, most TCP-based applications will be able to handle this sort of hiccup (remember that in this instance there’s no address change). UDP applications are less able to handle interruptions, and unfortunately, these are the ones where a break would be most noticed by the user. The killer? Voice. Not only is VoWLAN UDP-based for the bearer traffic, but it’s also the one application where you are likely to be using it as you move between APs. And you are definitely going to notice a one second hit. Which is presumably why the vendors that are pushing fast roaming for 802.11 are the ones squarely behind the use of wireless handsets in an IP Telephony environment, such as Cisco, SpectraLink and Symbol. Related standards
In fact these are three of the companies behind the drive for a new IEEE Working Group to create a standard to handle faster Layer 2 roaming. There are several related standards and works-in-progress, but none that actually cover this specific aspect:
* As already discussed, IAPP—802.11f—isn’t designed for speed.
* 802.11i, the security standard (not yet ratified) has provision for secure fast handoff, but it’s too security specific for this requirement.
* 802.11k—Radio Resource Management—might help in that it should cater for faster discovery of APs. Again, not yet finalised.
* 802.21 isn’t specifically for wireless LANs at all. It’s aimed at the handoff between heterogeneous networks (wired, 802.11, Bluetooth) and while it will deal with inter-ESS roaming (ie subnet to subnet in a WLAN), it won’t speed up the Layer 2 process which is needed prior to any Layer 3 interaction. This was the P802 Handoff Study Group, and is just in the process of kicking off now.
Fast roaming now
In the meantime of course, there are proprietary solutions. The two parts that need to be speeded up to cut down outage times are the scanning process (to allow clients to find new suitable APs to associate to), and, specifically for security, a faster way of reauthenicating to cut out the RADIUS request/response process. There are things that can be done to speed up the time it takes for a client to find another suitable AP. An AP can maintain information on its adjacent APs, which it can pass to a client on request—this will give the client a better indication of usable channels to scan, for example. The biggest time saver, however, is reckoned to be in localising the 802.1x authentication process. Cisco has incorporated Fast Secure Roaming into its Wireless Domain Services (WDS) portfolio as part of its Structured Wireless Aware Networking offering, which in effect allows an AP on each local subnet to act as the authenticator for clients. When a client (or other AP) goes through the initial RADIUS authentication, it does it via one AP running WDS. This lets that AP establish shared keys between itself and every other entity in the L2 domain, and allows for quicker reauthentication. Plans are for this capability to be included in Cisco’s router/switch platforms later this year as part of its SWAN development. Symbol provides similar functionality in its hardware, while Airespace) also caters for fast roaming in its wireless switches and appliances, and companies such as Bluesocket, which use gateways to control pretty dumb APs, manage everything centrally. Proxim handles things differently, pre-authenticating clients to nearby APs as well as the one currently in use in preparation for the client moving. So before you get excited about Layer 3 roaming, make sure you understand how your vendor of choice implements it at Layer 2. If that bit’s not fast enough to stop you losing traffic, you’ll never be able to move across subnets. It’s likely to be years before there’s a usable standard in place and in the meantime while you can probably get APs from different vendors to work together, there’s no guarantee of interoperability if you want to turn on their various fast roaming options.
Microsoft has released a number of non-security updates, the majority of which are for the latest versions of its client and server operating systems. All the patches are available on Windows Update and the Microsoft Download Center and most will require a restart. With the exception of the last patch, they're all for Windows 7 or Windows Server 2008 R2.
Most of these updates will be rolled into Service Pack 1 for Windows 7 and Windows Server 2008 R2. Testers got the first Windows 7 SP1 beta build two months ago, but just today Microsoft sent out build 7601.17077 to selected PC and Technology Adoption Program partners, according to ZDNet.
The first patch (KB2028560) is vaguely described as one that delivers "new functionality and performance improvements for the graphics platform."
The second patch (KB2249857) describes an issue that occurs on 2TB+ hard disk drives. If the OS is configured to save dump files to a volume of such an HDD, some of the dump file is offset at a disk offset greater than the 2TB address, and Windows is either put into hibernation or crashes, volumes on the HDD may be corrupted, and data is lost. If the corrupted volumes include the system partition, the computer will no longer boot.
The third patch (KB982110) fixes a problem when running 32-bit applications on a 64-bit edition of Windows 7 or Windows Server 2008 R2. If the application uses the QueryPathOfRegTypeLib function to retrieve the path of a registered type library, it may return the path of the 64-bit version of the type library instead of the 32-bit one.
The fourth patch (KB2272691) is for a game, application, or firmware that is either installed incorrectly, causes system instability, or has primary functions that do not work correctly. The update will either prevent incompatible software from running (hard block with third-party manufacturer consent), notify the user that incompatible software is starting to run (soft block), or improve the software's functionality (update). It lists just a single application (Sensible Vision FastAccess) as being affected.
The fifth patch (KB2203330) solves a problem when installing a third-party application for the multiple transport Media Transfer Protocol (MTP) device or for the Windows Portable Device (WPD). Connecting an MTP or WPD device may result in an APC_INDEX_MISMATCH stop error message because of a race condition in the Compositebus.sys driver.
The last patch (KB979453) is for Windows Home Server and addresses five separate issues that were found since the release of WHS Power Pack 3.
READ MORE
Most of these updates will be rolled into Service Pack 1 for Windows 7 and Windows Server 2008 R2. Testers got the first Windows 7 SP1 beta build two months ago, but just today Microsoft sent out build 7601.17077 to selected PC and Technology Adoption Program partners, according to ZDNet.
The first patch (KB2028560) is vaguely described as one that delivers "new functionality and performance improvements for the graphics platform."
The second patch (KB2249857) describes an issue that occurs on 2TB+ hard disk drives. If the OS is configured to save dump files to a volume of such an HDD, some of the dump file is offset at a disk offset greater than the 2TB address, and Windows is either put into hibernation or crashes, volumes on the HDD may be corrupted, and data is lost. If the corrupted volumes include the system partition, the computer will no longer boot.
The third patch (KB982110) fixes a problem when running 32-bit applications on a 64-bit edition of Windows 7 or Windows Server 2008 R2. If the application uses the QueryPathOfRegTypeLib function to retrieve the path of a registered type library, it may return the path of the 64-bit version of the type library instead of the 32-bit one.
The fourth patch (KB2272691) is for a game, application, or firmware that is either installed incorrectly, causes system instability, or has primary functions that do not work correctly. The update will either prevent incompatible software from running (hard block with third-party manufacturer consent), notify the user that incompatible software is starting to run (soft block), or improve the software's functionality (update). It lists just a single application (Sensible Vision FastAccess) as being affected.
The fifth patch (KB2203330) solves a problem when installing a third-party application for the multiple transport Media Transfer Protocol (MTP) device or for the Windows Portable Device (WPD). Connecting an MTP or WPD device may result in an APC_INDEX_MISMATCH stop error message because of a race condition in the Compositebus.sys driver.
The last patch (KB979453) is for Windows Home Server and addresses five separate issues that were found since the release of WHS Power Pack 3.
System restore sebenarnya tidak hanya dilakukan melalui jendela windows. Cara lain yang sebenarnya juga sangat mudah dan cepat adalah system restore melalui safe mode Command Prompt. Itulah yang akan saya bahas kali ini. Artikel ini berlaku untuk versi Windows XP dan saya belum mencoba pada versi windows terbaru seperti Windows Vista dan Windows 7. Jika Anda punya pengalaman, silakan sharing disini. Isi dalam artikel ini mungkin tidak relevan bagi sistem operasi Anda jika menggunakan versi lain dari windows.
dini saya akan menjelaskan cara untuk memulai System Restore dalam safe mode dengan menggunakan Command prompt (SAFEBOOT_OPTION = Minimal (AlternateShell)). Pilihan ini digunakan ketika Anda tidak bisa menjalankan sistem restore melalui jendela Windows XP.
System Restore merupakan sebuah tool yang secara otomatis memantau dan mencatat setiap perubahan yang dibuat pada file sistem Windows dan registri. Jika perubahan menyebabkan sistem anda menjadi tidak stabil, System Restore dapat membatalkan (atau “roll back”) sistem kesebuah titik waktu ketika komputer Anda masih dapat berfungsi dengan benar.
Bagaimana memulai System Restore menggunakan Command prompt, syarat pertama adalah Anda harus masuk ke Windows dengan account administrator, bukan sebagai user limited. Untuk memverifikasi bahwa Anda logon ke Windows dengan account pengguna sebagai administrator komputer, kunjungi Website Microsoft berikut ini:
http://support.microsoft.com/gp/admin (http://support.microsoft.com/gp/admin)
Jika sebuah program baru telah membuat komputer Anda crash, dan menguninstall program baru ini tidak dapat membantu, Anda dapat mencoba Windows XP System Restore melalui command prompt.
Syarat kedua adalah sistem restore hanya dapat dilakukan jika sebelumnya Anda mengaktifkan System Restore pada windows, jika tidak maka Anda tidak dapat mengembalikan komputer Anda ke keadaan sebelumnya.
Untuk memulai System Restore menggunakan Command prompt, ikuti langkah berikut:
1. Restart komputer Anda, kemudian tekan terus F8 pada saat startup awal untuk memulai komputer Anda dalam safe mode dengan Command prompt.
2. Gunakan tombol panah untuk memilih Safe Mode dengan opsi Command prompt.
3. Jika Anda diminta untuk memilih sistem operasi, gunakan tombol panah untuk memilih sistem operasi yang sesuai untuk komputer Anda, kemudian tekan ENTER.
4. Logon sebagai administrator atau dengan account yang memiliki level administrator.
5. Jika Anda sudah masuk pada jendela command prompt silakan ketik: %systemroot%/system32/restore/rstrui.exe, dan kemudian tekan ENTER.
6. Ikuti petunjuk yang muncul di layar untuk mengembalikan komputer Anda ke keadaan semula sebagaimana layaknya sebelum mengalami kerusakan.
READ MORE
dini saya akan menjelaskan cara untuk memulai System Restore dalam safe mode dengan menggunakan Command prompt (SAFEBOOT_OPTION = Minimal (AlternateShell)). Pilihan ini digunakan ketika Anda tidak bisa menjalankan sistem restore melalui jendela Windows XP.
System Restore merupakan sebuah tool yang secara otomatis memantau dan mencatat setiap perubahan yang dibuat pada file sistem Windows dan registri. Jika perubahan menyebabkan sistem anda menjadi tidak stabil, System Restore dapat membatalkan (atau “roll back”) sistem kesebuah titik waktu ketika komputer Anda masih dapat berfungsi dengan benar.
Bagaimana memulai System Restore menggunakan Command prompt, syarat pertama adalah Anda harus masuk ke Windows dengan account administrator, bukan sebagai user limited. Untuk memverifikasi bahwa Anda logon ke Windows dengan account pengguna sebagai administrator komputer, kunjungi Website Microsoft berikut ini:
http://support.microsoft.com/gp/admin (http://support.microsoft.com/gp/admin)
Jika sebuah program baru telah membuat komputer Anda crash, dan menguninstall program baru ini tidak dapat membantu, Anda dapat mencoba Windows XP System Restore melalui command prompt.
Syarat kedua adalah sistem restore hanya dapat dilakukan jika sebelumnya Anda mengaktifkan System Restore pada windows, jika tidak maka Anda tidak dapat mengembalikan komputer Anda ke keadaan sebelumnya.
Untuk memulai System Restore menggunakan Command prompt, ikuti langkah berikut:
1. Restart komputer Anda, kemudian tekan terus F8 pada saat startup awal untuk memulai komputer Anda dalam safe mode dengan Command prompt.
2. Gunakan tombol panah untuk memilih Safe Mode dengan opsi Command prompt.
3. Jika Anda diminta untuk memilih sistem operasi, gunakan tombol panah untuk memilih sistem operasi yang sesuai untuk komputer Anda, kemudian tekan ENTER.
4. Logon sebagai administrator atau dengan account yang memiliki level administrator.
5. Jika Anda sudah masuk pada jendela command prompt silakan ketik: %systemroot%/system32/restore/rstrui.exe, dan kemudian tekan ENTER.
6. Ikuti petunjuk yang muncul di layar untuk mengembalikan komputer Anda ke keadaan semula sebagaimana layaknya sebelum mengalami kerusakan.
 Dell N4010 come to the market with OS microsoft Windows 7 Home Basic, but some of people feel anoying with it, windows 7 so strange than Windows XP, more familiar and simple.
i will show any one who want to downgrade their Inspiron 14R / N4010, below is the set of drivers that I collected and tested working well, and follow step by step this guide.
first think needed for this guide work is Windows XP SP 3 64 bit installation,then you must download compatible drivers need for windows XP.
Inspiron_14R_N4010_XP_Drivers_Full_Set.part1.rar
Inspiron_14R_N4010_XP_Drivers_Full_Set.part2.rar
Inspiron_14R_N4010_XP_Drivers_Full_Set.part3.rar
Inspiron_14R_N4010_XP_Drivers_Full_Set.part4.rar
Inspiron_14R_N4010_XP_Drivers_Full_Set.part5.rar
Inspiron_14R_N4010_XP_Drivers_Full_Set.part6.rar
after downloaded, extract it all in one.
Driver Group below can be installed manually after OS install:
Atheros AR813-AR815x-v1.0.0.41_WHQL LAN Adapter
SX2210-Monitor_Webcam SW RC1.1 WebCam Driver & Applications
R255591 Synaptics TouchPad
Realtek RTS5138 Card Reader 6.1.7600
DW1501 5.60.48.35 WiFi Adapter
Realtek ALC269Q-GR WDM_HD Audio R249 5.10.0.6132
ATI Display Apps & Utilities
ATI Catalyst 10.6 Drivers Modified for Mobility HD 5470
ATI HDMI DP Audio Driver 10.6_XP32-64
BT365 Bluetooth Driver & Application
and Splitstearm this data into Windows XP Installation CD:
Intel HM57 AHCI
Intel HM57 Chipset
Intel HM57 Management Engine Interface
Intel HM57 Turbo Boost Technology
Download driver sata from ftp://ftp.ins.dell.com/sata/R254174.exe , run, and extract it to C:\dell\drivers\R254174\, keep it.
download Nlite software for make a bootable CD Windows XP SP 3 64 bit.
Install Nlite, do step by step, and put Folder "C:\dell\drivers\R254174\f6flpy-x86" to cd win xp. file "iaAHCI.inf"
do Nlite till proccess finish, and Dell N4010 Downgrade XP SP 3 64 bit ready t burn to Blank CD - ROM.
after OS had installed, don't forget to install drivers needed.
for install VGA driver, First extract the ATI Catalyst 10.6 Drivers then enter Device Manager and use the "Have Disk" method to update the display driver. Have disk method is a way to install a driver that does not have any setup program to install itself automatically. In principle what you are doing is showing Windows where drivers are located. Driver installation scripts are written in *.inf files so a driver must have these files, and this file is located inside:
Drivers\Display\XP_INF\
of the extracted directory.
To access the driver update follow the steps below:
1)Click Start, right-click My Computer, and then click Properties.
2)The System Properties window will open. Click the Hardware tab, and then click Device Manager.
3)The Device Manager window will open. Double-click Display adapters.
4)Right-click on whatever display adapter it shown and click "Update Driver"
5)Select the following option when the Hardware Update Wizard asks to connect to Windows Update: No, not this time. Click Next.
6)Select the following option: Install from a list or specific location (Advanced), and then click Next.
7)Select the Don’t search, I will choose the driver to install option, and then Next
7.1) UNCheck "Show compatible hardware"
8)Click on the Have Disk... button, and then click the Browse button.
9)Browse to the directory where you extracted the driver above i.e. the Drivers\Display\XP_INF subdirectory.
10)Locate and highlight the the CX100944.inf file then Click the Open button
11)Click the OK button. A window listing all of the available display types should open. Select the "ATI Mobility Radeon HD 5470", and then click the Next button.
12)The operating system will install the driver. Click the Finish button when done.
enjoy your new XP SP 3 64 bit on your Dell N4010.

windows memliki tiga fitur unique stand by, hibernate, dan turn off pada yang terdapat pada menu shut down, tapi apakah anda tahu apa perbedaan diantara ketiganya? berikut prinsip dasarnya yang akan saya jelaskan.
1. Shutdown
Kalau yang ini sudah jelas, yaitu mematikan komputer secara keseluruhan. Saat kita memilih shutdown, semua komponen komputer (RAM, hardisk, prosesor, dll) akan dinonaktifkan, yaitu diputus aliran listriknya. Pada saat ini memori komputer (RAM) dikosongkan, sehingga jika hendak menghidupkan komputer kembali, butuh waktu cukup lama untuk me-load sistem operasi (misal Windows) kembali ke RAM. Ini terkait dengan pentingnya memori bagi komputer dan cara kerja sistem operasi.
2. Hibernate
Pada hibernate, komponen komputer juga dimatikan secara keseluruhan, sama seperti shutdown. Bedanya, sebelum dimatikan (sebelum mengosongkan RAM), isi dari memori atau RAM tersebut disalin ke harddisk terlebih dahulu, sehingga saat hendak dihidupkan kembali, tidak membutuhkan waktu terlalu lama karena isi RAM sudah ada di harddisk (tinggal dikembalikan seperti sediakala).
Hibernate dapat menyimpan konfigurasi komputer sebelum dimatikan. Jadi jika misalkan Anda membuka banyak aplikasi kemudian meng-hibernate komputer, saat komputer dihidupkan kembali aplikasi-aplikasi itu masih terbuka seperti kondisi semula (tidak perlu takut kehilangan data). Ini berbeda dengan shutdown yang akan menghapus data Anda jika belum sempat disimpan. Cocok jika Anda hendak meninggalkan komputer dalam waktu yang agak lama.
Namun tidak semua sistem operasi menyediakan fitur hibernate ini. Tidak semua komputer juga dapat di-hibernate oleh sistem operasi.
3. Stand by
Pada kondisi stand by (kalau di Linux disebut suspend), komputer tidak dimatikan secara keseluruhan. Semua komponen komputer mati kecuali memori (RAM). Jadi, semua komponen diputus aliran listriknya kecuali RAM (dan prosesor mungkin). Karena itu, modus stand by masih menggunakan listrik untuk memberi daya pada RAM, berbeda dengan shutdown atau hibernate yang benar-benar mematikan komputer. Untuk menghidupkan komputer kembali dari modus stand by jauh lebih cepat dibandingkan hibernate (bisa dibilang instan), karena isi RAM masih dipertahankan.
Sama seperti hibernate, stand by juga menyimpan konfigurasi komputer sebelum di-stand by. Stand by dapat diibaratkan seperti “pause” saat bermain game. Cocok jika Anda hendak meninggalkan komputer dalam waktu singkat.
Kesimpulan
Apapun pilihan anda untuk menon-aktifkan komputer anda, stand by, hibernate, dan shutdown bisa disesuaikan dengan kebutuhan anda.
 Windows Genuine Advantage(WGA) adalah fitur validasi keaslian windows yang akan memunculkan peringatan jika windows kita tidak asli. Fitur ini akan muncul jika kita rajin online, makanya yang paling sering kena WGA ini adalah laptop yang sering digunakan untuk online. Jika tidak pernah online, maka tentu microsoft tidak akan dapat mengetahui apakah windows anda asli atau tidak.
Windows yang terdeteksi WGA ini dapat menyebabkan antara lain background desktop menjadi hitam, wallpaper tidak muncul dan selalu terdapat peringatan Windows Genuine Advantage. Memang apabila anda menginstall ulang, peringatan WGA bisa saja hilang. Tapi tentu sangat merepotkan karena semua program harus anda install kembali. Namun hanya dengan menginstall ulang windows bukan berarti WGA notification itu tidak muncul lagi.
Ada cara mudah untuk menghilangkan Windows Genuine Advantage, anda cukup me-rename extension dari wgalogon dan wgatray. Selain itu, sebenarnya untuk membuat genuine windows XP sangat mudah, namun berhubung kini XP sudah tidak laku lagi, berikut langkah-langkahnya untuk Windows 7.
- Buka folder system32 yang terdapat di C:\Windows\System32
- Cari file wgalogon.dll & ganti namanya menjadi wgalogon.dll.bak
- Klik kanan pada bagian kosong (folder System32) & pilih New » Text Document dan simpan dengan nama wgalogon.dll
- Cari file wgatray.exe & ganti namanya menjadi wgatray.txt
- Klik kanan pada bagian kosong & pilih New » Text Document dan simpan dengan nama wgatray.exe
- Ganti LegitCheckControl.dll menjadi LegitCheckControl.dll.bak & buat Text Document dengan nama legitcheckcontrol.dll dan simpan di folder System32
- Restart komputer anda!
- Jangan lupa menonaktifkan automatic updatenya dengan klik kanan MyComputer » Klik tab Automatic Update » Pilih Turn Off
1. Manual Method
- Matikan automatic update nya > klik kanan My Computer > properties > klik tab automatic update > klik turn off > OK
- Masuk ke regedit > HKEY_LOCAL_MACHINE\SOFTWARE\Microsoft\Windows NT\CurrentVersion\Winlogon\Notify.
- hapus folder ‘WgaLogon’ dan semua isi nya
- Restart komputer, kemudian masuk pada safe mode dengan menekan tombol F8 saat booting.
- Cari dan hapus file-file dibawah ini
C:\WINDOWS\system32\WgaLogon.dll
C: \WINDOWS\system32\WgaTray.exe
C:\WINDOWS\system32\LegitCheckControl.dll
- selesai. restart windows anda.
2. Cara Otomatis(Menggunakan Software)
Khusus untuk win 7 tidak perlu repot, cukup download software windows 7 loader activator remOVEWAT. Kemudian instal dan jalankan, setelah running dia akan minta restart. jangan lupa non-active kan update windowsnya agar tidak ada lagi Windows Genuine Advantage Notification.
 Your Flashdisk didn't responding? i think it's really annoying. Someone ask me about his Toshiba Flashdisk which won't work properly, it just show report disk drive and not responding in any PC. I don't say that Toshiba flash drive is bad, but many people meets that problem. Here i'll explain how to fix it, Try to follow the instructions on this page, it might the Flashdisk is infected by any malicious file.
Follow this guide :
- Go to Toshiba Downloads, navigate to your model and look for updated flash card oand the Toshiba Value Added Package. Good time to update other drivers while there.
- Download the one you need - SAVE - go to where you put them - RIGHT CLICK - RUN AS ADMIN - REBOOT
- after each installation - you should check in Device Manager to make sure the drivers were updated as some (such as sound)
- You might need to be run more than once as they Roll Back until finally the current driver is installed. Other things you can try include removing possible corruption from system.
- Start - type this in Search Box -> COMMAND find at top and RIGHT CLICK - RUN AS ADMIN
- Enter this at the prompt - sfc /scannow
- How to analyze the log file entries that the Microsoft Windows Resource Checker (SFC.exe) program
- generates in Windows Vista cbs.log
- Try running checkdisk - schedule it to run at next start and then Apply OK your way out then restart.
- How to Run Check Disk at Startup in Vista
Hope this help your Toshiba Flashdisk Not Responding.
 Windows 7 wireless, setting up, defining features of this network will be the lack of network passwords for local connections(both wirelessly or wired) and no single “boss” computer. Devices on the network will act as peers – no computer will rely on another computer to be present on the network – in order to reach the Internet, but it won’t be an ad-hoc network. File and folder sharing, of course, will depend on other computers being present, but we’ll look at specifying what folders we’ll share with others and these we will share and share alike.
Router Configurations
The most boss-like object in the network is the wireless router. For our purposes, we’ll presuppose that each computer can connect to the router. In our test network, the Vista desktop computer has the wired connection to the router and was used to set the router up. It’s very important that the router is not left at defaults and is set up properly because the security of the simplified network is based on the router and on having both a strong network password and an encrypted connection. By strong password, we mean a mix of letters and numbers that can’t be guessed or easily “cracked” by brute force. Your router setup program may suggest a pseudo-random password based on the encryption you selected. This is very safe to use. By encryption, we mean Wi-Fi Protected Access, or WPA-PSK. The “PSK” part stands for “pre-shared key,” which is that secure password.
Since setup varies and you’ll need to use the documentation for your router to perform it, we’ll only briefly touch further on this. You want to set it to broadcast your network name or service set identifier (SSID). You’ll want to make sure that each computer on the network can reach the Internet. A somewhat common problem you may encounter is that a PC can connect wirelessly to the router and seems to be passing some data when you view “Status” for the device, but the web browser can’t reach any web pages.
This can mean that the computer was set up by default for wireless networking(with Microsoft networks, of course), but not for Internet access. It is, however, easy to fix.
 Tak ada gading yang tak retak, mungkin perumpamaan itu pantas untuk Winrar. Walaupun dikenal sebagai software archiver terbaik, ternyata Winrar juga punya kelemahan. Sebagai contoh, kita punya kebiasaan menyimpan data pribadi dengan bentuk Rar dan kita beri password. Dan kita beri nama misalnya : Secret.rar. Kadang2 kalo kita menemukan file yg menarik di internet, kita save ke database Winrar kita dgn cara men-drag file yg sudah didownload tersebut ke icon Secret.rar. Karena file Secret.rar itu sudah cukup besar (ratusan mega byte), perlu waktu sekitar 10-15 menit utk proses memasukkan file baru (yg gw donlot dr internet tsb).
Merujuk pada pengalaman teman saya, ini adalah salah satu kelemahan winrar. Saat suatu hari kita akan membuka file Secret.rar tsb utk mengambil file kita, ternyata saat kita ketik passwordnya maka akan muncul perintah salah. Berkali- kali dicoba hasilnya nihil, dan akhirnya data itu terbuang sia-sia. Apakah itu karena file kita dalam winrar yang rusak? apakah software winrar kita?
Akhirnya setelah penasaran, kita coba membuat file winrar yg cukup besar (puluhan mega) dan saya beri password seperti sebelumnya. Lalu kita drag satu file ke dalam file Winrar tersebut. Nah, saat proses adding berjalan, saya coba break, dan saya tekan tombol reset di CPU (ini sbg simulasi bhw komputer hang/restart sendiri/mati listrik/listrik turun naik). Dan apa yang terjadi? File itu tetap minta password, tapi password yg saya masukkan dinyatakan salah!
Parahnya, bukan cuma file baru tersebut yang hilang, semua file dalam file Rar tersebut juga menjadi corrupt. Akhirnya, ketemu juga kelemahan winrar. Jadi, bagi yg akan melakukan hal yang sama dengan saya, saya ada formula dan trik untuk mengakalinya:
1. Waktu adding file usahakan komputer jangan hang, tidak mati listrik dan tidak restart secara mendadak. Kalo tidak, bisa dipastikan akan mengalami hal yang sama dengan saya.
2. Usahakan file winrar kita, dipecah dalam ukuran yg agak kecil agar proses adding filenya lebih cepat, jadi resiko break/putus ditengah jalan bisa diminimalkan.
Nah, itulah sedikit tips bagaimana cara menghindari file corrupt pada Winrar. Saya belum mencoba untuk ekstensi lain seperti 7zip dll, karena dapat saya simpulkan itu merupakan bug ato kelemahan winrar. Sambil kita menunggu perbaikan dari developer Winrar yang akan datang.
Semakin hari teknologi website dan programming terus berkembang. Yang dulunya hanya menggunakan HTML dan PHP, lalu muncul CSS dan Javascript, setelah itu muncul lagi ASP dan ASP.NET. Lalu pertanyaannya, apa itu ASP.NET dan bagaimana kegunaannya? Berikut ini kartolo akan membahas segalanya tentang ASP.Net.
Programmer menentukan bahasa apa yg paling dibutuhkan dan disesuaikan dengan perangkat server yang di dukung , dan ASP.Net pun menjadi salah satu bahasa yang digemari akhir2 ini karena kecanggihan baik dalam tekhnologi , tampilan dan dukungan support terhadap environment yang ada , saya akan mengupas sedikit tentang ASP.Net itu sendiri dan pengetahuan mendasar yang kita butuhkan sebelum kita memulai mempelajari ASP.Net ini agar kita mengetahui konsep ASP.Net.
ASP.Net sendiri dapat dibuat dengan Visual Studio, disini penulis menggunakan Visual Studdio 2008 , Visual Studio sendiri pun ada versi-versi nya seperti VS Express , VS Standard , VS Profesional , VS Team System Editions , VS yang gratis tetapi memiliki batasan tertentu dan dapat langsung di download melalu Microsoft adalah Visual Studio Express. Saya akan menerangkan sedikit perbedaan di antara masing-masing Visual Studio berdasrkan versi-versi yang ada pada saat ini :
Tabel Perbandingan Product Visual Studio :


Sejarah ASP.Net dan ruang lingkupnya:
Setelah di release Internet Information Service, kemudian Microsoft mengeluarkan ASP ,ASP.Net sendiri merupakan pengembangan dari ASP 3.0 , kemudian pada ASP.Net muncul pertama kali pada tahun 2000 yaitu ASP.Net 1.0 yang di release pada 5 January 2002 dengan .Net Framework versi 1.0 pada saat itu . perbedaaan ASP dengan ASP.Net terletak pada penggunaan .Net Framework yang di butuhkan sebagai komponen dasar pada ASP.Net untuk mengakses library dan mendukung bahasa pemprograman yang ada padaVisual Studio seperti VB.Net , C# , dan ASP.Net , dengan adanya framework ini programmer di harapkan dapat membuat program menjadi lebih ringkas dan cepat di karenakan penggunaan framework dapat mengurangi jumlah script yang dibuat oleh programmer.
Berikut adalah gambaran dari lingkup bagian yang di dukung oleh ASP.Net.

Nah, bagi anda yang ingin tahu lebih dalam mengenai ASP.Net dan berniat untuk belajar silahkan download dan baca ebook tutorial ASP.net ini.
http://www.mediafire.com/?vmdiqjiy1zd
Sekian tentang ASP.Net, silahkan berkomentar jika ada pertanyaan... :D
READ MORE
Programmer menentukan bahasa apa yg paling dibutuhkan dan disesuaikan dengan perangkat server yang di dukung , dan ASP.Net pun menjadi salah satu bahasa yang digemari akhir2 ini karena kecanggihan baik dalam tekhnologi , tampilan dan dukungan support terhadap environment yang ada , saya akan mengupas sedikit tentang ASP.Net itu sendiri dan pengetahuan mendasar yang kita butuhkan sebelum kita memulai mempelajari ASP.Net ini agar kita mengetahui konsep ASP.Net.
ASP.Net sendiri dapat dibuat dengan Visual Studio, disini penulis menggunakan Visual Studdio 2008 , Visual Studio sendiri pun ada versi-versi nya seperti VS Express , VS Standard , VS Profesional , VS Team System Editions , VS yang gratis tetapi memiliki batasan tertentu dan dapat langsung di download melalu Microsoft adalah Visual Studio Express. Saya akan menerangkan sedikit perbedaan di antara masing-masing Visual Studio berdasrkan versi-versi yang ada pada saat ini :
Tabel Perbandingan Product Visual Studio :


Sejarah ASP.Net dan ruang lingkupnya:
Setelah di release Internet Information Service, kemudian Microsoft mengeluarkan ASP ,ASP.Net sendiri merupakan pengembangan dari ASP 3.0 , kemudian pada ASP.Net muncul pertama kali pada tahun 2000 yaitu ASP.Net 1.0 yang di release pada 5 January 2002 dengan .Net Framework versi 1.0 pada saat itu . perbedaaan ASP dengan ASP.Net terletak pada penggunaan .Net Framework yang di butuhkan sebagai komponen dasar pada ASP.Net untuk mengakses library dan mendukung bahasa pemprograman yang ada padaVisual Studio seperti VB.Net , C# , dan ASP.Net , dengan adanya framework ini programmer di harapkan dapat membuat program menjadi lebih ringkas dan cepat di karenakan penggunaan framework dapat mengurangi jumlah script yang dibuat oleh programmer.
Berikut adalah gambaran dari lingkup bagian yang di dukung oleh ASP.Net.

Nah, bagi anda yang ingin tahu lebih dalam mengenai ASP.Net dan berniat untuk belajar silahkan download dan baca ebook tutorial ASP.net ini.
http://www.mediafire.com/?vmdiqjiy1zd
Sekian tentang ASP.Net, silahkan berkomentar jika ada pertanyaan... :D
Dengan munculnya windows 7 bukan berarti itu dapat mengurangi penggunaan windows XP. Masih banyak orang yang percaya dengan windows XP, mungkin karena ada anggapan bahwa windows vista dan windows 7 merupakan produk gagal. Selain karena banyaknya program beta, windows 7 terkesan berat dan tidak jauh beda dengan windows XP.
Bicara tentang windows XP, apakah windows XP anda genuine? atau bajakan? lalu, kalau tidak genuine, gimana cara mengubah windows XP menjadi genuine? Disini akan kartolo jelaskan trik mengubah windows XP kita menjadi windows XP genuine. Karena seperti kita ketahui, dengan mengubah windows XP menjadi genuine akan semakin memudahkan kita dalam update nantinya.
Jika belum berikut Salah Satu Cara Paling Mudah Untuk Validasi Copy Illegal Anda Dari Windows yang saya baca dari sebuah forum luar, dan cara ini sebenarnya juga sudah agak lama sekitar pertengahan tahun 2009, mudah-mudahan berguna untuk anda. Saya sudah mempraktekanya dan bekerja 100%. Sangat mudah dan simpel. Menggunakan metoda hacking.
Langsung saja, langkah pertama cara mengubah XP menjadi genuine:
Buka sebuah notepad kemudian copy dan paste kan code berikut kedalam notepad
Windows Registry Editor Version 5.00
Kemudian Save notepad tersebut klik file pilih save pada kotak dialog box pada pilihan Save as type pilih " All files " berikan nama file tersebut terserah anda yang terpenting ekstensi file tersebut .reg lalu klik Save.

Setalah file tesebut di save kemudian buka klik dua kali akan ada peringatan Are sure you want to continue? klik Yes.
Kemudian untuk memastikan file .reg tersebut bekerja silahkan cek ke alamat ini untuk validasi:
http://www.microsoft.com/genuine/validate/ValidateNow.aspx?displaylang=en
klik tombol Validasi Windows kemudian klik install ActiveX jika ditanyakan.
Cara ini bekerja untuk windows XP pro, home, SP1, SP2, SP3, hebat kan?
Jika anda ingin menginstall XP coba key windows XP berikut ini :
V2C47-MK7JD-3R89F-D2KXW-VPK3J
Q6TD9-9FMQ3-FRVF4-VPF7Y-38JV3
FPJC9-YTC23-GHKTW-D87K6-WHJPQ
JG28K-H9Q7X-BH6W4-3PDCQ-6XBFJ
CTMDQ-QQVTB-9CMBP-HPJ2T-9D2FG
QYPXW-F9K84-PBW8P-VPWQ9-TRT7M
Jika key Windows XP tadi tidak berhasil anda bisa melakukan reset Activation 30 hari dengan cara jalankan command prompt sebagai admin ketik " slmgr -rearm " tanpa tanda kutip klik enter dan lakukan secara continue selama 30 hari.
Demikian cara mengubah windows XP menjadi genuine, apabila ada pertanyaan langsung komen atau contact kartolo ya. Jika anda bosan dengan windows Xp, silahkan coba Direct Download Windows 7 Free dari kartolo.
READ MORE
Bicara tentang windows XP, apakah windows XP anda genuine? atau bajakan? lalu, kalau tidak genuine, gimana cara mengubah windows XP menjadi genuine? Disini akan kartolo jelaskan trik mengubah windows XP kita menjadi windows XP genuine. Karena seperti kita ketahui, dengan mengubah windows XP menjadi genuine akan semakin memudahkan kita dalam update nantinya.
Jika belum berikut Salah Satu Cara Paling Mudah Untuk Validasi Copy Illegal Anda Dari Windows yang saya baca dari sebuah forum luar, dan cara ini sebenarnya juga sudah agak lama sekitar pertengahan tahun 2009, mudah-mudahan berguna untuk anda. Saya sudah mempraktekanya dan bekerja 100%. Sangat mudah dan simpel. Menggunakan metoda hacking.
Langsung saja, langkah pertama cara mengubah XP menjadi genuine:
Buka sebuah notepad kemudian copy dan paste kan code berikut kedalam notepad
Windows Registry Editor Version 5.00
[HKEY_LOCAL_MACHINE\SOFTWARE\Microsoft\Windows NT\CurrentVersion]
"CurrentBuild"="1.511.1 () (Obsolete data - do not use)"
"ProductId"="55274-640-7450093-23464"
"DigitalProductId"=hex:a4,00,00,00,03,00,00,00,35,35,32,37,34,2d,36,34,30,2d,\
37,34,35,30,30,39,33,2d,32,33,34,36,34,00,2e,00,00,00,41,32,32,2d,30,30,30,\
30,31,00,00,00,00,00,00,00,62,fc,61,4c,e0,26,33,16,05,d3,54,e7,a0,de,00,00,\
00,00,00,00,49,36,c2,49,20,47,0c,00,00,00,00,00,00,00,00,00,00,00,00,00,00,\
00,00,00,00,00,00,00,00,00,00,00,33,33,35,30,30,00,00,00,00,00,00,00,65,10,\
00,00,74,99,dd,b0,f7,07,00,00,98,10,00,00,00,00,00,00,00,00,00,00,00,00,00,\
00,00,00,00,00,00,00,00,00,00,00,00,00,00,00,00,00,c4,ae,d6,1c
"LicenseInfo"=hex:e7,77,18,19,f8,08,fc,7d,e8,f0,df,12,6e,46,cb,3f,ad,b2,dd,b9,\
15,18,16,c0,bc,c3,6a,7d,4a,80,8b,31,13,37,5a,78,a2,06,c8,6b,b9,d9,dd,cc,6a,\
9c,c5,9b,77,aa,07,8d,56,6a,7c,e4
[HKEY_LOCAL_MACHINE\SOFTWARE\Microsoft\Windows NT\CurrentVersion\WPAEvents]
"OOBETimer"=hex:ff,d5,71,d6,8b,6a,8d,6f,d5,33,93,fd
Kemudian Save notepad tersebut klik file pilih save pada kotak dialog box pada pilihan Save as type pilih " All files " berikan nama file tersebut terserah anda yang terpenting ekstensi file tersebut .reg lalu klik Save.

Setalah file tesebut di save kemudian buka klik dua kali akan ada peringatan Are sure you want to continue? klik Yes.
Kemudian untuk memastikan file .reg tersebut bekerja silahkan cek ke alamat ini untuk validasi:
http://www.microsoft.com/genuine/validate/ValidateNow.aspx?displaylang=en
klik tombol Validasi Windows kemudian klik install ActiveX jika ditanyakan.
Cara ini bekerja untuk windows XP pro, home, SP1, SP2, SP3, hebat kan?
Jika anda ingin menginstall XP coba key windows XP berikut ini :
V2C47-MK7JD-3R89F-D2KXW-VPK3J
Q6TD9-9FMQ3-FRVF4-VPF7Y-38JV3
FPJC9-YTC23-GHKTW-D87K6-WHJPQ
JG28K-H9Q7X-BH6W4-3PDCQ-6XBFJ
CTMDQ-QQVTB-9CMBP-HPJ2T-9D2FG
QYPXW-F9K84-PBW8P-VPWQ9-TRT7M
Jika key Windows XP tadi tidak berhasil anda bisa melakukan reset Activation 30 hari dengan cara jalankan command prompt sebagai admin ketik " slmgr -rearm " tanpa tanda kutip klik enter dan lakukan secara continue selama 30 hari.
Demikian cara mengubah windows XP menjadi genuine, apabila ada pertanyaan langsung komen atau contact kartolo ya. Jika anda bosan dengan windows Xp, silahkan coba Direct Download Windows 7 Free dari kartolo.
 Kecepatan internet memang tidak selalu sesuai dengan apa yng kita inginkan. Kadang cepat, kadang lambat. Saat kecepatan internet lambat, seperti biasa terjadi di warnet atau warung free hotspot misalnya, kita memang akan merasa jenuh dan ingin rasanya bandwidth hanya milik kita sendiri. Apa daya, walaupun kita komplain pada pemilik warung, karena kecepatan intenet lambat mereka akan menjawab dengan jawaban klasik "memang dari sana-nya mas, mungkin ada gangguan, tunggu aja, nanti juga cepat sendiri...", ya, hanya itulah yang bisa mereka katakan. Tetapi bukan berarti kita tidak bisa melakukan apa - apa. Kita bisa mengubah settingan laptop/komputer kita agar lebih friendly dengan bandwidth dalam rangka menambah kecepatan internet kita. Dalam hal ini akan saya bahas mengenai cara menambah kecepatan internet dengan menggunakan SQUID sebagai windows proxy server. Dalam artikel ini, saya dibantu oleh blog guntingbatukertas.
Dengan windows proxy server ini kita akan mendapatkan beberapa keuntungan. Yaitu menghemat bandwidth sekaligus menambah kecepatan internet. Yang mana saat kita menggunakan access mobile broadband yang biasanya tidak mendapat sinyal fullbar, akan dapat meningkatkan kecepatan internetnya sebesar 3x lipat, tentunya dengan bantuan windows proxy server ini. Yaitu SQUID Proxy.
Cara Kerja SQUID Proxy :
Tiap kita mengakses situs sebenarnya yang kita lakukan adalah mendownload semua data berupa tulisan, link, teks, gambar dan file lain dalam halaman tersebut.
Dalam proses standar, semua file ini akan disimpan dalam file temporer browser. Namun pada prakteknya, tiap kita membuka halaman yang sama, kita tetap mendownload file yang sama, berulang kali. Anggap saja suatu halaman web berukuran total 500KB, maka jika kita membuka halaman tersebut sepuluh kali dalam sehari maka kita akan menggunakan bandwith sebesar 500KB x 10 = 5MB!
Proxy atau juga yang disebut Squid sebenarnya adalah program yang dikembangkan dalam dunia Linux yang bekerja efektif mengelola file temporer. Saya menemukan SquidNT yang dikembangkan dari versi linuxnya oleh Guido Serassio. Cara kerjanya sama dengan Squid di Linux, yakni dengan otomatis menyimpan semua file yang kita download saat mengakses situs di dalam satu file temporer yang disebut cache. Di sana semua konten, alamat, teks, gambar dan halaman web disimpan. Pada saat kita mengakses situs untuk pertama kali, squid akan secara otomatis menyimpannya dan membuat link bayangan agar saat halaman yang sama dibuka untuk kedua kali, browser tidak langsung mendownload dari situs aslinya. Melainkan mendownload dari cache squid yang notabene ada di PC/LAN. Sehingga halaman web akan lebih cepat terbuka. Jika kita sering membuka halaman yang sama, prosesnya akan jauh lebih cepat saat kedua kali dan seterusnya.
Sekarang kita lihat, berapa perhitungan bandwithnya. Suatu halaman sebesar 500KB, berisi halaman web sederhana dan berbagai gambar. Squid hanya akan mendownload kode HTML nya saja dan menyaring semua informasi yang ada di dalamnya. Jika dalam screening ini semua data pendukung (gambar, skrip, file) sudah ada di cache, bandwith Anda tidak akan lebih besar dari 100Kb bahkan lebih kecil lagi. Anggap saja kita lakukan refresh selama 10 kali maka hasil yang didapat adalah: 100KB x 10 = 2MB saja. Anda bisa menghemat bandwith menjadi 1/5 bahkan lebih kecil lagi. Apalagi buat yang pakai internet dari smart yang gak dapet banyak sinyal. Baca juga artikel Cara Efektif untuk Meningkatkan Koneksi Internet Smart.
INSTALASI DAN SETTING SQUID
Pertama, anda download dulu SQUID-nya.
Download Squid 2.7 Stable7 untuk Windows
Download Alternatif Mirror Squid 2.7 Stable7 untuk Windows
Selanjutnya langkah instalasi:
1. Ekstrak file Squid-2.7STABLE7.bin yang telah Anda download. Saya sarankan Anda ekstrak ke c:\squid\ untuk lebih mempermudah Anda mengikuti tutorial ini.
2. Lihat dan perhatikan isi folder c:\squid\etc\. Disana ada beberapa file konfigurasi default squid sebagai berikut:
- cachemgr.conf.default
- mime.conf.default
- squid.conf.default
- squid_radius_auth.conf.default
- cachemgr.conf
- mime.conf
- squid.conf
- squid_radius_auth.conf
# TAG: http_port
# Usage: port [options]
# hostname:port [options]
…
# If you run Squid on a dual-homed machine with an internal
# and an external interface we recommend you to specify the
# internal address:port in http_port. This way Squid will only be
# visible on the internal address.
#
# Squid normally listens to port 3128
http_port 3128
4. Temukan TAG: visible_hostname, tambahkan tulisan visible_hostname localhost di bagian bawah tag ini. Anda boleh menghapus tulisan # none. sehingga tampak seperti berikut:
# TAG: visible_hostname
# If you want to present a special hostname in error messages, etc,
# define this. Otherwise, the return value of gethostname()
# will be used. If you have multiple caches in a cluster and
# get errors about IP-forwarding you must set them to have individual
# names with this setting.
#
#Default:
visible_hostname localhost
5. Temukan http_access allow localnet. Tambahkan http_access allow localhost di bawahnya menjadi:
# Example rule allowing access from your local networks.
# Adapt localnet in the ACL section to list your (internal) IP networks
# from where browsing should be allowed
http_access allow localnet
http_access allow localhost
6. Temukan TAG: dns_nameservers, pada tulisan dns_nameservers. Pada bagian bawah tag ini, isi dengan alamat DNS dari ISP yang Anda gunakan dengan format dns_nameservers [primary DNS] [secondary DNS]. Dalam hal ini saya menggunakan ISP speedy Wilayah Jatim maka akan tampak sebagai berikut:
# TAG: dns_nameservers
# Use this if you want to specify a list of DNS name servers
# (IP addresses) to use instead of those given in your
# /etc/resolv.conf file.
# On Windows platforms, if no value is specified here or in
# the /etc/resolv.conf file, the list of DNS name servers are
# taken from the Windows registry, both static and dynamic DHCP
# configurations are supported.
#
# Example: dns_nameservers 10.0.0.1 192.172.0.4
#
#Default:
dns_nameservers 202.134.1.10 203.130.208.18
Akhiri dengan menyimpan file squid.conf tersebut.
7. Buka Start > Run > Ketik CMD [Enter]. Dalam Command Prompt, ketik baris perintah berikut:
c:\squid\sbin\squid.exe -z [Enter]
Jika muncul pesan popup Windows Security Alert, pilih Unblock untuk memberi akses kepada instalasi Squid Proxy.
8. Selanjutnya, ketik perintah berikut:
c:\squid\sbin>squid.exe -d l -D [Enter]
Tunggu beberapa saat kemudian tekan CTRL + C.
9. Ketik perintah berikut:
c:\squid\sbin>squid.exe -i [Enter]
c:\squid\sbin\squid.exe -O -D [Enter]
Setelah mengetik keempat baris perintah di atas, layar Command Prompt Anda seharusnya akan tampak seperti berikut ini:

10. Jalankan Service Panel melalui Control Panel > Administrative Tools > Services. atau
Start > Run > ketik Services.msc [Enter]
Temukan service bernama Squid > Klik link Start di panel sebelah kiri untuk menjalankan Squid.

11. Selanjutnya, Ubah setting Browser Anda. Arahkan proxy pada browser anda ke alamat localhost dengan port 3128. Untuk Firefox, langkah setting nya tampak seperti berikut:

Secara default Squid akan menjalankan proses sendiri tiap kali PC melakukan restart. Cache squid ini disimpan dalam folder c:\squid\var\cache. Untuk melihat log file squid proxy, Anda bisa mengetikkan:
more c:\squid\var\logs\access.log [Enter]
UNINSTALL
Jika Anda ingin menghapus squid, ketikkan perintah berikut di Command Prompt.
c:\squid\sbin>squid -r -n squid [Enter]
Selesai.
INSTALASI CARA CEPAT
Bagi Anda yang nggak mau pusing-pusing dengan setting di atas, sudah sediakan Squid Proxy di atas yang sudah dikonfigurasi lengkap. Anda tinggal meng-ekstrak, dobel klik file konfigurasi, setting browser dan Kecepatan akses Anda sekarang jadi beberapa kali lebih cepat.
Download SquidProxy-2.7STABLE7 Siap Pakai
Password: guntingbatukertas.com
Keterangan:
Dalam file konfigurasi default (squid.conf) Squid siap pakai di atas saya menggunakan dns dari Google. Dengan setting tersebut seharusnya Anda sudah bisa langsung online tanpa melakukan perubahan apapun.
Tapi sekedar untuk backup, saya sudah menyertakan beberapa DNS lain seperti DNS Speedy dan OpenDNS. Jika perlu, silakan pilih sesuai keinginan. Dalam hal ini yang perlu Anda lakukan adalah membuka file squid.conf di \squid\etc\ dan temukan bagian berikut:
.....
# Hapus tanda (#) di depan baris berikut jika Anda ingin menggunakan DNS Speedy Jatim dan Jateng
#dns_nameservers 202.134.1.10 203.130.208.18
# Hapus tanda (#) di depan baris berikut jika Anda ingin menggunakan DNS Speedy Jakarta – Jateng
#dns_nameservers 202.134.0.155 203.130.208.18
# Hapus tanda (#) di depan baris berikut jika Anda ingin menggunakan DNS OpenDNS
#dns_nameservers 208.67.222.222 208.67.220.220
# Tambah tanda (#) di depan baris berikut jika Anda TIDAK ingin menggunakan DNS Google
dns_nameservers 8.8.8.8 8.8.4.4
....
Perhatikan, dari baris di atas, hanya satu baris dns_nameservers yang tidak didahului tanda comment (tanda #). Yakni di depan dns_nameservers punya Google. Itulah setting yang sedang aktif/digunakan. Untuk memilih setting dns yang lain Anda tinggal memberi comment (tanda #) di depan dns_nameservers yang sedang aktif dan menghapus dns_nameservers lain yang Anda inginkan. Ingat, Anda hanya diperbolehkan memlih dns_nameservers yang aktif.
Misalnya saya memakai OpenDNS, maka setting diatas perlu diubah ubah menjadi:
....
# Hapus tanda (#) di depan baris berikut jika Anda ingin menggunakan DNS Speedy Jatim dan Jateng
#dns_nameservers 202.134.1.10 203.130.208.18
# Hapus tanda (#) di depan baris berikut jika Anda ingin menggunakan DNS Speedy Jakarta – Jateng
#dns_nameservers 202.134.0.155 203.130.208.18
# Hapus tanda (#) di depan baris berikut jika Anda ingin menggunakan DNS OpenDNS
dns_nameservers 208.67.222.222 208.67.220.220
# Tambah tanda (#) di depan baris berikut jika Anda TIDAK ingin menggunakan DNS Google
#dns_nameservers 8.8.8.8 8.8.4.4
.....
Simpan, dan setting Anda yang baru siap dicoba. Sekian artikel kartolo mengenai Menambah Kecepatan Internet dengan Windows Proxy Server(SQUID). insya Allah bisa menambah kecepatan internet anda.
Semoga bermanfaat,
Source: http://guntingbatukertas.com/sistem-operasi/windows/hemat-bandwith-dan-dongkrak-kecepatan-akses-internet-dengan-squid-proxy/
 Saya yakin anda semua akan merasa jengkel ketika muncul pesan error pada browser, baik itu firefox, internet explorer, atau opera browser. Sebagai contoh, ketika kita sedang sibuk - sibuknya mencari materi untuk bahan skripsi, tiba - tiba muncul pesan error pada browser. Padahal kita sudah yakin bahwa alamat URL itu mengandung materi yang kita butuhkan. Pasti anda akan merasa kecewa berat. Disini saya tidak membahas bagaimana cara mengatasi error pada browser. Disini kita akan membahas tentang pesan error yang muncul ketika sedang asik browsing. Apalagi error itu berbahas inggris. Pasti akan malas mengartikannya. Dan akibatnya kita tidak mengetahui arti dari pesan error tersebut. Dibawah ini ada penjelasan sedikit makna pesan error/error caution yang sering muncul. Baik error koneksi server atau kesalahan koneksi lainnya. Semoga pengertian saya dibawah ini dapat mengurangi kejengkelan anda akan error dalam berinternet.
Inilah pesan - pesan error pada browser yang sering kita temui:
500 - Internal Server Error
Pesan error tersebut diartikan sebagai adanya masalah atau gangguan dan kesalahan dalam server internal website sehingga Anda tidak bisa mengakses website yang bersangkutan dan selama administrator situs belum memperbaikinya, maka pesan error tersebut akan muncul terus. Sabar saja
404 - Not Found
Ada beberapa hal yang menyebabkan hal tersebut terjadi, yaitu :
- Data di database sebelumnya sudah ada, namun sudah dihapus atau dihilangkan dari database server.
- Terjadi gangguan akses internet atau down.
- Jika akses Internet tetap gagal, maka kemungkina besar halaman tersebut sudah tidak lagi beredar/broken link.
- Terjadi kesalahan penulisan alamat URL.
400 - Bad Request
Pesan kesalahan tersebut dialami oleh server yang tidak bisa mengerti perintah dari client. Umumnya, berupa kesalahan script coding di server, sehingga hanya administrator serverlah yang bisa mengatasinya. Kita hanya bisa berharap saja. hehehe...
403 - Forbidden
Yang pertama karena halaman situs tidak dapat diakses karena telah diatur sedemikian sehingga dalam servernya. Dan alasan kedua adalah sang pemilik situs tersebut belum membayar sewa hosting atau domain ke perusahaan tempat dia menyewa, sehingga terjadi pemblokiran dari pihak perusahaan server.
401 - Unauthorized
Pesan kesalahan tersebut karena user tidak memiliki otoritas atau ijin untuk mengakses halaman website. Biasanya situs diberi security berupa username dan password, sehingga Anda harus tahu username dan password tersebut.
408 - Request Timeout
Pesan ini terjadi karena timer atau waktu untuk mengakses situs terlampau lama dan telah habis. Hal tersebut disebabkan oleh kecepatan dan koneksi akses internet yang cukup lambat, dan server biasanya memiliki timer atau kuota batas waktu tertentu dalam pengaksesan data dalam database servernya.
Sebagai tambahan dan perlu diingat bahwa pesan-pesan khusus atau status mempunyai kode dalam pengertiannya, berikut :
Kode status 1xx : sifatnya sebagai informasi dan saat ini belum resmi digunakan.
Kode Status 2xx : Status proses positif, artinya request berhasil diterima, dimengerti dan bisa diproses oleh webserver.
Kode Status 3xx : Redirection, artinya web client harus melakukan proses lain, dalam hal ini mengakses informasi sesuai redirection yang diberikan untuk mengakses informasi yang diinginkan secara lengkap.
Kode Status 4xx : Status Client Error, artinya web server mendeteksi bahwa request dari web client tidak memenuhi format yang standar, sehingga tidak dapat dikenali dan diproses lebih lanjut.
Kode Status 5xx : Status server error, artinya webserver gagal memenuhi request dari web client karena ada asuatu hal yang menghalangi.
Nah, demikian error pada saat berinternet yang sering kita temui. Yang lainnya menyusul. Semoga bisa menambah ilmu buat sodara2 sekalian. Silahkan juga baca trik - trik firefox dan trik internet lainnya.
Semoga bermanfaat.
 Smart hebat hemat, itu moto dari sebuah operator layanan telekomunikasi seluler di Indonesia dengan jaringan CDMA 2000. Kebetulan saya sendiri adalah salah satu pelanggan dari smart. Saya gunakan koneksi modem hp haier D1200P. Disini kartolo akan coba jelaskan bagaimana cara optimize smart internet dan cara meningkatkan kecepatan internet smart D1200P. Nah untuk optimalisasi pertama, yaitu dengan mengganti Configuration Setting pada Windows seperti setting pada koneksi Internet pada umumnya yaitu dengan cara edit pada Register dari menu Run. setelah itu ketik gpedit.msc, selanjutnya tekan Enter. Pada menu Computer Configuration pilih Administrative Templates lalu pilih Network, selanjutnya pilih Qos Packet Scheduler kemudian pilih Limit Reservable Bandwidth (klik dua kali) selanjutnya pada menu setting ubah dari Not Configured ke Enable… dan ubah Bandwidth dari 20% ke 0%… Langkah tersebut digunakan untuk meniadakan akses bandwidth oleh System Microsoft sehingga seluruh bandwidth diharapkan dapat digunakan untuk Akses Internet (Smart) dan dapat mempercepat koneksi internet smart d1200p.
Selanjutnya untuk mempercepat Koneksi Smart jangan gunakan driver bawaan dari Smart, tetapi gunakan software driver Smart yang telah di Upgrade. blogger bisa download dari site smartnya langsung.
Trik yang kedua adalah dengan melakukan perubahan-perubahan setting koneksi smart yaitu pada username, password dan dial-number. Dari sini ternyata ada yang unik…. pada akses internet smart kita dapat melakukan perubahan-perubahan pada variabel tersebut dan setiap perubahan ternyata sangat berpengaruh dalam meningkatkan kecepatan akses atau koneksi internet smart d1200p. Berikut ini saya tampilkan hasil dari speedtest untuk setiap perubahan yang saya lakukan pada variabel-variabel tersebut….
1. username : smart / password : smart / dial-number : #777 (Default)
smart777
2. username : smart / password : smart / dial-number : *31*11111#
smart311
3. username : cdma / password : cdma / dial-number : #777
cdma777
4. username : cdma / password : cdma / dial-number : *31*11111#
cdma311
5. username : wap / password : wap / dial-number : *31*11111#
wap311
6. username : telkom / password : telkom / dial-number : 080989999
telkom0809
Saat melakukan trik mempercepat akses atau koneksi internet smart hp modem d1200p ini, ternyata pada smart d1200p dapat digunakan dial-number Telkomnet Instant yaitu 080989999 dengan username telkom dan password telkom dan diperoleh kecepatan cukup tinggi yaitu 0,12 Mbps download dan 0,07 Mbps upload. Kecepatan ini sama dengan setting smart dengan dial-number *31*11111#.
Selain itu yang unik lagi adalah… bahwa username, password dan dial-number tersebut dapat saling dikombinasikan antar setting. Selain nomor-nomor dial diatas masih ada lagi beberapa dial-number yaitu diantaranya *777#. Namun dari hasil speedtest ternyata tidak lebih cepat dari setting di atas.
Biasanya kecepatan tertinggi sering didapat pada pagi hari (menjelang subuh) sampai sekitar jam 07.00 pagi dan menjelang sore hari. Saat-saat seperti itu kecepatan sering menyentuh 0,14 Mbps untuk download dan 0,09 Mbps untuk upload… Sebuah kecepatan yang Fantastis untuk Internet Unlimited seharga Rp.50.000,-/bulan.
Akan tetapi kecepatan download sebesar itu ternyata hanya kecepatan Browsing Download dan tidak pernah tercapai saat kita melakukan Download File kecuali dengan bantuan IDM (Internet Download Manager). Mungkin itu salah satu kekurangan dari koneksi smart d1200p. Ingat, trik ini tidak dapat digunakan pada HP modem lain seperti ZTE C261 atau Haier C700.
Demikian posting saya tentang Cara Efektif untuk Meningkatkan Koneksi Internet Smart. Apabila ada pertanyaan langsungs aja komen. Akan saya jawab sebisa saya. Artikel ini adalah terusan dari artikel saya sebelumnya tentang Meningkatkan Kecepatan Internet Smart d1200p.
Semoga bermanfaat.