 Android dropbox app allows you to download and view your files in your Dropbox folder and also upload files to the server. Dropbox android apps is best suited for people who like to work on with the phone. If there is anything that we are unsatisfied with, it have to be the inability to sync your local files (in SD card) back to the server. When you open a file from your Dropbox folder in Android, the file will be downloaded to your SD card and you can then view/edit the file with a file manager. However, after you have made changes to the file, the Dropbox app does not automatically sync it back to the server. The only solution is to manually upload the file. This is definitely a bad file sync problem in android. A good solution to overcome this file sync problem is using an additional dropbox app, that is Dropspace. DropSpace is another great apps for Android Dropbox. DropSpace will allows you to create a link between a folder in SD card and a sub-directory in Dropbox. Once the link is created, it will auto sync the files from/to your Dropbox. Dropspace is free, just download it via android market.
Download Dropspace Android App
Step by Step
Connect your Dropbox account to DropSpace.

Tap the “Manage Sync List” button to set up the sync.

Navigate to the directory on your SD card that you want to link and long tap on it to add to the sync list.

Next, it will show your Dropbox folder and you can do the same thing (long tap on the folder) to complete the sync configuration.
Lastly, go back to its main screen and tap the “Sync Now” to start the sync.

By default, you have to manually tap the “Sync Now” button everytime you want it to perform a sync. However, you can set it as a service and get it to run at a regular interval. You can also configure whether to remove the remote files when the local files are deleted.

Syncing notes to Dropbox
If you want to create notes on your Android phone and have them synced to your Dropbox, You can use another additional dropbox app, Epistle. With Epistle, you can create simple notes and it will automatically synced to the Epistle folder in Dropbox. I have found this to be extremely handy, especially when I need to jot down some ideas while on the move.
Download Epistle Android App

Epistle also supports two-way file sync. That means, if you create a text file on your desktop and drop it into the Dropbox Epistle folder, it will show up in your Android phone as well. Until the android dropbox team implements the synchronization feature in their mobile apps, we will have to make use of the above android dropbox file sync method to get things done. They might not be the most complete feature of android dropbox app, but it will help you little.
Just let me know if still have a problem :)
 You ever felt disappointed after downloading an e-book as the e-book you've downloaded have password attached and you can't modify it? We must be annoyed when we have to type the password first before we open the PDF file. Sometimes we must use the bad ways to remove the PDF password. And there are a few PDF Password Remover Tool that can help use to remove PDF password. First, we must know the password protection that attached, so we don't get me wrong.
There are two types of protections in PDF which is,
- User password – Password to open the PDF file
- Owner Password – Password to print, copy, modify the PDF file
However if the PDF file is using Owner Password, this tool will decrypt and remove the password so you can print, copy, and make changes to the document.
PDF Password Remover Tool
PDF Password Remover Tool is a freeware PDF password recovery that will decrypt the Owner Password and remove it from the PDF file. I’ve tested this software and it works perfectly.If you want to remove the User Password, this tool will popup an alert saying ‘Cannot decrypt pdf file. Incorrect password.’ as shown in the image below.
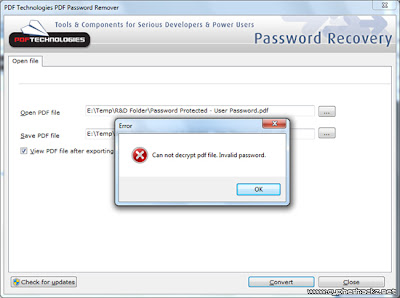
But if the e-book PDF file is using Owner Password, the password removal software will able to remove it, and save a new copy which allows you to print, copy and modify the document content.
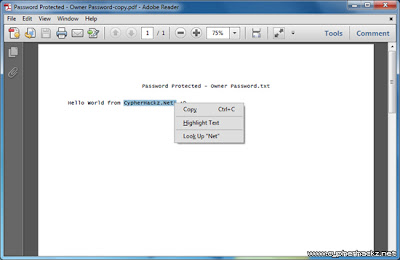
PDF Password Remover Tool is free for personal use. Please use this software to remove passwords from PDF files of yours. It was developed to help you recover PDF files in cases where you forget the owner passwords you once set and can no longer remember. Don't use this removal tool to infringe the PDF ebook copyright or etc. Read our other similar article about how to convert word doc to PDF file. Hope this tutorial can solve your problem :)

Nowadays, many people got many benefits from the wireless network(hotspot) that've been installed in many place, especially the town square or coffee break place. It means that now internet is an easy thing to get. Now, we will speak about securing your pc or laptop on a wireless network location that called hotspot.
Public Wi-Fi hotspots seem to be available in more locations than ever before. If you move between them a lot or are just getting started, following these security precautions can help keep your machine safe and secure. For this article we look at security steps in Windows 7, but most of these tips and suggestions will work in XP, Vista, and even other operating systems as well.
Enable Your Firewall
Whether you use the Firewall built into Windows or a 3rd-party app like ZoneAlarm, make sure it’s enabled before signing on to a public hotspot. Click on Start then Control Panel, make sure View by large icons is selected then click Windows Firewall.Then select Turn Windows Firewall on or off…

Then make sure it’s turned on under Home or Work and Public network location settings.

Turn Off All Sharing
File and folder sharing is a great feature in Windows 7 at home, but when you’re on a public network, you don’t want others to see your data. To turn it off, click on the Network icon in the Taskbar and select Open Network and Sharing Center.

Then click on the Change advanced sharing settings hyperlink.

Now make sure to Turn off file and Printer Sharing and Turn off Public folder sharing…make sure you save the changes when you’re done.

Use Correct Public Wi-Fi Connection
Rather than having to worry about changing your settings every time you log on to a Public Network. When you first connect to the Public Hotspot, Windows will ask you to select a location for the Network. For example here we want to connect to the local coffee shop Wi-Fi.

Make sure you choose Public Network…

This will automatically turn off File Sharing, Network Discovery, and Public Folder Sharing.

Use HTTPS Protocol
If you use regular HTTP protocol when connected to a public network, all of your text information can be easily found by an evil geek with a packet sniffer. You will want to use HTTPS (Hypertext Transfer Protocol Secure) or SSL wherever you can. For example you can set your Gmail and other Google services to always use https when connecting. Open your Gmail account settings, under the General tab scroll down to Browser connection and select Always use https. Again, make sure you click to Save Settings at the bottom of the page.

Then when you go to any Google services linked with that account, you will see https:// before the URL in the Address Bar.

It will work for any browser you’re using.

Another thing to check on your browser to ensure you’re using https is to look for the lock icon in the lower right corner of your browser.

Firefox Addons
If you’re using Firefox and don’t want to worry if Google services switch to https, then check out the OptimizeGoogle addon. Among other awesome ways it allows you to customize Google, you can set it to have all services use https when able.

Another handy Firefox addon from the EFF (Electronic Frontier Foundation) is HTTPS Everywhere. It will switch to https protocol for several major sites, and you can write your own rulesets with it as well.

Private VPNs
Even with using the addons above, not all sites you visit will be protected with SSL encryption. If you want to make sure you have extra protection, go through a VPN (Virtual Private Network). This `llows you to route your data traffic though a separate and secure network. There are several different free and subscription services that will do this for you but we’ll just take a look at a couple.
ProXPN is an easy to use VPN client. You need to create an account first, then download and install the client. After that log into your account and you’ll be connected to their secure VPN without worrying about traffic from your machine being on the hotspot.

They offer a free and premium version. We found that our connection could be slow at times using the free version, especially on multimedia sites. If you find you’re using Hotspots a lot, you might want to pay the $5/month for the premium version which did produce faster speeds, and ensures higher levels of encryption.

Hotspot Shield is another popular and easy to use VPN utility that runs in the background and creates the VPN automatically.

The biggest caveat is it will display ads and try to install crapware on your machine. Make sure to uncheck any crapware it tries to offer you.

While it will annoy you with ads, it is free and easy to use. If you only need to use it occasionally while at a Hotspot, it might be worth the ad annoyance.

Another thing you might want to consider is setting up your own VPN on your computer or on Windows Home Server. We’ll be writing up a full step by step tutorial on how to create your own VPN in the near future, so stay tuned.

Disable Wi-Fi When not in Use
If you’re not using your Wireless connection while you at a hotspot, simply turn it off. This can be hard to remember, and annoying if you’re constantly doing research online while working. But if you can plan your work around times when you don’t need to be online for good chunk of time, just turn it off. Click on the Wireless icon on the Taskbar right-click the network you’re connected to and Disconnect.

Windows Updates
Make sure you’re keeping your machine updated with the latest security fixes from Microsoft. In the geek community we all know the 2nd Tuesday of every month is called “Patch Tuesday”, when the team from Redmond send out the latest security fixes to plug holes and fix vulnerabilities in the OS, hardware drivers –including wireless patches, and other installed software like MS Office.

However, some vital patches might be released before then so make sure you’re receiving Automatic Updates. You don’t have to have them download and install automatically, but you can have Windows notify you when fixes are available and you can research if you want to add them or not. When in doubt, it’s usually best to just install the updates, and keep note of what they are so you can uninstall them if you find something isn’t working.

Update Antivirus Software
This should also go without saying, but keeping your Antivirus software is extremely important on all of your machines especially on a large public network where there can be a lot of malicious software lurking.

While this is microsoft security essentials, no matter what brand you use, make sure Real-time scanning is enabled.

Use Your Best Judgment
- Get to know the folks who are operating the Wi-Fi Hotspot. Ask them the type of encryption they are using on the router and if they seem to know basic Wi-Fi security. If not, you might want to use a different location – especially if they have it wide open.
- Don’t enter personal information connected to a Wi-Fi Hotspot unless you’re completely sure everything is safe and encrypted. If you need to do Internet Banking, wait until you’re at home or in the office.
- Busy hotpots like at an airport or hotel can have a lot of people on it, who knows what their looking at, but there most certainly are some “bad guys”. Try to use smaller locations like at a library or coffee shop.
- When in doubt, just don’t connect. If your online activity can wait, just hold off until you’re sure you’re on a secure network.
- Make sure and follow the guidelines described above, if you just connect and leave everything open, there is only yourself to blame.
from : howtogeek.com

Nowadays a lot of which can be used to create a vpn server from starting a direct form of hardware up to the only form of application, from the expensive to the free.
OpenVPN is a VPN application is free (opensource) is quite reliable. Some sources say OpenVPN is in fact not the safest but if the data must be transferred between two or more networks are not too sensitive like more than enough moreover OpenVPN OpenVPN is also very easy to install.
Here I will just tell you about the installation steps OpenVPN on FreeBSD. Although probably could have used some of his tricks on Linux or * nix like any other OS.
Ok long story rather than let's start it.
First OpenVPN on FreeBSD can be found in the folder / usr / ports / security / openvpn, which is required usually lzo library lib but since I installed it through the ports, then all the dependencies will automatically be installed.
For installation please follow these steps (all performed by root)
cd / usr / ports / security / openvpn
make config
Make the build
make install clean
Performed the above steps so that you have a chance to see what happens at each step. Actually you can just change directory and typing make install clean immediately.
After the installation process goes wrong and no significant errors, then input the following line to / etc / rc.conf with your favorite text editor.
openvpn_enable = "YES"
Now we will create a config file to be placed in the folder / usr / local / etc / openvpn if the folder does not exist yet please make advance with the command
mkdir / usr / local / etc / openvpn
Then please move to the folder and start creating openvpn.conf file with your favorite text editor.
cd / usr / local / etc / openvpn
pico openvpn.conf
Now please enter the following sample config.
# Specify device
dev tun
# # The server and client IP Pool
server 10.8.0.0 255.255.255.0
ifconfig-pool-persist ipp.txt
# Certificates for VPN Authentication
ca / usr / local / etc / openvpn / keys / ca.crt
cert / usr / local / etc / openvpn / keys / server.crt
key / usr / local / etc / openvpn / keys / server.key
dh / usr/local/etc/openvpn/keys/dh1024.pem
# Routes to client
push "route 192.168.0.0 255.255.255.0"
# Compression VPN link
comp-lzo
keepalive 10 60
ping-timer-rem
persist-tun
persist-key
# Run OpenVPN as a daemon and drop privileges to user / group nobody user nobody
group nobody
daemon
Save the file above, and we continue with cerificates. Copy the script to create a certificate from the folder / usr / local / share / doc / openvpn manner as follows (examples copied it to the folder / home / giest please be replaced with your user).
cp-r / usr / local / share / doc / openvpn / easy-rsa / home / guest /
cd / home / guest / easy-rsa
After successfully copying easy-rsa scripts then please adan edit the vars file with your favorite editor and adjust purposes (without dieditpun no problems then you will be given only a few questions over and over again). Here are examples of parts that you need to edit.
export KEY_COUNTRY = ID
export KEY_PROVINCE = "ENGLAND"
export KEY_CITY = LONDON
export KEY_ORG = "GUEST-VPN"
export KEY_EMAIL = "admin@guest.org"
Then we moved from the FreeBSD default shell (usually tcsh) to sh or bash first. If you do not move the shell I guarantee you will not succeed in making certificates for openvpn.
To switch to sh or bash please type the following command.
sh
Once you move the shell follow the steps below.
. vars
NOTE: Pls you run. / Clean-all, I Will be doing a rm-rf on / usr / home / Guest / easy-rsa / keys
. / Clean-all
. / Build-ca
Generating a 1024 bit RSA private key
....................................++++++
..............++++++
writing new private key to 'ca.key'
-----
You are about to be asked to enter information That Will be incorporated
into your certificate request.
What you are about to enter is what is Called a Distinguished Name or a DN.
There are quite a Few fields but you can leave some blank
For some fields there Will be a default value,
If you enter '.,' Will the field be left blank.
-----
Country Name (2 letter code) [ID]:
State or Province Name (full name) [ENLAND]:
Locality Name (eg, city) [LONDON]:
Organization Name (eg, company) [GUEST-VPN]:
Organizational Unit Name (eg, section) []:
Common Name (eg, your name or your server's hostname) []:
Email Address [admin@guest.org]:
Ok as you can see you are required to answer some questions, but because previously I've edit the file vars so I can just hit enter to use the default answer.
Next is to build certificate and key follow the steps below
. / Build-key-server server
Generating a 1024 bit RSA private key
..........++++++
.................................................. ++++++
writing new private key to 'server.key'
-----
You are about to be asked to enter information That Will be incorporated
into your certificate request.
What you are about to enter is what is Called a Distinguished Name or a DN.
There are quite a Few fields but you can leave some blank
For some fields there Will be a default value,
If you enter '.,' Will the field be left blank.
-----
Country Name (2 letter code) [ID]:
State or Province Name (full name) [ENGLAND]:
Locality Name (eg, city) [LONDON]:
Organization Name (eg, company) [GUEST-VPN]:
Organizational Unit Name (eg, section) []:
Common Name (eg, your name or your server's hostname) []: SERVER
Email Address [admin@guest.org]:
Please enter the following 'extra' attributes
to be sent with your certificate request
A challenge password []: 123456
An optional company name []: ARSENAL
Using configuration from / usr / home / Guest / easy-rsa / openssl.cnf
Check That the request matches the signature
Signature ok
The Subject's Distinguished Name is as follows
countryName : P RINTABLE: 'ID'
stateOrProvinceName: P RINTABLE: 'ENGLAND'
localityName : RINTABLE: 'LONDON'
OrganizationName : RINTABLE: 'GUEST-VPN'
commonName : RINTABLE: 'SERVER'
emailAddress : IA5STRING: 'admin@guest.org'
Certificate is to be certified until July 12 18:04:29 2019 GMT (3650 days)
Sign the certificate? [Y / n]: y
1 out of 1 certificate requests certified, commit? [Y / n] y
Write out database with 1 new entries
Data Base Updated
See if we do not edit the file vars we need to answer that question once again. now we will build certificate and key for use by the client. I emulated this will make the client certificate for 2 only. if you have more than two clients please adjusted.
. / Build-key client1
Generating a 1024 bit RSA private key
.........++++++
....................................++++++
writing new private key to 'client1.key'
-----
You are about to be asked to enter information That Will be incorporated
into your certificate request.
What you are about to enter is what is Called a Distinguished Name or a DN.
There are quite a Few fields but you can leave some blank
For some fields there Will be a default value,
If you enter '.,' Will the field be left blank.
-----
Country Name (2 letter code) [ID]:
State or Province Name (full name) [ENGLAND]:
Locality Name (eg, city) [LONDON]:
Organization Name (eg, company) [GUEST-VPN]:
Organizational Unit Name (eg, section) []:
Common Name (eg, your name or your server's hostname) []: CLIENT1
Email Address [admin@giest.org]:
Please enter the following 'extra' attributes
to be sent with your certificate request
A challenge password []: 123456
An optional company name []: ARSENAL
Using configuration from / usr / home / Guest / easy-rsa / openssl.cnf
DEBUG [load_index]: unique_subject = "yes"
Check That the request matches the signature
Signature ok
The Subject's Distinguished Name is as follows
countryName: P RINTABLE: 'ID'
stateOrProvinceName: P RINTABLE: 'england'
localityName: P RINTABLE: 'london'
OrganizationName: P RINTABLE: 'GUEST-VPN'
commonName: P RINTABLE: 'CLIENT1'
emailAddress: IA5STRING: 'admin@guest.org'
Certificate is to be certified until July 12 18:10:43 2019 GMT (3650 days)
Sign the certificate? [Y / n]: y
1 out of 1 certificate requests certified, commit? [Y / n] y
Write out database with 1 new entries
Data Base Updated
To client2 just typing
. / Build-key client2
you should replace only the part
[Source] Common Name (eg, your name or your server's hostname) []: CLIENT2 [/ source]
If you do not make changes here the certificates and keys for the client to the two would not formed.
Next we build dh parameters with a command like the following
1. #. / Build-dh
2. Generating DH parameters, 1024 bit long safe prime, generator 2
3. This is going to take a long time
4.
ok now completed the process of making key right now you just exit back to your default shell with the command exit
Now copied keys folder to / usr / local / etc / openvpn with the command
cp-r keys / usr / local / etc / openvpn /
Before we start running the openvpn server we first prepare a file for the log. Please edit the file / etc / syslog.conf and add the following line at the bottom of the syslog.conf file.
! Openvpn
.* / Var / log / openvpn.log
then create the file and restart syslog openvpn.log ny
touch / var / log / openvpn.log
killall-HUP syslogd
Now we load the first module tun / tap tun device that could arise later.
kldload if_tun
kldload if_tap
if you find errors kldload: can not load if_tun: File exists mean tun or tap and it was too load so do not worry.
In order to tun and tap was loaded each time the boot please edit the file / boot / defaults / loader.conf then locate the following lines and change to YES
if_tap_load = "YES" # Ethernet tunnel software network interface
if_tun_load = "YES" # Tunnel driver (user process ppp)
Ok lah is now complete we are ready to run the OpenVPN server for the first time. To run OpenVPN please type the following command.
/ Usr / local / etc / rc.d / openvpn start
Next we check whether everything is ready or not we check first with the command ifconfig tun device
tun0: flags = 8051 mtu 1500
inet 10.8.0.1 -> 10.8.0.2 netmask 0xffffffff
Opened by PID 10147
If you've seen a display like the above means that the OpenVPN server is already successful path.
It remains to add the following rules for your pf.conf
# VPN Interface
vpn_if = "tun0"
# VPN Network
vpn_network = "10.8.0.0/24"
# NAT VPN connections
nat on $ ext_if from $ vpn_network to any -> ($ ext_if)
# Inbound VPN connections
pass in on $ ext_if proto udp from any to port 1194 keep state
pass quick on $ vpn_if

Hosting is a place or Internet service to create web pages that you created online and can be accessed by others. So, based on own experience of hosting, there is one thing to note in terms of renting a hosting for the site that we created, ie: note the true owner of the company's rental service provider hosting, about whether stable or not. Companies that are unstable, potentially aka "bankrupt" or going to close, more or less will cause instability of the sites we manage. For example it could cause problems of domain ownership, the problem of domain transfer process is complicated due to email "hostmaster" no man's land, and so on. Sure we'll hassle of having problems earlier. Therefore choose a company that is stable, although it may cost a little bit expensive. but we can avoide all risk with make own hosting a thome.
In this tutorial we will teach you make own hosting, what need for make it..?
PC for server specification.
ADSL modem with Internet connection Unlimited
XAMPP as Localhost
With the above assumptions infrastructure needs have been installed and an Internet connection Unlimited is the normal way we can make your own webhost with the help of XAMPP.
Now we begin to modify the modem configuration to make a pc that is connected to the adsl who we are as a server host needs as I mentioned above (www, ftp, telnet, etc.).
was logged into your Speedy ADSL Modem
speedy change in the modem connection, which was originally PPPoE / PPPoA (with user & password), Becoming Bridge Mode (without user & password)
Save your Modem Configuration. now to be able to get a dynamic ip from speedy, we switch to the connected PC with Speedy directly or connected through a hub.
open the Network Connection or by clicking Start - Settings - Control Panel - Network Connections
Then Make a PPP connection from your Windows to get a dynamic ip from speedy by clicking Create a new connections with your username and password Speedy
This will bring up Fields Username & Password, if you've followed the above correctly STEP 2, then the box that pops up will have been filled for his column username & password, now to do the connection, press CONNECT
When Speedy connection you two indicators will appear as shown below, and when the ipconfig via DOS, PC You Have 2 IP Address, which is Local IP (private IP) and IP from Speedy (public IP)
From the experiments above, your PC can now be made in servers that can be recognized the world directly, in the sense that can host many needs such as www, ftp, email, etc., for the above role is just as Bridging the modem (it has no IP and as a bridge your speedy internet connection)
Getting a dynamic DNS via DynDNS
DynDNS (Dynamic DNS) - www.dyndns.com is a provider for dynamic DNS and static IP as well as many Sub-Domain that can be used freely and FREE, in this article we will create a sub domain 'anda.subdomain.xxx' with subdomains are dozens of options already available in dyndns.com and periodically updating the domain to always recognize your speedy ip always change because it is dynamic, and supporting software.
Terms and How:
Your internet connection should already connected with your ISP
open this url in your browser: www.dyndns.com
or immediately wrote to create an account at: https://www.dyndns.com/account/create.html
do a confirmation via email before, and click on the url that is in it to activate your account.
when it is activated, your account will be activated immediately
dydns do log into the user + password before
click on the My Services located in upper right corner
menu, select Add Host Services (pl. circumference 1)
then click Add Dynamic DNS Host (pl. circumference 2)
A quick way to make by-pass numbers to 7-9 with a click / copy paste in browser: https://www.dyndns.com/account/services/hosts/dyndns/add.html
Example:
eg the hostname field: yourhost
then with the domain option: blogdns.net
some other setting? default (no change)
then click? Add Host
then the domain url address for your speedy is:
http://yourhost.blogdns.net/
NOTE:
Sub-Domain that you can make a sub-domain you forever
Sub-domains that you created earlier (http://yourhost.blogdns.net/) can not keep changing your ip on speedy unless you follow the last stage of which I will explain below, that will automatically update your dynamic ip with sub -domains at DynDNS
Updating DNS at DynDNS.com process
Updating DNS at DynDNS is very necessary, given ip Speedy you're a Dynamic IP (no IP)
In order to understand changes in the IP DynDNS always speedy, you need to update it regularly on his Web DynDNS, especially when the new modem at the switch, or other factors erosive change ip
To facilitate the process of Updating and updates AUTOMATICALLY, DynDNS has provided its support software provided by Free, which serves to lawyer-updatan automatically sub-domain with your speedy dynamic ip.
Follow the steps below and download the updater file:
https://www.dyndns.com/support/clients/ or here
extract is the file
install file
create groups
fill in your username and password there speedy, or click the Detect button to detect dialers account that you created above
then click OK until the application is closed, but be sure to try DynDNS icon is still there, wait a minute for about 5-10 seconds, to make connecting automatically DynDNS
enter the sub-domain that you created above with a choice of system DynDNS
Indicators:
Green tick you are successful
Check the yellow update process
Check your red failed

WiFi HotSpot As we know, hotspots or wireless internet access with standard 802.11b / g are not familiar stuff our ears, and when we go in public places like the Mall, Cafe, hotels and offices, with our easy to find the facility ..
Unfortunately not all providers offer wireless Internet facilities for free, or if free. extremely limited.
One of the protection used wireless service providers is to restrict Internet access based on MAC Address.
What is MAC Address?
In computer networking a Media Access Control address (MAC address) or Ethernet Hardware Address (EHA) or hardware address or adapter address is a quasi-unique identifier attached to most network adapters (NICs) ..
Okay so the conclusion MAC Address is a unique number that distinguishes each network device that is attached dikomputer us.
An example is the hotspot in hotel hilton. At hilton hotspot The Wireless Internet service providers, limiting the use of the Internet is free only for 3 hours, after that you can not access the Internet again, and would not be able to access again tomorrow. Type of protection used is MAC Address Filtering.
How to break through the protection with a MAC Address?
There is a very useful tool for anda.Tools was named K-MAC Download Dicini
With this tool you will be able to change your MAC-Address instantly and what does it mean? You can break the MAC Address Protection!. Each share of Internet access you run out in 3 hours, you need to do is change your MAC address, and do the connection.
I add more for info. WEP/WPA/WPA-2 cracking passwords using
programs are available in packages of OS backtrack
kismet
Kismet is a security tool that runs Linux, Kismet is used to eavesdrop on data traffic in the Internet network.
Aircrak-Aircrak-PTW PTW is a tool used to crack wireless protected. Each of these notebooks with different specs, so any way to use aircrack different.
One trick is also used to search for passwords which are used by someone to access hotspots that use prepaid cards.
Simple tool that prepared aja sih:
Software required:
1. Angry IP Scanner
2. Technitium MAC Address
Immediately wrote now to how:
# Find the location of the hotspot service provider, certainly in the area of affordable hotspot network is ..
# Turn on your laptop, and also turn on your wireless network and see the wireless network system tray icon, then right click and select view avalible wireless network, and of course after that you must connect to a wireless hotspot your destination.
# After connect, right click the system tray and select status> choose details tab> look there ip given to us. Write down the ip.
# Open the program AngryIP Scanner 2.21 and enter the ip range that we will scan (ip data used were we) at the top. For example: 135.125.1.13 IP that we can then enter the ip in the first column of our range in accordance with an earlier but instead of ip numbers at the end of the first to be 135.125.1.1 and the second column write the same but the number one end was replaced with 255 to 135 125 .1.255. result is 135.125.1.1 to 135.125.1.255 and click start (red button).
# After scanning then we'll get a live ip data connected with these hotspots. after scanning is complete then see the ip of the living (alive hosts) blue right click on the live ip ip Right-click on the blue color was right click> show> mac address and there will be a code mac address (mac addresses sometimes there does not appear, select Just the other ip). Write down the mac address that we get.
# Open the program Technitium MAC Address v5 release 3 which we have prepared. There is a mac address field. well now just change the mac address with which we got earlier and press change mac id.
# Wait for our mac will be replaced and a temporary connection and connect again automatically disconnected itself.
# Go to the firefox web browser, or anything goes. Enjoy Free Internet.
One thing to remember is that our system is the transfer of passenger data to hack an account that we had.
It can outsmart the status of hotspot login page enter it (to account). For example status and so go there it looks prepaid card code number and we simply keep track of, then logout and log back into the hotspot's login page quickly enter the password earlier. This will make us can directly access the Internet without a ride again (because that make us prepaid card code) so if anyone wants to login to use the card (which had a code) when you log in using the card of course he can not enter because prepaid cards.
"Already logged".
How about it, interesting is not it?
But I suggest, as I do is to ride alone, because I do not want to go too far, like the way I Tell to log off and log in again will surely make the owner can not log in. Request permission directly is also a possibility that had not refused, the origin of his interests is urgent.
For Ip Scanning can also use the application Dude, download it here, to determine the condition of the computers connect to the hotspot. Can be tried too ya ..
Hmm, i have some usefull tools again, check it.
WEP and WPA KeyGenerator
Wireless Key Generator
run it live programs generate,, and coffee directly into the network key. ...
Or also you used this application "wifi password finder"
seach it self in search engine :D, all this is just for learning, as long as we are still able to use the legal why not wrote. And this can also be used by the hotspot owner, if in this way can still be used to break into. So it needs more security.

Of course, we can use the system to plant two Dual Booting OS in one computer. But sometimes this method is less practical because more needs to be prepared such as set partitioning, manage files, etc.. In addition, if one day we already do not need a second OS, then the uninstall process was not easy. All too often ended up reformatting, and that means set the partitions and file again.
Actually, there is one practical solution to this, that is by using VirtualBox. With VirtualBox, you can as if making a new computer ( virtual machine ) and install it with the OS you want (Guest OS). More great again, you can run both at the same time, moving from guest to host and vice versa with ease. If it does not need anymore, you just delete it (remove) the virtual machine without a complex process.
Well, in this article I will explain about how to create a virtual machine using VirtualBox. Because many things to be explained, for convenience, so I split them up into several sections, namely: Download & installl Virtual Box, Virtual Machine http://www.blogger.com/img/blank.gifSetup & Guest OS, and the last is the setting. In this example, I will install WinXP in a virtual machine that will be created. As for his own VirtualBox I run across operating systems Win7. So, the Guest OS and Host OS = WinXP = Win7. Here are the steps:
DOWNLOAD & INSTALL VirtualBox
First download the installer once its in here . Select according to the type of OS you use.

1. After that run its installer file. Click Next> when VirtualBox Setup Wizard appears.
2. Then you can choose the installation location. Click Next> to continue.
3.Choose anywhere you want a shortcut is created, then click Next>
4. Usually will appear warning that the connection to the network is disconnected while on during the installation process. Just click Next>.
5. Click Install to begin the installation process.
6. If UAC appears, click Yes.
7. Up here you've managed to install VirtualBox. Click Finish to run the VirtualBox program
VIRTUAL MACHINE SETUP
Next you need to do is make her a virtual machine. Click New on VirtualBox Manager to get started. You will be greeted by the New Virtual Machine Wizard. Click Next to continue. Here you will choose what type of OS you want to install as guest OS. In this example we will install WinXP. Click Next when done select the type of OS. You can determine how much memory (RAM) for the virtual machine later. Move the slider to the desired number, then click Next.For the first time, make sure you men-centang/contreng Boot Hard Disk and also select Create new hard disk, If so, click Next. Next you will go to the Create New Virtual Disk Wizard. Click Next to continue. You can choose whether the size of virtual hard disk later this magnitude can change or always remain. For savings should you choose a dynamically expanding storage. Click Next if you have selected. Here you can choose the location where the virtual hard disk will be created, it also determines the maximum size hard disk (hard disk maximum size). VirtualBox by default suggested size is 10 G. But you also can set smaller as long as you believe that size is sufficient for your needs later. Click Next. This is a Summary of the Create New Virtual Disk Wizard. Click Finish. It appears that you already have a virtual machine called WinXP, although it is still empty. Now the next task is to fill this virtual machine with the Guest OS. Double-click on the entry to start WinXP.
You will be greeted by First Run Wizard. Just click Next.Here you will select the media you will use as a source installation. In this example I use WinXP CD (bootable of course), which I enter into Drive E (DVD ROM). If so, click Next. This is a Summary of the First Run Wizard. It's good here you have prepared her to drive installer that you selected earlier. Click Finish to begin the installation process. Display WinXP installation will start out. Press Enter to continue. Select Format the partition using the NTFS file system, then press Enter. Please wait until the WinXP installation process is complete.
Congratulations, you now have a WinXP Guest OS on your virtual machine! Before you start "playing around" with this new virtual machine it's good to do some changes to the settings used to make you more comfortable in using it later. Some settings require the virtual machine in a non-active, some can only be done in the Guest OS Safe Mode. Thus, to present first shutdown the Guest OS you.
SETTING UP PROCCESS
This time will discuss about some important settings of your order the more comfortable in using your virtual machine. Make sure your virtual machine is turned off (powered off), then double-click to turn on and be prepared to press F8 as we will go into Safe Mode.

Choose Safe Mode, then Enter twice.
After entering Safe Mode, click Yes to close the window notification.
In the VirtualBox menu, select Devices -> Install Guest Additions.
It would appear the Windows Explorer . Double-click VBoxWindowsAdditions.
You will be greeted by the VirtualBox Guest Additions Setup Wizard. Click Next> to continue.
Select the installation location and click Next>.
If you plan to run an application in the Guest OS that require Direct3D (games for example), then make sure the Direct3D Support selected. If you already click Install.
Guest Additions installation process was completed. Click OK.
Click Finish to restart and get into WinXP as normal.
Next we'll create a Shared Folders. Usefulness is as a place to exchange (transfer) files between Guest and Host. The trick is to select Devices -> Shared Folders.
Click the Add button on the right side of the window.
In the Folder Path, select Other.
Specify the folder where you want shared.
Then select Auto-mount that folder directly at-shared automatically at startup.
Rekapnya be seen here. You also can create more than one Shared Folders if you wish. Click OK to finish.
Shared Folders will only begin to be used if you have to restart. But for now the Guest OS shutdown before you because we will make changes in the last settings via VirtualBox Manager.
Click Settings on the menu VirtualBox Manager.
Select the System tab on the left. Well here you can make settings memory (RAM) and also the Boot Order. In order for fast booting, select Hard Disk as the Boot Order first priority.
Select the Display tab and you can change the amount of Video Memory (VGA Card) and also activate the Enable 3D Acceleration feature. Click OK if it is.
Next run the virtual machine again. After entering Windows, try running Explorer. It appears that the Shared Folders now can be accessed.
Applications that can not be opened in Win7 are now able to run.
an explanation of the technical steps to create a virtual machine and its installation with the Guest OS using VirtualBox. In this way, we seemed to have a "new computer" is ready to run. In the world of IT, many benefits to be gained by using this VirtualBox. A Java programmer who want to create a multi-platform applications, can use VirtualBox to test programs in various OS (Windows, Mac, Linux, FreeBSD, etc.).
Or someone who is studying to be a hacker, usually also will create a virtual machine to test the efficacy of scripts or artificial virus, without having to worry about major OS that is being used also infected. You can also experiment with VirtualBox it suits your needs.

Motherboard won't work properly problem is most likely a software one and NOT a hardware problem. You should, of course, check that all the cooling fans are working (especially the ones on the processor and the video card) in case overheating is a problem. If you have two or more sticks of RAM which are from different manufacturers you could try using them one at a time in case a RAM mismatch is causing the problem. But other than that the only real way to see if it's a software or a hardware problem is to try running it with a fresh, clean installation of Windows.
Extra storage space is always worth having and they're quite inexpensive. Swap your current drive out, put the new one in, and load Windows onto it. If all runs fine you know for certain that the problem is in your original Windows installation. If not you've got a second hard drive to use once you track down the hardware problem and fix it!
if the machine won't start afterwards you've got clues to where the problem lies. Remove the recently added device or component and try again. If it still won't start have a good look inside to ensure you haven't dislodged or damaged some other component while you were working in there. Make sure everything is firmly in place.
When you make changes to the hardware of a PC you need to physically reset the CMOS memory, either by 'shorting' a jumper on the mainboard or by removing the CMOS battery and waiting several minutes at least before replacing it. A vast number of instances where machines won't start up are simply the result of changes made without resetting CMOS afterwards.
Modern ATX motherboards still have power running through them after Windows has been shut down! You must either switch off at the wall outlet or remove the power cord before opening it up to perform internal work. Damage to components can ensue if you make hardware changes when the motherboard is still receiving power.
Even without a hard drive fitted, your machine should run the Power On Self Test. If it doesn't, then it is either incorrectly assembled or it contains a faulty component. You should be getting the memory check, the device detection information, and perhaps an 'Operating System not found" message.
although PCs are quite easy to assemble, putting the whole thing together before trying it to see if it works is far from the ideal approach. If the entire PC is fully assembled, tracking down the reason for the failure can become a nightmare. The 'bare bones' approach is far better when assembling, and far better when troubleshooting. If your system is already fully assembled, go back several steps and try again.
The 'bare bones' PC contains only the following components:
- Motherboard
- Processor
- Processor heatsink/fan unit, connected to power
- A video card if there is no onboard video available
- One RAM module (unless the RAM is of a type which requires installing in pairs. 'Dual channel' RAM is NOT such a type!)
- The front panel connectors for Power Switch, Power LED and case speaker attached to the motherboard
- The ATX connector connected and supplying power to the motherboard. - The P4 power connector attached also if required. A molex connector attached to the display card if required.
That's it. Attach monitor and keyboard and see if it'll POST. Reset CMOS and try again if it doesn't. If you are building a new system stop at this point and try it out. If you're troubleshooting a fully assembled PC strip it back to this point and try!
If the PC won't POST in this configuration you need to determine why before proceeding:
*check power switch and LED connectors. If they are reversed the system won't start
* check that the processor is correctly fitted
* try a different RAM module
* ensure that the display card is correcxtly seated.
* get a technician to check it over if you can't locate the cause
Once the 'bare bones' system is operational, add other components one by one. Try starting the machine after every addition to check that it will still POST. This is the ONLY procedure by which you can adequately and effectively troubleshoot where a hardware problem lies.
'Other components' includes additional RAM modules, add in cards, drives, etc.
If your are troubleshooting a system which has already had Windows installed to a hard drive, add that drive last so that the system doesn't continually try to boot into Windows.
If you strike problems and need to post a new thread about your problem, include the following information:
* Identification details (make and model) of all components
* Full details of any onscreen error messages
* Full description of any BIOS 'beep' codes emitted through the internal speaker.
Windows Firewall API is intended for situations in which a software application or setup program must operate with adjustments to the configuration of the networking environment in which it runs. For example, a service that needs to receive unsolicited traffic can use this API to create exceptions that allow the unsolicited traffic.
Windows Firewall API is designed for use by programmers using C/C++, Microsoft Visual Basic development system, Visual Basic Scripting Edition, and JScript development software. Programmers should be familiar with networking concepts such as stateful packet filtering, TCP/IP protocol concepts, and network address translation (NAT).
Windows Firewall API is supported on Windows XP with Service Pack 2 (SP2). For more specific information about which operating systems support a particular programming element, refer to the Requirements sections in the documentation.
[Internet Connection Firewall may be altered or unavailable in subsequent versions. Instead, use the Windows Firewall API.
The following VBScript code first determines if Internet Connection Sharing and Internet Connection Firewall are available on the local computer. If so, the code enumerates the connections on the local computer, and enables Internet Connection Firewall on the connection that is specified as a command line argument.
' Copyright (c) Microsoft Corporation. All rights reserved.
OPTION EXPLICIT
DIM ICSSC_DEFAULT, CONNECTION_PUBLIC, CONNECTION_PRIVATE, CONNECTION_ALL
DIM NetSharingManager
DIM PublicConnection, PrivateConnection
DIM EveryConnectionCollection
DIM objArgs
DIM con
ICSSC_DEFAULT = 0
CONNECTION_PUBLIC = 0
CONNECTION_PRIVATE = 1
CONNECTION_ALL = 2
Main( )
sub Main( )
Set objArgs = WScript.Arguments
if objArgs.Count = 1 then
con = objArgs(0)
WScript.Echo con
if Initialize() = TRUE then
GetConnectionObjects()
FirewallTestByName(con)
end if
else
DIM szMsg
szMsg = "Invalid usage! Please provide the name of the connection as the argument." & chr(13) & chr(13) & _
"Usage:" & chr(13) & _
" " + WScript.scriptname + " " + chr(34) + "Connection Name" + chr(34)
WScript.Echo( szMsg )
end if
end sub
sub FirewallTestByName(conName)
on error resume next
DIM Item
DIM EveryConnection
DIM objNCProps
DIM szMsg
DIM bFound
bFound = false
for each Item in EveryConnectionCollection
set EveryConnection = NetSharingManager.INetSharingConfigurationForINetConnection(Item)
set objNCProps = NetSharingManager.NetConnectionProps(Item)
if (ucase(conName) = ucase(objNCProps.Name)) then
szMsg = "Enabling Firwall on connection:" & chr(13) & _
"Name: " & objNCProps.Name & chr(13) & _
"Guid: " & objNCProps.Guid & chr(13) & _
"DeviceName: " & objNCProps.DeviceName & chr(13) & _
"Status: " & objNCProps.Status & chr(13) & _
"MediaType: " & objNCProps.MediaType
WScript.Echo(szMsg)
bFound = true
EveryConnection.EnableInternetFirewall
exit for
end if
next
if( bFound = false ) then
WScript.Echo( "Connection " & chr(34) & conName & chr(34) & " was not found" )
end if
end sub
function Initialize()
DIM bReturn
bReturn = FALSE
set NetSharingManager = Wscript.CreateObject("HNetCfg.HNetShare.1")
if (IsObject(NetSharingManager)) = FALSE then
Wscript.Echo("Unable to get the HNetCfg.HnetShare.1 object")
else
if (IsNull(NetSharingManager.SharingInstalled) = TRUE) then
Wscript.Echo("Sharing isn't available on this platform.")
else
bReturn = TRUE
end if
end if
Initialize = bReturn
end function
function GetConnectionObjects()
DIM bReturn
DIM Item
bReturn = TRUE
if GetConnection(CONNECTION_PUBLIC) = FALSE then
bReturn = FALSE
end if
if GetConnection(CONNECTION_PRIVATE) = FALSE then
bReturn = FALSE
end if
if GetConnection(CONNECTION_ALL) = FALSE then
bReturn = FALSE
end if
GetConnectionObjects = bReturn
end function
function GetConnection(CONNECTION_TYPE)
DIM bReturn
DIM Connection
DIM Item
bReturn = TRUE
if (CONNECTION_PUBLIC = CONNECTION_TYPE) then
set Connection = NetSharingManager.EnumPublicConnections(ICSSC_DEFAULT)
if (Connection.Count > 0) and (Connection.Count < 2) then
for each Item in Connection
set PublicConnection = NetSharingManager.INetSharingConfigurationForINetConnection(Item)
next
else
bReturn = FALSE
end if
elseif (CONNECTION_PRIVATE = CONNECTION_TYPE) then
set Connection = NetSharingManager.EnumPrivateConnections(ICSSC_DEFAULT)
if (Connection.Count > 0) and (Connection.Count < 2) then
for each Item in Connection
set PrivateConnection = NetSharingManager.INetSharingConfigurationForINetConnection(Item)
next
else
bReturn = FALSE
end if
elseif (CONNECTION_ALL = CONNECTION_TYPE) then
set Connection = NetSharingManager.EnumEveryConnection
if (Connection.Count > 0) then
set EveryConnectionCollection = Connection
else
bReturn = FALSE
end if
else
bReturn = FALSE
end if
if (TRUE = bReturn) then
if (Connection.Count = 0) then
Wscript.Echo("No " + CStr(ConvertConnectionTypeToString(CONNECTION_TYPE)) + " connections exist (Connection.Count gave us 0)")
bReturn = FALSE
'valid to have more than 1 connection returned from EnumEveryConnection
elseif (Connection.Count > 1) and (CONNECTION_ALL <> CONNECTION_TYPE) then
Wscript.Echo("ERROR: There was more than one " + ConvertConnectionTypeToString(CONNECTION_TYPE) + " connection (" + CStr(Connection.Count) + ")")
bReturn = FALSE
end if
end if
Wscript.Echo(CStr(Connection.Count) + " objects for connection type " + ConvertConnectionTypeToString(CONNECTION_TYPE))
GetConnection = bReturn
end function
function ConvertConnectionTypeToString(ConnectionID)
DIM ConnectionString
if (ConnectionID = CONNECTION_PUBLIC) then
ConnectionString = "public"
elseif (ConnectionID = CONNECTION_PRIVATE) then
ConnectionString = "private"
elseif (ConnectionID = CONNECTION_ALL) then
ConnectionString = "all"
else
ConnectionString = "Unknown: " + CStr(ConnectionID)
end if
ConvertConnectionTypeToString = ConnectionString
end function

In this tutorial we are going to learn how to install any given Android application in Android emulator. i will help you to setup the android 1.1 and 1.5 emulator.
You must have java installed on your machine before installing the Android emulator.
Install Java from here: Go to java.com and install to java.
If you already installed java or recently then you must know that the version of Java installed on your machine is correct or not.
Test installed java from here: Go java.com to check whether you have correct version of java installed or not. If you fine that correct version is not installed then follow the instruction provided in page and install the correct version of java.
After completion of java installation successfully follow below steps to install the Android emulator.
download the android emulator
Android emulator comes with Android sdk.You can download latest sdk from:android.com
How to install android emulator
Downloaded android sdk will be in compressed format.Uncompressed it to the desired location [e.g. C:\Emulator]and you are done.
Android sdk commands for emulator
Launch the command prompt: Start>Run>Cmd.Locate the emulator.exe path where the android got installed, in this case go to C:\Emulator directory and navigate to tools directory e.g:C:\Emulator\Android\android-sdk-windows-1.5_r2\tools where emulator.exe is present.Navigate to tools directory path in command prompt like shown below.
Type: Emulator.exe -help and execute it. You will find the list of the useful commands related to emulator usage.
* Type: Android -h and execute it. You will find the list of the useful commands related to Android usage.
android virtual device
Android virtual device is the emulator that we are going to create based on the specific platform of android
.E.g. Android1.1, Abdroid1.5, Android2.0 etc.
* Type: Emulator.exe -help-virtual-device and execute it for more information about android virtual device.
setup the Android virtual device
This is the command format to create the android virtual device: android create avd -n [UserDefinedNameHere] -t [1 or 2 or 3 etc. based on which android platform you want to create]
* If you want to create android virtual device based on Android1.1 platform then type:android create avd -n MyAndroid1 -t 1
* If you want to create android virtual device based on Android1.5 platform then type:android create avd -n MyAndroid2 -t 2
* After executing one of the above command you will be prompted for the message like below to create custom hardware profile. Type no if you don't want to create custom hardware profile.
* Now after successful setup of android virtual device you will be prompted message like this depending on what platform android virtual device is created:"Created AVD 'MyAndroid1' based on Android1.1 or Created AVD 'MyAndroid2' based on Android1.5"
list of created android virtual devices
Type: Android list avd : This command will display the list of the created android virtual devices as shown in below screen shot.
launch created android virtual device or emulator
A: Type:emulator.exe -avd [name of the emulator created] : In our case type:emulator.exe -avd MyAndroid1 or emulator.exe -avd MyAndroid2
Now you can see the emulator launched as below. Wait some time to get it initialized , ignore any error message if it appears if it is not blocking,It will also get the Internet connection automatically so you do not need to do anything to surf Internet in emulator. Now you are ready to start you application on emulator !
But fear not good people of the internet! There is hope on the horizon yet. Lucky for all of us there are more people with great ideas and ambition trying to solve the riddles than there are riddle masters holding us back. Thanks to these internet superheroes much of the mystery that shrouds effective search engine marketing has been lifted, and what we are left with is a much clearer picture of what works and what does not.
Choose the Right Blog Software, The right blog CMS makes a big difference. If you want to set yourself apart, I recommend creating a custom blog solution - one that can be completely customized to your users. In most cases, WordPress, Blogger, MovableType or Typepad will suffice, but building from scratch allows you to be very creative with functionality and formatting. The best CMS is something that's easy for the writer(s) to use and brings together the features that allow the blog to flourish. Think about how you want comments, archiving, sub-pages, categorization, multiple feeds and user accounts to operate in order to narrow down your choices. OpenSourceCMS is a very good tool to help you select a software if you go that route.
Host Your Blog Directly on Your Domain, Hosting your blog on a different domain from your primary site is one of the worst mistakes you can make. A blog on your domain can attract links, attention, publicity, trust and search rankings - by keeping the blog on a separate domain, you shoot yourself in the foot. From worst to best, your options are - Hosted (on a solution like Blogspot or Wordpress), on a unique domain (at least you can 301 it in the future), on a subdomain (these can be treated as unique from the primary domain by the engines) and as a sub-section of the primary domain (in a subfolder or page - this is the best solution).
Write Title Tags with Two Audiences in Mind, First and foremost, you're writing a title tag for the people who will visit your site or have a subscription to your feed. Title tags that are short, snappy, on-topic and catchy are imperative. You also want to think about search engines when you title your posts, since the engines can help to drive traffic to your blog. A great way to do this is to write the post and the title first, then run a few searches at Overture, WordTracker & KeywordDiscovery to see if there is a phrasing or ordering that can better help you to target "searched for" terms.
Participate at Related Forums & Blogs, Whatever industry or niche you're in, there are bloggers, forums and an online community that's already active. Depending on the specificity of your focus, you may need to think one or two levels broader than your own content to find a large community, but with the size of the participatory web today, even the highly specialized content areas receive attention. A great way to find out who these people are is to use Technorati to conduct searches, then sort by number of links (authority). Del.icio.us tags are also very useful in this process, as are straight searches at the engines (Ask.com's blog search in particular is of very good quality).
Tag Your Content, Technorati is the first place that you should be tagging posts. I actually recommend having the tags right on your page, pointing to the Technorati searches that you're targeting. There are other good places to ping - del.icio.us and Flickr being the two most obvious (the only other one is Blogmarks, which is much smaller). Tagging content can also be valuable to help give you a "bump" towards getting traffic from big sites like Reddit, Digg & StumbleUpon (which requires that you download the toolbar, but trust me - it's worth it). You DO NOT want to submit every post to these sites, but that one out of twenty (see tactic #18) is worth your while.
Launch Without Comments, There's something sad about a blog with 0 comments on every post. It feels dead, empty and unpopular. Luckily, there's an easy solution - don't offer the ability to post comments on the blog and no one will know that you only get 20 uniques a day. Once you're upwards of 100 RSS subscribers and/or 750 unique visitors per day, you can open up the comments and see light activity. Comments are often how tech-savvy new visitors judge the popularity of a site (and thus, its worth), so play to your strengths and keep your obscurity private.
Don't Jump on the Bandwagon, Some memes are worthy of being talked about by every blogger in the space, but most aren't. Just because there's huge news in your industry or niche DOES NOT mean you need to be covering it, or even mentioning it (though it can be valuable to link to it as an aside, just to integrate a shared experience into your unique content). Many of the best blogs online DO talk about the big trends - this is because they're already popular, established and are counted on to be a source of news for the community. If you're launching a new blog, you need to show people in your space that you can offer something unique, different and valuable - not just the same story from your point of view. This is less important in spaces where there are very few bloggers and little online coverage and much more in spaces that are overwhelmed with blogs (like search, or anything else tech-related).
Link Intelligently, When you link out in your blog posts, use convention where applicable and creativity when warranted, but be aware of how the links you serve are part of the content you provide. Not every issue you discuss or site you mention needs a link, but there's a fine line between overlinking and underlinking. The best advice I can give is to think of the post from the standpoint of a relatively uninformed reader. If you mention Wikipedia, everyone is familiar and no link is required. If you mention a specific page at Wikipedia, a link is necessary and important. Also, be aware that quoting other bloggers or online sources (or even discussing their ideas) without linking to them is considered bad etiquette and can earn you scorn that could cost you links from those sources in the future. It's almost always better to be over-generous with links than under-generous. And link condoms? Only use them when you're linking to something you find truly distasteful or have serious apprehension about.
Invite Guest Bloggers, Asking a well known personality in your niche to contribute a short blog on their subject of expertise is a great way to grow the value and reach of your blog. You not only flatter the person by acknowledging their celebrity, you nearly guarantee yourself a link or at least an association with a brand that can earn you readers. Just be sure that you really are getting a quality post from someone that's as close to universally popular and admired as possible (unless you want to start playing the drama linkbait game, which I personally abhor). If you're already somewhat popular, it can often be valuable to look outside your space and bring in guest authors who have a very unique angle or subject matter to help spice up your focus. One note about guest bloggers - make sure they agree to have their work edited by you before it's posted. A disagreement on this subject after the fact can have negative ramifications.
Eschew Advertising, Usually, I ignore adsense, but I also cast a sharp eye towards the quality of the posts and professionalism of the content when I see AdSense. That's not to say that contextual advertising can't work well in some blogs, but it needs to be well integrated into the design and layout to help defer criticism. Don't get me wrong - it's unfair to judge a blog by its cover (or, in this case, its ads), but spend a lot of time surfing blogs and you'll have the same impression - low quality blogs run AdSense and many high quality ones don't. I always recommend that whether personal or professional, you wait until your blog has achieved a level of success before you start advertising. Ads, whether they're sponsorships, banners, contextual or other, tend to have a direct, negative impact on the number of readers who subscribe, add to favorites and link - you definitely don't want that limitation while you're still trying to get established.
Go Beyond Text in Your Posts, Blogs that contain nothing but line after line of text are more difficult to read and less consistently interesting than those that offer images, interactive elements, the occasional multimedia content and some clever charts & graphs. Even if you're having a tough time with non-text content, think about how you can format the text using blockquotes, indentation, bullet points, etc. to create a more visually appealing and digestible block of content.
Cover Topics that Need Attention, In every niche, there are certain topics and questions that are frequently asked or pondered, but rarely have definitive answers. While this recommendation applies to nearly every content-based site, it's particularly easy to leverage with a blog. If everyone in the online Nascar forums is wondering about the components and cost of an average Nascar vehicle - give it to them. If the online stock trading industry is rife with questions about the best performing stocks after a terrorist threat, your path is clear. Spend the time and effort to research, document and deliver and you're virtually guaranteed link-worthy content that will attract new visitors and subscribers.
Pay Attention to Your Analytics, Visitor tracking software can tell you which posts your audience likes best, which ones don't get viewed and how the search engines are delivering traffic. Use these clues to react and improve your strategies. Feedburner is great for RSS and I'm a personal fan of Indextools. Consider adding action tracking to your blog, so you can see what sources of traffic are bringing the best quality visitors (in terms of time spent on the site, # of page views, etc). I particularly like having the "register" link tagged for analytics so I can see what percentage of visitors from each source is interested enough to want to leave a comment or create an account.
Use a Human Voice, Charisma is a valuable quality, both online and off. Through a blog, it's most often judged by the voice you present to your users. People like empathy, compassion, authority and honesty. Keep these in the forefront of your mind when writing and you'll be in a good position to succeed. It's also critical that you maintain a level of humility in your blogging and stick to your roots. When users start to feel that a blog is taking itself too seriously or losing the characteristics that made it unique, they start to seek new places for content. We've certainly made mistakes (even recently) that have cost us some fans - be cautious to control not only what you say, but how you say it. Lastly - if there's a hot button issue that has you posting emotionally, temper it by letting the post sit in draft mode for an hour or two, re-reading it and considering any revisions. With the advent of feeds, once you publish, there's no going back.
Archive Effectively, The best archives are carefully organized into subjects and date ranges. For search traffic (particularly long tail terms), it can be best to offer the full content of every post in a category on the archive pages, but from a usability standpoint, just linking to each post is far better (possibly with a very short snippet). Balance these two issues and make the decision based on your goals. A last note on archiving - pagination in blogging can be harmful to search traffic, rather than beneficial (as you provide constantly changing, duplicate content pages). Pagination is great for users who scroll to the bottom and want to see more, though, so consider putting a "noindex" in the meta tag or in the robots.txt file to keep spiders where they belong - in the well-organized archive system.
Implement Smart URLs, The best URL structure for blogs is, in my opinion, as short as possible while still containing enough information to make an educated guess about the content you'll find on the page. I don't like the 10 hyphen, lengthy blog titles that are the byproduct of many CMS plugins, but they are certainly better than any dynamic parameters in the URL. Yes - I know I'm not walking the talk here, and hopefully it's something we can fix in the near future. To those who say that one dynamic parameter in the URL doesn't hurt, I'd take issue - just re-writing a ?ID=450 to /450 has improved search traffic considerably on several blogs we've worked with.
Reveal as Much as Possible, The blogosphere is in love with the idea of an open source world on the web. Sharing vast stores of what might ordinarily be considered private information is the rule, rather than the exception. If you can offer content that's usually private - trade secrets, pricing, contract issues, and even the occasional harmless rumor, your blog can benefit. Make a decision about what's off-limits and how far you can go and then push right up to that limit in order to see the best possible effects. Your community will reward you with links and traffic.
Only One Post in Twenty Can Be Linkbait, Not every post is worthy of making it to the top of Digg, Del.icio.us/popular or even a mention at some other blogs in your space. Trying to over-market every post you write will result in pushback and ultimately lead to negative opinions about your efforts. The less popular your blog is, the harder it will be to build excitement around a post, but the process of linkbait has always been trial and error - build, test, refine and re-build. Keep creating great ideas and bolstering them with lots of solid, everyday content and you'll eventually be big enough to where one out of every 20-40 posts really does become linkbait.
Make Effective Use of High Traffic Days, If you do have linkbait, whether by design or by accident, make sure to capitalize. When you hit the front page of Digg, Reddit, Boing Boing, or, on a smaller scale, attract a couple hundred visitors from a bigger blog or site in your space, you need to put your best foot forward. Make sure to follow up on a high traffic time period with 2-3 high quality posts that show off your skills as a writer, your depth of understanding and let visitors know that this is content they should be sticking around to see more of. Nothing kills the potential linkbait "bump" faster than a blog whose content doesn't update for 48 hours after they've received a huge influx of visitors.
Create Expectations and Fulfill Them, When you're writing for your audience, your content focus, post timing and areas of interest will all become associated with your personal style. If you vary widely from that style, you risk alienating folks who've come to know you and rely on you for specific data. Thus, if you build a blog around the idea of being an analytical expert in your field, don't ignore the latest release of industry figures only to chat about an emotional issue - deliver what your readers expect of you and crunch the numbers. This applies equally well to post frequency - if your blog regularly churns out 2 posts a day, having two weeks with only 4 posts is going to have an adverse impact on traffic. That's not to say you can't take a vacation, but you need to schedule it wisely and be prepared to lose RSS subscribers and regulars. It's not fair, but it's the truth. We lose visitors every time I attend an SES conference and drop to one post every two days.
Build a Brand, Possibly one of the most important aspects of all in blogging is brand-building. As Zefrank noted, to be a great brand, you need to be a brand that people want to associate themselves with and a brand that people feel they derive value from being a member. Exclusivity, insider jokes, emails with regulars, the occasional cat post and references to your previous experiences can be off putting for new readers, but they're solid gold for keeping your loyal base feeling good about their brand experience with you. Be careful to stick to your brand - once you have a definition that people like and are comfortable with, it's very hard to break that mold without severe repercussions. If you're building a new blog, or building a low-traffic one, I highly recommend writing down the goals of your brand and the attributes of its identity to help remind you as you write.
Best of luck to all you bloggers out there. It's an increasingly crowded field to play in, but these strategies should help to give you an edge over the competition. As always, if you've got additions or disagreements, I'd love to hear them.


