Tampilkan postingan dengan label Utility. Tampilkan semua postingan
Tampilkan postingan dengan label Utility. Tampilkan semua postingan
 You ever felt disappointed after downloading an e-book as the e-book you've downloaded have password attached and you can't modify it? We must be annoyed when we have to type the password first before we open the PDF file. Sometimes we must use the bad ways to remove the PDF password. And there are a few PDF Password Remover Tool that can help use to remove PDF password. First, we must know the password protection that attached, so we don't get me wrong.
There are two types of protections in PDF which is,
- User password – Password to open the PDF file
- Owner Password – Password to print, copy, modify the PDF file
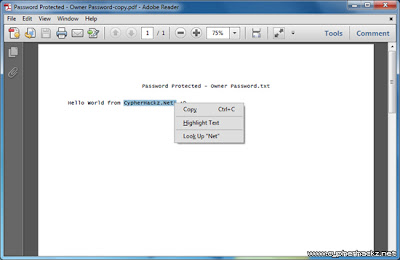
However if the PDF file is using Owner Password, this tool will decrypt and remove the password so you can print, copy, and make changes to the document.
PDF Password Remover Tool
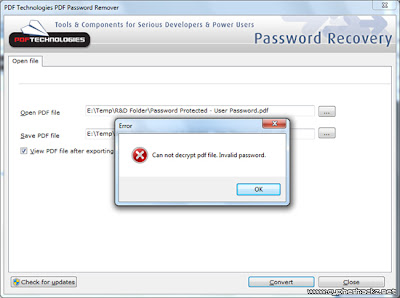
PDF Password Remover Tool is a freeware PDF password recovery that will decrypt the Owner Password and remove it from the PDF file. I’ve tested this software and it works perfectly.If you want to remove the User Password, this tool will popup an alert saying ‘Cannot decrypt pdf file. Incorrect password.’ as shown in the image below.
But if the e-book PDF file is using Owner Password, the password removal software will able to remove it, and save a new copy which allows you to print, copy and modify the document content.
PDF Password Remover Tool is free for personal use. Please use this software to remove passwords from PDF files of yours. It was developed to help you recover PDF files in cases where you forget the owner passwords you once set and can no longer remember. Don't use this removal tool to infringe the PDF ebook copyright or etc. Read our other similar article about how to convert word doc to PDF file. Hope this tutorial can solve your problem :)
Backing up your computer is an important thing to us who love to store data. There are many methods about backing up your computers data. The most ancient things is backing up our data and store it to our CD(Compact Disk) and DVD. Please forget about it, because now there is a new technology for backing up your data that called online backup. For a beginner in online backup, we may have trouble in choosing the perfect place to store our data. Don’t worry, the WPDesigner has been experienced in this. They already know the top online backup. The top 3 of them.
The 3 of them are myPCbackup.com, carbonite.com and mozy. There is no doubt about their reputation. Online backup is the safest and practical way of storing data, because you don’t require to have a physical drive like CD, DVD or external harddisk to restore your backups from. Even if your house or your office burns down, you can get a new computer, connect it to the internet and restore your files from another place, whenever and anywhere. That might not seem like a good things about your house is burns down. It’s just for emergencies.
So, decide it immediately which one would you choose as your data storage. Just leave the old way that will bother you. The price we pay is worth with what we get.
READ MORE
The 3 of them are myPCbackup.com, carbonite.com and mozy. There is no doubt about their reputation. Online backup is the safest and practical way of storing data, because you don’t require to have a physical drive like CD, DVD or external harddisk to restore your backups from. Even if your house or your office burns down, you can get a new computer, connect it to the internet and restore your files from another place, whenever and anywhere. That might not seem like a good things about your house is burns down. It’s just for emergencies.
So, decide it immediately which one would you choose as your data storage. Just leave the old way that will bother you. The price we pay is worth with what we get.

Internet Speed Booster is an easy way to speed up your internet connection. With Internet Speed Booster you can speed up your internet connection, utilize your memory, utilize your internet connection and change your windows settings. The main window consists of the following items: Speed Booster, Net Pinger, Ram Booster and System Settings. Speed Booster contais Wizard mode, Advanced mode, and Backup manager. Net Pinger contains settings Pingr. Ram Booster consists of Ram System status and configuration. System Settings contains Internet properties, System Settings, Modem Settings and Network Settings. To speed up your connection just choose one of the default connection settings and click the Optimize Now. In Backup manager every time you change your program settings will keep your old settings. You can select the backup file you want to restore or delete. PING utility helps you keep getting your modem connection is disconnected by the service provider. Most Internet Service Providers Disconnect users after a fixed period of modem activity. Ram Booster System Status option allows you to monitor your system resources. And you can optimize memory with one click. You can adjust the ram booster settings from Ram Configuration form Ram Booster. All the tools you need to be efficient on the Web! Improve and optimize your Internet connection speed with this set of tools. Net Pinger prevents you from being disconnected from your ISP. Speed Booster how to optimize your PC to send and receive data over the Internet. RAM Booster allows you to free physical memory or RAM on your PC
To complete the writing of tricks internet connection, here I inform a program that can optimize your internet connection speed be it with a usb modem phone modem, or modem and other connections. This software is the Internet Speed Booster, a free program developed by Onestopsoft. Internet Speed Booster offers some functionality in it, namely the Speed Booster, Net Pinger, Ram Booster and.
Speed Booster.
Speed Booster optimizes your Windows system function in terms of data transfer (upload and download). Optimization here is almost the same with some software that had previously informed me (TCPSpeed, TCP / IP Optimizer, FullSpeed, SpeedConnect, and some other software).
To optimize the speed of internet connections with Speed Booster can be in two ways: the Wizard mode and Normal mode. In Wizard mode is already available optimalisasinya choice, we just select one and execute the Optimize Now button.
A second way to Normal mode, for this way, we will do the setup in a few steps (a total of 8 steps), start by selecting a type of Internet connection that we use. If we are confused fill it, do not worry, because this software will give you the option with the default answer, so stay just follow the process (unless we want to change it).
Net Pinger
Function Net Pinger is anticipating that the connection is lost (usually if you open a web page, and do not perform any activity within a certain time then the connection we would stop / cut off), Net Pinger is almost the same function as the Connection Keeper.
To enable Net Pinger, simply by checking the Enable Pinger, while for the choice of configuration (Configuration), we can choose the Automatic Mode (every one minute to ping), or Manual Mode (you set yourself how long the time interval to ping)
Ram Boosterhttp://www.blogger.com/img/blank.gif
From the name Ram Booster've seen that here serves to optimize memory usage in our PC. In the menu there are 2 Ram Booster menu options, namely the System status that indicates the use of our computer processor and memory in the form of real-time graph and the Ram Config governing the use (optimize) the existing resources automatically.
Internet Speed Booster can be run automatically when you enter Windows and run it in the System tray (bottom right corner of the monitor), by selecting Settings. Mark Run Main Courses Pls Windows start-up and Run program in system tray.
download here

Windows 7 not only attracted much attention from the press as a high-tech, but also there are many new interface changes, such as the redesigned taskbar, new file management features, libraries and others. Several tools have been enhanced which is then included with the OS. Here we discuss 10 of the best tools windows 7 which makes the job easier computing.
1. Action Center
Centralized management is hot in Windows 7 and gives you one-stop shopping site where you can take care of security, troubleshooting, and recovery, rather than searching for an applet for each part. Everything is combined in an easy to use Control Panel, where you get a maintenance and safety messages and can view performance information, change the UAC settings, and more.
This is a development from the Security Center in Windows Vista. It makes sense to combine the security settings, system maintenance, and recovery. Action Center has emerged as an icon in the system tray, which displays a red X symbol if there is a problem that needs you are looking for.
2. Problem Steps Recorder
One of the coolest new tool in Windows 7 is the Problem Steps Recorder (PSR), mainly to provide technical support to users of Windows. No matter how hard they try, but users often have problems to accurately describe their problem and steps they take before or after the experience. Sure, Remote Assistance can be a blessing in this situation. But we can not always connect to a user's computer in real time. That's when PSR come in handy.
Problem Steps Recorder is a type of software that records all actions keystrokes, mouse clicks, including screenshots etc. and save the sequence of events in an MHTML document pages. You can start by entering psr.exe PSR in the Start Search box via the command prompt option.
3. ISO burner
ISO image file is a file type that is often used to distribute software. In Windows 7, Microsoft included this as an answer to many users wish list for a long time. Now you do not need to download and install a third-party program to burn ISO files to disk. Suppose you want to create a bootable CD use this tool. This is a simple process: Once you've downloaded. ISO to your hard drive, simply double click and Windows 7 will open the Burn Disc Image dialog box to burn the disc.
4. Biometric device management
In previous Windows versions, biometric authentication and management of biometric devices (fingerprint sensor) required third party software that may or may not be well integrated with the OS. Now in Windows 7 already built in. Windows Biometric Framework, which gives developers the API that you can use to build biometrics into applications. Fingerprint sensor hardware makers, such as UPEK and AuthenTec, in cooperation with Microsoft on developing its framework. Biometric can be accessed through the Control Panel.
5. Credential Manager
Credential Manager is a new feature in Windows 7. This tool is similar in some ways premises password management features in Vista User Account but this is more sophisticated. You can manage the Windows credentials for the various computers that you are signed onto, certificate-based credentials, and others (for e-mail accounts, web accounts, etc.). This is all saved by default in Windows Vault.
Perhaps the best feature new in Credential Manager is the ability to backup anhttp://www.blogger.com/img/blank.gifd restore Vault. Microsoft recommends that you keep backing up on removable drives, such as flash drives, to back up if you experience a hardware failure. For more information, see Windows 7: Windows 7: Exploring Credential Vault Manager and Windows directly from the website.
6. Projection display and the Windows Mobility Center
If you give many presentations, you will be greeted by a new tool in Windows 7 that makes it easy for you to display projectors in the desktop Windows 7. Just press the Windows logo key + P and you will see a pop-up box where you can make the choice of presentation. The first is the default settings and displayed on computer screens only. The second clone display settings on the computer screen to the projector. A third setting to extend the desktop on both computer screen and projector, and the fourth displays only the settings through the projector and turn off the computer screen.
7. Text tuning and color calibration
Your computer might not work, but your screen is what you see throughout the day. If it does not look good, you do not get the most from your computing experience, and can even cause you eye strain. In Windows 7 there are two tools to customize the look to suit your preferences. You can access the ClearType Text Tuner from Control Panel or from the command (cttune.exe). If you have multiple monitors, you can adjust according to each monitor.
This tuning tool works much like the eye chart at the optometrist's office, and please you choose one that looks best for you. In addition to text tuner, Windows 7 provides color calibration tool. It can be accessed from the Control Panel or from the command line (dccw.exe). It helps you to adjust gamma, brightness, contrast, and color rendition on your monitor to display the best.
8. Disc Repair System
Actually, the Vista Service Pack 1 Beta already lets you easily create disc repair system with friendly graphical interface, but has been removed and re-released in the final in SP1. Windows 7 to improve this function. Just click [Start] and type [System Repair] in the Search box. Click [Create A System Repair Disc] to open the dialog box. To use the disc, please mesukkan in the drive and reboot the computer from the disk. (You may need to set the CD / DVD drive as primary boot device in BIOS) Then you will get a list of system recovery options, which include:
- Startup Repair
- System restore
- System image recovery
- Windows Memory Diagnostic
- Command prompt
9. Better backup utility
In previous Windows versions already include a backup utility, but this tool has been perfect significantly in Windows 7. Vista backup program is user friendly but not very flexible. Windows 7 provides more detailed control over what you want to backup. You can run the Backup And Restore from Control Panel or by typing a backup in the Search box on the Start menu. You can back up files to local hard disk, removable disk, DVD, or another computer on the network (origin diisinkan on the network). Then you can also choose to create a backup folder or individual libraries. You can also exclude certain folders when backing up.
10. PowerShell v2
Windows PowerShell (Figure P) is a shell command-line interface and scripting tools that make it easier for Windows administrators to automate tasks using cmdlets, which are commands that perform a single command, and scripts, which consists of several cmdlets for complex tasks , multi-step tasks. Earlier versions of Windows includes a command-line interpreter (command.com or cmd.exe), but PowerShell is much more powerful, also provided the UNIX environment, this command can automate nearly every function of the GUI.
PowerShell can be downloaded and run on Windows XP or Vista, but in Windows 7 is included in a built-in. PowerShell v2 adds about 240 new cmdlets, as well as APIs and new features, such as the ability to call the PowerShell scripts and cmdlets on remote computer. You can find out more about PowerShell on Microsoft's website.

Windows Installer 5.0 is available for both Microsoft Windows 7 and Windows Server 2008 R2. With Windows Installer 5.0, setup developers can use Windows Installer 5.0 to author a single installation package capable of either per-machine installation or per-user installation of the application.Beginning with Windows Installer 5.0, a package can be authored to secure new accounts, Windows Services, files, folders, and registry keys. The package can specify a security descriptor that denies permissions, specifies inheritance of permissions from a parent resource, or specifies the permissions of a new account. For information, see Securing Resources. The Windows Installer 5.0 service can enumerate all components installed on the computer and obtain the key path for the component.
Windows Installer 5.0 has been released with, and require Windows Server 2008 R2 or Windows 7. Versions earlier than Windows Installer 5.0 were released with Windows Server 2008, Windows Vista, Windows Server 2003, Windows XP, and Windows 2000.
Windows Installer 4.5 was available as a redistributable for Windows Vista RTM and Service Pack 1, Windows XP Service Pack 3 and earlier, Windows Server 2008 RTM/SP1, and Windows Server 2003 SP1 and SP2.
unlike Windows Installer 5, Windows Installer 4.5 does not support some features that enable a single installation package to be installed in either the per-machine or per-user installation context.Moreover, Windows Installer 4.5 does not support some services configuration options that can enable a package to customize the services on a computer.It also does not support some features that enable the Windows Installer to secure new accounts, Windows Services, files, folders, and registry keys.
Get Windows 7 and enjoy the new capabilities in Windows Installer 5.Note that windows 7 free download is available for students of schools enrolled in MSDN AA (Microsoft Developer Network Academic Alliance) program and free Windows 7 upgrade is available for buyers of windows vista.
Wi-Fi Alliance on Monday announced that its direct peer-to-peer networking version of WiFi, called WiFi Direct, is now available on several new WiFi devices. The Alliance is also announcing that it has begun the process of certifying devices for WiFi Direct compatibility.
The organization has already certified a handful of WiFi cards from Atheros, Broadcom, Intel, Ralink, Realtek, and Cisco, as well as the Cisco Aironet 1240 Series access points. These devices will also be used in the test suite to certify that future devices are compatible with the protocol. Any device passing the tests will be designated "Wi-Fi CERTIFIED Wi-Fi Direct."
"We designed Wi-Fi Direct to unleash a wide variety of applications which require device connections, but do not need the internet or even a traditional network," said Edgar Figueroa, CEO of the Wi-Fi Alliance, in a statement. The certification program will ensure compatibility with the standard across a range of devices. WiFi Direct devices can also connect to older "Wi-Fi CERTIFIED" devices for backward compatibility, so chances are your current equipment will work with newer devices using the protocol.
The new protocol allows compatible devices to connect in a peer-to-peer fashion, either one-to-one or in a group, to share data with each other. The Alliance noted that many users carry a lot of data with them on portable devices like smartphones; WiFi Direct will enable users to connect these devices with each other to share that data without the need for a local WiFi network.
Though ad-hoc WiFi and Bluetooth protocols serve similar purposes, WiFi direct offers the longest range and fastest throughput, and includes enterprise-class management and security features.
READ MORE
The organization has already certified a handful of WiFi cards from Atheros, Broadcom, Intel, Ralink, Realtek, and Cisco, as well as the Cisco Aironet 1240 Series access points. These devices will also be used in the test suite to certify that future devices are compatible with the protocol. Any device passing the tests will be designated "Wi-Fi CERTIFIED Wi-Fi Direct."
"We designed Wi-Fi Direct to unleash a wide variety of applications which require device connections, but do not need the internet or even a traditional network," said Edgar Figueroa, CEO of the Wi-Fi Alliance, in a statement. The certification program will ensure compatibility with the standard across a range of devices. WiFi Direct devices can also connect to older "Wi-Fi CERTIFIED" devices for backward compatibility, so chances are your current equipment will work with newer devices using the protocol.
The new protocol allows compatible devices to connect in a peer-to-peer fashion, either one-to-one or in a group, to share data with each other. The Alliance noted that many users carry a lot of data with them on portable devices like smartphones; WiFi Direct will enable users to connect these devices with each other to share that data without the need for a local WiFi network.
Though ad-hoc WiFi and Bluetooth protocols serve similar purposes, WiFi direct offers the longest range and fastest throughput, and includes enterprise-class management and security features.
DHCP (Dynamic Host Configuration Protocol) adalah protokol yang berbasis arsitektur client/server yang dipakai untuk memudahkan pengalokasian alamat IP dalam satu jaringan. Sebuah jaringan lokal yang tidak menggunakan DHCP harus memberikan alamat IP kepada semua komputer secara manual. Jika DHCP dipasang di jaringan lokal, maka semua komputer yang tersambung di jaringan akan mendapatkan alamat IP secara otomatis dari server DHCP. Selain alamat IP, banyak parameter jaringan yang dapat diberikan oleh DHCP, seperti default gateway dan DNS server.
Cara Kerja DHCP

Karena DHCP merupakan sebuah protokol yang menggunakan arsitektur client/server, maka dalam DHCP terdapat dua pihak yang terlibat, yakni DHCP Server dan DHCP Client.
* DHCP server merupakan sebuah mesin yang menjalankan layanan yang dapat “menyewakan” alamat IP dan informasi TCP/IP lainnya kepada semua klien yang memintanya. Beberapa sistem operasi jaringan seperti Windows NT Server, Windows 2000 Server, Windows Server 2003, atau GNU/Linux memiliki layanan seperti ini.
* DHCP client merupakan mesin klien yang menjalankan perangkat lunak klien DHCP yang memungkinkan mereka untuk dapat berkomunikasi dengan DHCP Server. Sebagian besar sistem operasi klien jaringan (Windows NT Workstation, Windows 2000 Professional, Windows XP, Windows Vista, atau GNU/Linux) memiliki perangkat lunak seperti ini.
DHCP server umumnya memiliki sekumpulan alamat yang diizinkan untuk didistribusikan kepada klien, yang disebut sebagai DHCP Pool. Setiap klien kemudian akan menyewa alamat IP dari DHCP Pool ini untuk waktu yang ditentukan oleh DHCP, biasanya hingga beberapa hari. Manakala waktu penyewaan alamat IP tersebut habis masanya, klien akan meminta kepada server untuk memberikan alamat IP yang baru atau memperpanjangnya.
DHCP Client akan mencoba untuk mendapatkan “penyewaan” alamat IP dari sebuah DHCP server dalam proses empat langkah berikut:
1. DHCPDISCOVER: DHCP client akan menyebarkan request secara broadcast untuk mencari DHCP Server yang aktif.
2. DHCPOFFER: Setelah DHCP Server mendengar broadcast dari DHCP Client, DHCP server kemudian menawarkan sebuah alamat kepada DHCP client.
3. DHCPREQUEST: Client meminta DCHP server untuk menyewakan alamat IP dari salah satu alamat yang tersedia dalam DHCP Pool pada DHCP Server yang bersangkutan.
4. DHCPACK: DHCP server akan merespons permintaan dari klien dengan mengirimkan paket acknowledgment. Kemudian, DHCP Server akan menetapkan sebuah alamat (dan konfigurasi TCP/IP lainnya) kepada klien, dan memperbarui basis data database miliknya. Klien selanjutnya akan memulai proses binding dengan tumpukan protokol TCP/IP dan karena telah memiliki alamat IP, klien pun dapat memulai komunikasi jaringan.
Konsep DHCP yaitu melayani permintaan dari pada Clientnya, meminta IP untuk disebarkan ke client2 secara otomatis. >DHCP ini didesain untuk melayani network yang besar dan konfigurasi TCP/IP yang kompleks….
Hal ini berlaku jika komputer tersebut menggunakan setting IP dengan DHCP atau di Windows mengaktifkan pilihan “Obtain IP Address Automatically” tau kan maksud gw..
Trus Jika terdapat sebuah DHCP Server dengan range IP 192.168.1.100 sampai dengan 192.168.10.200, maka setiap komputer yang terhubung pada jaringan tersebut dan mengaktifkan penggunaan DHCP, maka DHCP Server akan memberikan alamat IP pada range diatas yaitu antara 100 – 200. ngarti kan…
kalo pada jaringan tersebut terdapat sebuah komputer dengan IP Statik dan masih dalam range dari IP DHCP Server maka DHCP Server tidak akan menggunakan IP tersebut untuk diberikan kepada pengguna DHCP yang lain..
* IP Address berarti= network addres = Host address
PROSES DHCP :
1. Indentifikasi DHCP Server
2. MeminTa IP
3. Menerima IP
4. Memutuskan Untuk Menggunakan IP tersebut…
DHCP menggunakan konsep DHCP relay agent ( tak henti2 ) nyambung terus walaupun mati, DHCP relay agent adalah sebuah host yang melanjutkan paket DHCP antara
Client dan server. Relay agent digunakan untuk melanjutkan permintaan dan balasan
antara client dan server yang mereka tidak dalam physical subnet yang sama…
Konfigurasi DHCP
Database DHCP server diorganisasikan seperti pohon. Akar dari pohon adalah alamat pool untuk network alami, ranting-rantingnya dalah alamat pool subnetwork, dan daunnya secara manual mengikat client.
Subnetwork mewarisi parameter network dan client mewarisi subnetwork parameter. Oleh karena itu, kebanyakan parameter, seperti nama domain, harus di konfigurasi pada level tertinggi (network atau subnetwork) dari pohon…..pohon jambu, pohon beringin dan lain lain….
Kelemahan DHCP :
kelemahan DHCP ini diantaranya terhubungnya komputer yang tidak diinginkan masuk pada jaringan komputer. Sehingga komputer atau laptop yang tidak diinginkan tersebut dapat mengakses sumber daya yang ada pada jaringan.
untuk menghindari hal tersebut, setiap klient komputer yang ingin terhubung ke jaringan harus di identifikasi ke absahannya. dengan menerapkan MAC address yang dimiliki oleh setiap NIC, dapat diketahui keabsahan komputer tersebut. sehingga jika ada MAC address yang tidak tidak terdaftar di komputer DHCP server, maka komputer tersebut tidak dapat mengakses jaringan…
READ MORE
Cara Kerja DHCP

Karena DHCP merupakan sebuah protokol yang menggunakan arsitektur client/server, maka dalam DHCP terdapat dua pihak yang terlibat, yakni DHCP Server dan DHCP Client.
* DHCP server merupakan sebuah mesin yang menjalankan layanan yang dapat “menyewakan” alamat IP dan informasi TCP/IP lainnya kepada semua klien yang memintanya. Beberapa sistem operasi jaringan seperti Windows NT Server, Windows 2000 Server, Windows Server 2003, atau GNU/Linux memiliki layanan seperti ini.
* DHCP client merupakan mesin klien yang menjalankan perangkat lunak klien DHCP yang memungkinkan mereka untuk dapat berkomunikasi dengan DHCP Server. Sebagian besar sistem operasi klien jaringan (Windows NT Workstation, Windows 2000 Professional, Windows XP, Windows Vista, atau GNU/Linux) memiliki perangkat lunak seperti ini.
DHCP server umumnya memiliki sekumpulan alamat yang diizinkan untuk didistribusikan kepada klien, yang disebut sebagai DHCP Pool. Setiap klien kemudian akan menyewa alamat IP dari DHCP Pool ini untuk waktu yang ditentukan oleh DHCP, biasanya hingga beberapa hari. Manakala waktu penyewaan alamat IP tersebut habis masanya, klien akan meminta kepada server untuk memberikan alamat IP yang baru atau memperpanjangnya.
DHCP Client akan mencoba untuk mendapatkan “penyewaan” alamat IP dari sebuah DHCP server dalam proses empat langkah berikut:
1. DHCPDISCOVER: DHCP client akan menyebarkan request secara broadcast untuk mencari DHCP Server yang aktif.
2. DHCPOFFER: Setelah DHCP Server mendengar broadcast dari DHCP Client, DHCP server kemudian menawarkan sebuah alamat kepada DHCP client.
3. DHCPREQUEST: Client meminta DCHP server untuk menyewakan alamat IP dari salah satu alamat yang tersedia dalam DHCP Pool pada DHCP Server yang bersangkutan.
4. DHCPACK: DHCP server akan merespons permintaan dari klien dengan mengirimkan paket acknowledgment. Kemudian, DHCP Server akan menetapkan sebuah alamat (dan konfigurasi TCP/IP lainnya) kepada klien, dan memperbarui basis data database miliknya. Klien selanjutnya akan memulai proses binding dengan tumpukan protokol TCP/IP dan karena telah memiliki alamat IP, klien pun dapat memulai komunikasi jaringan.
Konsep DHCP yaitu melayani permintaan dari pada Clientnya, meminta IP untuk disebarkan ke client2 secara otomatis. >DHCP ini didesain untuk melayani network yang besar dan konfigurasi TCP/IP yang kompleks….
Hal ini berlaku jika komputer tersebut menggunakan setting IP dengan DHCP atau di Windows mengaktifkan pilihan “Obtain IP Address Automatically” tau kan maksud gw..
Trus Jika terdapat sebuah DHCP Server dengan range IP 192.168.1.100 sampai dengan 192.168.10.200, maka setiap komputer yang terhubung pada jaringan tersebut dan mengaktifkan penggunaan DHCP, maka DHCP Server akan memberikan alamat IP pada range diatas yaitu antara 100 – 200. ngarti kan…
kalo pada jaringan tersebut terdapat sebuah komputer dengan IP Statik dan masih dalam range dari IP DHCP Server maka DHCP Server tidak akan menggunakan IP tersebut untuk diberikan kepada pengguna DHCP yang lain..
* IP Address berarti= network addres = Host address
PROSES DHCP :
1. Indentifikasi DHCP Server
2. MeminTa IP
3. Menerima IP
4. Memutuskan Untuk Menggunakan IP tersebut…
DHCP menggunakan konsep DHCP relay agent ( tak henti2 ) nyambung terus walaupun mati, DHCP relay agent adalah sebuah host yang melanjutkan paket DHCP antara
Client dan server. Relay agent digunakan untuk melanjutkan permintaan dan balasan
antara client dan server yang mereka tidak dalam physical subnet yang sama…
Konfigurasi DHCP
Database DHCP server diorganisasikan seperti pohon. Akar dari pohon adalah alamat pool untuk network alami, ranting-rantingnya dalah alamat pool subnetwork, dan daunnya secara manual mengikat client.
Subnetwork mewarisi parameter network dan client mewarisi subnetwork parameter. Oleh karena itu, kebanyakan parameter, seperti nama domain, harus di konfigurasi pada level tertinggi (network atau subnetwork) dari pohon…..pohon jambu, pohon beringin dan lain lain….
Kelemahan DHCP :
kelemahan DHCP ini diantaranya terhubungnya komputer yang tidak diinginkan masuk pada jaringan komputer. Sehingga komputer atau laptop yang tidak diinginkan tersebut dapat mengakses sumber daya yang ada pada jaringan.
untuk menghindari hal tersebut, setiap klient komputer yang ingin terhubung ke jaringan harus di identifikasi ke absahannya. dengan menerapkan MAC address yang dimiliki oleh setiap NIC, dapat diketahui keabsahan komputer tersebut. sehingga jika ada MAC address yang tidak tidak terdaftar di komputer DHCP server, maka komputer tersebut tidak dapat mengakses jaringan…
System restore sebenarnya tidak hanya dilakukan melalui jendela windows. Cara lain yang sebenarnya juga sangat mudah dan cepat adalah system restore melalui safe mode Command Prompt. Itulah yang akan saya bahas kali ini. Artikel ini berlaku untuk versi Windows XP dan saya belum mencoba pada versi windows terbaru seperti Windows Vista dan Windows 7. Jika Anda punya pengalaman, silakan sharing disini. Isi dalam artikel ini mungkin tidak relevan bagi sistem operasi Anda jika menggunakan versi lain dari windows.
dini saya akan menjelaskan cara untuk memulai System Restore dalam safe mode dengan menggunakan Command prompt (SAFEBOOT_OPTION = Minimal (AlternateShell)). Pilihan ini digunakan ketika Anda tidak bisa menjalankan sistem restore melalui jendela Windows XP.
System Restore merupakan sebuah tool yang secara otomatis memantau dan mencatat setiap perubahan yang dibuat pada file sistem Windows dan registri. Jika perubahan menyebabkan sistem anda menjadi tidak stabil, System Restore dapat membatalkan (atau “roll back”) sistem kesebuah titik waktu ketika komputer Anda masih dapat berfungsi dengan benar.
Bagaimana memulai System Restore menggunakan Command prompt, syarat pertama adalah Anda harus masuk ke Windows dengan account administrator, bukan sebagai user limited. Untuk memverifikasi bahwa Anda logon ke Windows dengan account pengguna sebagai administrator komputer, kunjungi Website Microsoft berikut ini:
http://support.microsoft.com/gp/admin (http://support.microsoft.com/gp/admin)
Jika sebuah program baru telah membuat komputer Anda crash, dan menguninstall program baru ini tidak dapat membantu, Anda dapat mencoba Windows XP System Restore melalui command prompt.
Syarat kedua adalah sistem restore hanya dapat dilakukan jika sebelumnya Anda mengaktifkan System Restore pada windows, jika tidak maka Anda tidak dapat mengembalikan komputer Anda ke keadaan sebelumnya.
Untuk memulai System Restore menggunakan Command prompt, ikuti langkah berikut:
1. Restart komputer Anda, kemudian tekan terus F8 pada saat startup awal untuk memulai komputer Anda dalam safe mode dengan Command prompt.
2. Gunakan tombol panah untuk memilih Safe Mode dengan opsi Command prompt.
3. Jika Anda diminta untuk memilih sistem operasi, gunakan tombol panah untuk memilih sistem operasi yang sesuai untuk komputer Anda, kemudian tekan ENTER.
4. Logon sebagai administrator atau dengan account yang memiliki level administrator.
5. Jika Anda sudah masuk pada jendela command prompt silakan ketik: %systemroot%/system32/restore/rstrui.exe, dan kemudian tekan ENTER.
6. Ikuti petunjuk yang muncul di layar untuk mengembalikan komputer Anda ke keadaan semula sebagaimana layaknya sebelum mengalami kerusakan.
READ MORE
dini saya akan menjelaskan cara untuk memulai System Restore dalam safe mode dengan menggunakan Command prompt (SAFEBOOT_OPTION = Minimal (AlternateShell)). Pilihan ini digunakan ketika Anda tidak bisa menjalankan sistem restore melalui jendela Windows XP.
System Restore merupakan sebuah tool yang secara otomatis memantau dan mencatat setiap perubahan yang dibuat pada file sistem Windows dan registri. Jika perubahan menyebabkan sistem anda menjadi tidak stabil, System Restore dapat membatalkan (atau “roll back”) sistem kesebuah titik waktu ketika komputer Anda masih dapat berfungsi dengan benar.
Bagaimana memulai System Restore menggunakan Command prompt, syarat pertama adalah Anda harus masuk ke Windows dengan account administrator, bukan sebagai user limited. Untuk memverifikasi bahwa Anda logon ke Windows dengan account pengguna sebagai administrator komputer, kunjungi Website Microsoft berikut ini:
http://support.microsoft.com/gp/admin (http://support.microsoft.com/gp/admin)
Jika sebuah program baru telah membuat komputer Anda crash, dan menguninstall program baru ini tidak dapat membantu, Anda dapat mencoba Windows XP System Restore melalui command prompt.
Syarat kedua adalah sistem restore hanya dapat dilakukan jika sebelumnya Anda mengaktifkan System Restore pada windows, jika tidak maka Anda tidak dapat mengembalikan komputer Anda ke keadaan sebelumnya.
Untuk memulai System Restore menggunakan Command prompt, ikuti langkah berikut:
1. Restart komputer Anda, kemudian tekan terus F8 pada saat startup awal untuk memulai komputer Anda dalam safe mode dengan Command prompt.
2. Gunakan tombol panah untuk memilih Safe Mode dengan opsi Command prompt.
3. Jika Anda diminta untuk memilih sistem operasi, gunakan tombol panah untuk memilih sistem operasi yang sesuai untuk komputer Anda, kemudian tekan ENTER.
4. Logon sebagai administrator atau dengan account yang memiliki level administrator.
5. Jika Anda sudah masuk pada jendela command prompt silakan ketik: %systemroot%/system32/restore/rstrui.exe, dan kemudian tekan ENTER.
6. Ikuti petunjuk yang muncul di layar untuk mengembalikan komputer Anda ke keadaan semula sebagaimana layaknya sebelum mengalami kerusakan.


