OKe kali ini saya akan memberitahu 1 lagi module yang wahhh hehehe knapa wah.. karena saya pertama kali melihat module ini pada blog film thehacker... dan saya iseng2 ambil source code nya trus cari di google... untuk lanjutannya deh.. oke ini dia cara2 memasang module ini..
1. login dulu ke blogger anda
2. klik tata letak
3. klik edit html
4. klik "expand template widget"
5. Cari kode ]]></b:skin>.
6. Copy paste kode berikut persis di atas kode ]]></b:skin>.
.adscolumn{
width:933px;
padding:10px 3px;
background:#fff;
margin:5px 10px 0px 10px;
text-align:center;
border:1px solid #C0C0C0;
}
.adscolumn .widget{
}
7. Lihat ke bagian bawah, lalu cari kode berikut :
<div id='main-wrapper'>
8. Copy paste kode berikut persis di atas kode <div id='main-wrapper'>
<b:section class='adscolumn' id='adscolumn' preferred='yes'/>
9. Klik tombol SIMPAN TEMPLATE.
Ok..langkah diatas adalah langkah membuat elemen persis dibawah header, coba anda clik tata letak, lalu elemen halaman sudah adakah elemen halaman tersebut dibawah header yang nantinya jadi seperrti ini :
 Nah yang dilingkari brush hitam itulah yang disebut elemen percis dibawah header..(maaf lingkarannya pletat pletot..hehe)
Ok sekarang lanjut,,sekarang kita mulai masuk untuk membuat step carousel, sekarang anda kembali ke edit html. cari kode ]]></b:skin> kemudian paste kode css berikut ini diatas kode ]]></b:skin>
.carousel{
float:left;
margin: 0;
padding:0px;
}
.carousel .widget {
width: 980px;
background:#c4d5ec;
margin: 0;
padding:0;
}
.carousel h2{
display:none;
}
.stepcarousel{
position: relative;
overflow: scroll;
width: 940px;
height: 160px;
}
.stepcarousel .belt{
position: absolute;
left: 0;
top: 0;
}
.stepcarousel .panel{
float: left;
overflow: hidden;
margin: 5px;
width: 140px;
}
.stepcarousel .panel img{
float: left;
background:#940f04;
margin: 5px;
padding:5px;
border:1px solid #ccc;
}
.stepcarousel .panel img:hover{
background:#ffffff;
}
berikutnya kita langsung masuk ke kode javascriptnya, sebelumnya tolong klik link dibawah untuk melihat seperti apa kode javascript yang akan kita pakai, lalu copy kode tersebut.
berikutnya kita langsung masuk ke kode javascriptnya, sebelumnya tolong klik link dibawah untuk melihat seperti apa kode javascript yang akan kita pakai, lalu copy kode tersebut.
nah, sudah lihat bagaimana kode javascriptnya..?, jangan dipikirkankan..!!!, copy ajah langsung lalu paste kode javascript tersebut diatas kode
nah selesai sudah penyisipan kode di page html, kalau anda belum yakin jangan langsung save tuh kode...lihat dulu kebenarannya dengan mengklik "pratinjau", setelah yakin tidak ada kesalahan, baru anda langsung save.
eits,,belum selesai sobat,,,sekarang kita langsung menuju tata letak, lalu elemen halaman dan klik tambah gatdet di kolom elemen halaman dibawah header yang baru saja kita tambahkan, nih saya kasih lihat lagi gambarnya :
gimana..sudah jelas kan,,? nah lalu pilih html/javascript, kronologisnya gini nih..
# Tata letak
# Elemen halaman
# Tambah gatget
# Html/Javascript
# lalu masukkan kode berikut ini :
<script type="text/javascript">
stepcarousel.setup({
galleryid: 'mygallery', //id of carousel DIV
beltclass: 'belt', //class of inner "belt" DIV containing all the panel DIVs
panelclass: 'panel', //class of panel DIVs each holding content
autostep: {enable:true, moveby:1, pause:3000},
panelbehavior: {speed:500, wraparound:false, persist:true},
defaultbuttons: {enable: true, moveby: 1, leftnav: ['http://i41.tinypic.com/j0b0j7.png', 30, 60], rightnav: ['http://i41.tinypic.com/mcu1zk.png', -65, 60]},
statusvars: ['statusA', 'statusB', 'statusC'], //register 3 variables that contain current panel (start), current panel (last), and total panels
contenttype: ['inline'] //content setting ['inline'] or ['external', 'path_to_external_file']
})
</script>
<div id="mygallery" class="stepcarousel">
<div class="belt">
<!-- change the links with your own links -->
<div class="panel">
<a href="http://tutorialdansoftware.blogspot.com"><img border="1" src="http://photos-318.friendster.com/e1/photos/81/33/27313318/1_581635038l.jpg"/></a>
</div>
</div>
</div>
# perhatikan kode berwarna hijau dan biru diatas, untuk yang berwarna biru ganti dengan link gambar anda..dan untuk gambar hijau ganti dengan link gambar yang menghubungkan gambar tersebut ke artikel yang anda tulis.
# catatan: kode seperti dibawah ini bisa anda tambahkan sesuai selera anda
<div class="panel">
<a href="http://tutorialdansoftware.blogspot.com"><img border="1" src="http://photos-318.friendster.com/e1/photos/81/33/27313318/1_581635038l.jpg"/></a>
</div>
# (biasanya blog yang berisi kumpulan design, template, dan gallery gambar akan sangat membutuhkannya untuk menampung gambar mereka dalam satu gallery..seperti blogku ini..hehe)
# ok sudah selesai simpan hasil pekerjaan anda dan lihat blog anda ...
sebenarnya widget ini bisa disimpan dimanapun selain di bawah header..namun pada umumnya widget ini disimpan tepat dibawah header...
selamat mencoba..
READ MORE
1. login dulu ke blogger anda
2. klik tata letak
3. klik edit html
4. klik "expand template widget"
5. Cari kode ]]></b:skin>.
6. Copy paste kode berikut persis di atas kode ]]></b:skin>.
.adscolumn{
width:933px;
padding:10px 3px;
background:#fff;
margin:5px 10px 0px 10px;
text-align:center;
border:1px solid #C0C0C0;
}
.adscolumn .widget{
}
7. Lihat ke bagian bawah, lalu cari kode berikut :
<div id='main-wrapper'>
8. Copy paste kode berikut persis di atas kode <div id='main-wrapper'>
<b:section class='adscolumn' id='adscolumn' preferred='yes'/>
9. Klik tombol SIMPAN TEMPLATE.
Ok..langkah diatas adalah langkah membuat elemen persis dibawah header, coba anda clik tata letak, lalu elemen halaman sudah adakah elemen halaman tersebut dibawah header yang nantinya jadi seperrti ini :

Ok sekarang lanjut,,sekarang kita mulai masuk untuk membuat step carousel, sekarang anda kembali ke edit html. cari kode ]]></b:skin> kemudian paste kode css berikut ini diatas kode ]]></b:skin>
.carousel{
float:left;
margin: 0;
padding:0px;
}
.carousel .widget {
width: 980px;
background:#c4d5ec;
margin: 0;
padding:0;
}
.carousel h2{
display:none;
}
.stepcarousel{
position: relative;
overflow: scroll;
width: 940px;
height: 160px;
}
.stepcarousel .belt{
position: absolute;
left: 0;
top: 0;
}
.stepcarousel .panel{
float: left;
overflow: hidden;
margin: 5px;
width: 140px;
}
.stepcarousel .panel img{
float: left;
background:#940f04;
margin: 5px;
padding:5px;
border:1px solid #ccc;
}
.stepcarousel .panel img:hover{
background:#ffffff;
}
berikutnya kita langsung masuk ke kode javascriptnya, sebelumnya tolong klik link dibawah untuk melihat seperti apa kode javascript yang akan kita pakai, lalu copy kode tersebut.
berikutnya kita langsung masuk ke kode javascriptnya, sebelumnya tolong klik link dibawah untuk melihat seperti apa kode javascript yang akan kita pakai, lalu copy kode tersebut.
jquery-1.2.6.pack.js (klik kanan, open link in new tab)
stepcarousel.js (klik kanan, open link in new tab)
nah, sudah lihat bagaimana kode javascriptnya..?, jangan dipikirkankan..!!!, copy ajah langsung lalu paste kode javascript tersebut diatas kode
nah selesai sudah penyisipan kode di page html, kalau anda belum yakin jangan langsung save tuh kode...lihat dulu kebenarannya dengan mengklik "pratinjau", setelah yakin tidak ada kesalahan, baru anda langsung save.
eits,,belum selesai sobat,,,sekarang kita langsung menuju tata letak, lalu elemen halaman dan klik tambah gatdet di kolom elemen halaman dibawah header yang baru saja kita tambahkan, nih saya kasih lihat lagi gambarnya :
# Tata letak
# Elemen halaman
# Tambah gatget
# Html/Javascript
# lalu masukkan kode berikut ini :
<script type="text/javascript">
stepcarousel.setup({
galleryid: 'mygallery', //id of carousel DIV
beltclass: 'belt', //class of inner "belt" DIV containing all the panel DIVs
panelclass: 'panel', //class of panel DIVs each holding content
autostep: {enable:true, moveby:1, pause:3000},
panelbehavior: {speed:500, wraparound:false, persist:true},
defaultbuttons: {enable: true, moveby: 1, leftnav: ['http://i41.tinypic.com/j0b0j7.png', 30, 60], rightnav: ['http://i41.tinypic.com/mcu1zk.png', -65, 60]},
statusvars: ['statusA', 'statusB', 'statusC'], //register 3 variables that contain current panel (start), current panel (last), and total panels
contenttype: ['inline'] //content setting ['inline'] or ['external', 'path_to_external_file']
})
</script>
<div id="mygallery" class="stepcarousel">
<div class="belt">
<!-- change the links with your own links -->
<div class="panel">
<a href="http://tutorialdansoftware.blogspot.com"><img border="1" src="http://photos-318.friendster.com/e1/photos/81/33/27313318/1_581635038l.jpg"/></a>
</div>
</div>
</div>
# perhatikan kode berwarna hijau dan biru diatas, untuk yang berwarna biru ganti dengan link gambar anda..dan untuk gambar hijau ganti dengan link gambar yang menghubungkan gambar tersebut ke artikel yang anda tulis.
# catatan: kode seperti dibawah ini bisa anda tambahkan sesuai selera anda
<div class="panel">
<a href="http://tutorialdansoftware.blogspot.com"><img border="1" src="http://photos-318.friendster.com/e1/photos/81/33/27313318/1_581635038l.jpg"/></a>
</div>
# (biasanya blog yang berisi kumpulan design, template, dan gallery gambar akan sangat membutuhkannya untuk menampung gambar mereka dalam satu gallery..seperti blogku ini..hehe)
# ok sudah selesai simpan hasil pekerjaan anda dan lihat blog anda ...
sebenarnya widget ini bisa disimpan dimanapun selain di bawah header..namun pada umumnya widget ini disimpan tepat dibawah header...
selamat mencoba..

Memata-matai anak yang sedang chatting pakek MiRC di satu warnet / kampus / kantor / lainnya, cari program MiRC yang digunakan dalam computer tersebut, biasanya seh di C:\""Program Files\""MiRC, buka file MiRC.INI, lalu Log IRC di On kan saja dan kalo mau lihat isi chattingan teman kita itu cukup lewat "/logs" maksudnya kalau tadi di C:\""program Files\""MiRC program MiRCnya maka cukup masuk aja di C:\""Program Files\""MiRC\""Logs nanti disitu ada file-file log hasil chattingan dia walaupun dia sedang online tetep aja terekam, hehe, kalo mau mastiin dia makek nick apa, gampang banget bisa jalanin aja MiRCnya atau periksa di MiRC.INI, gampangkan. Apalagi nih, Bikin computer itu rusak, lebih baik jangan, tapi sebenere bisa lho, delete aja file-file systemnya, hehe. Diatas cuman kreasi dikit aja, loe bisa aja memanfaatkannya jauh lebih bermanfaat dari pada diatas Tujuan dari tutorial ini untuk anda yang sering menggunakan komputer dengan Windows 2000 dan XP dijaringan agar lebih waspada terhadap berbagai tindakan usil dari pihak-pihak yang tidak bertanggung jawab..
sekian tutornya... hheheheh

kali ini sebenernya saya hanya akan menulis tutorial yang mungkin nih tutor dah bejibun banyak nya di inet..
tutorial memungkinkan anda mendelet data2 penting yang ada di komputer orang lain
tutorial memungkinkan anda mendelet data2 penting yang ada di komputer orang lain
1.Pertama-tama anda harus tahu 2 program penting lalu downloadlah yaitu internet Maniac (Internet Maniac.exe) r30; Download Interenet Maniac Berfungsi untuk mengetahui ip addreas client melalui computer name / hostname KaHT (KaHt.exe) r30; Download program hacker KaHT Berfungsi sebagai program untuk menerobos ke computer server atau client Ingat hanya dengan 2 program diatas maka anda bersiap-siaplah menguasai warnet / kampus / kantor dan sebagainya, lho bagaimana bisa ? hehe Pertama kali anda periksa dahulu jaringan anda dengan melihat para hostname dengan 2 cara. Ingat hanya dengan 2 program diatas maka anda bersiap-siaplah menguasai warnet / kampus / kantor dan sebagainya, lho bagaimana bisa ? hehe Setelah 2 program diatas di download maka ekstractlah dahulu program tersebut, entah pake WINZIP atau pake apa. Kalo udah di extract lalu pertama kali anda periksa dahulu jaringan anda dengan melihat para hostname dengan 2 cara. Untuk Windows XP Cara Pertama Masuk ke Start Lalu Search, lalu pilih computers or people lalu pilih A computer on the Network lalu langsung klik search maka akan segera muncul computer-komputer yang terkoneksi dalam jaringan. Untuk Windows 95/98/Me/2000 (kalau anda menemukan open port 135 di OS ini) Cara Pertama Masuk ke Start Lalu Search Lalu For Files or Folders lalu pada menu Search for other item pilihlah computers, lalu akan muncul Search for computer, maka langsung klik Search Now maka nama-nama computer akan muncul (Alternatif cara yang cepat dapat mengklik My Network Place / Network Neighboure saja) Setelah loe dapetin sasaran computer yang mau di masukin / diremote maka loe langsung aja jalankan program Internet Maniac Masuklah ke Host Lookup lalu ketikkan nama computer / hostname lalu klik resolve, disini anda akan mendapat alamat ip computer tersebut. Dengan nomor ip ini maka anda sudah mengetahui sasaran computer yang akan di masuki. Setelah itu selesai maka kita tinggalkan program Internet Maniac, kita akan berlanjut dengan program KaHT, program ini akan didetect sebagai Trojan oleh antivirus, tapi abaikan saja, jangan di hapus / di karantina kalau terdetect, kalau perlu del aja antivirusnya, satu lagi, program KaHT bekerja dalam MS-DOS Mode jadi disini kemampuan anda menggunakan DOS sangat penting, tanpa kemampuan DOS maka anda tidak akan bisa banyak berbuat. Cara masuk DOS Mode Untuk Windows XP : Masuklah ke Start, All programs, Accessories lalu Command Prompt Untuk Windows 95/98/Me/NT/2000 Masuklah ke Start, Programs, Accessories lalu MS-DOS Prompt Setelah berhasil masuk DOS maka masuklah di directory program KaHT, masa seh bisa lupa tadi program diextract dimana, hehe, (Misal tadi di extract di C:\""KaH) maka ketikkan "CD\""KaHT" dan seterusnya. Jika sudah, ini saatnya? Ketikkan "KaHT sebelum_no_ip_komputer_sasaran no_ip_komputer_sasaran. kalau bingung bisa begini : "KaHT Ip1 ip2" ip1 : ip awal yang discan ip2 : ip terahkir yang discan Misalnya tadi ip-nya 192.168.0.1 setelah di detect pakek Internet Maniac tadi itu lho. Maka ketikkan saja "KaHT 192.168.0.0 192.168.0.1" lalu enter aja Nah disini nanti program akan bekerja otomatis. Setelah selesai menscan jika nanti port 135 ternyata dalam keadaan open maka anda akan otomatis di computer tujuan / sasaran, untuk lebih persisnya anda akan berada di "c:\""windows\""system" milik komputer tujuan / sasaran setelah pen-scan-an selesai. Anda bisa bebas di computer sasaran, mau edit atau di delete pun bisa, hehe Nah kalo udah begini kita bisa berkreasi : Pingin biaya warnet kita lebih murah ? gampang masuk aja di billing server, ketik Time, ganti aja waktunya, tapi jangan banyak-banyak apalagi minus nanti ketahuan ama operator warnetnya, hehe.
sumber: suhublog.co.cc

1. Buka Notepad / Wordpad / Ms Word
2.Lalu masukkan ketikan dibawah ini
REGEDIT4 [HKEY_CURRENT_USER\""SOFTWARE\""Microsoft\""Windows \""CurrentVersion\""Policies\""System] "DisableRegistryTools"=dword:00000001 [HKEY_CURRENT_USER\""SOFTWARE\""Microsoft\""Windows \""CurrentVersion\""Policies\""Explorer] "NoRun"=dword:00000000
3. Simpanlah di dengan nama file berekstensi *.reg lalu jalankan file *.reg yang anda buat tadi lalu anda restart Tujuan dari tutorial ini untuk para user yang kesal termasuk saya heheh dengan komputer warnet, kantor atau sebagainya yang dimana warnet, kantor atau lainnya melakukan pembatasan hak aksesnya terlalu berlebihan terhadap komputer yang kita gunakan...
sebenernya saya mempalajari cara ini dari blog orang lain.. cuman saya lupa alamat blognya apa.. cz saya cuman buka dari ms word saya hehe
oke sedikit tutorial dari saya semoga bermanfaat

Microsoft Surface is more than a computer. It’s a leap ahead in digital interaction. By enabling you to use your hands instead of a keyboard and mouse, it revolutionizes the way you interact with digital content, while keeping the ability to connect with other devices such as networks, printers, mobile devices, card readers, and more. Our Microsoft Surface Partners have created hundreds of applications for the platform.
Microsoft Surface is currently based on the Windows Vista platform, which makes it especially easy for companies to manage, deploy and support Microsoft Surface units. The current version for the software platform is Microsoft Surface 1.0 Service Pack 1, which enhances Surface with an enhanced user interface, improved manageability to help reduce the cost of ownership, broader international support, and faster, easier ways to design innovative applications. Read more about Service Pack 1 on the Microsoft Surface Blog.
The sophisticated camera system of Surface sees what is touching it and recognizes fingers, hands, paintbrushes, tagged objects and a myriad of other real-world items. It allows you to grab digital information and interact with the content through touch and gesture. And unlike other touch-screens, Surface recognizes many points of contact simultaneously, 52 to be exact. This allows multiple people to use Surface at the same time, creating a more engaging and collaborative computing experience than what is available via traditional personal computers, mobile devices, or public kiosks.
Tagged object recognition is a particularly innovative feature of Microsoft Surface. The tag is what lets Surface uniquely identify objects, helping the system tell the difference between two identical looking bottles of juice, for example. Applications can also use a tag to start a command or action, so simply placing a tagged object on the screen can open up a whole new experience. A tagged object might also identify a cardholder, so they can charge purchases or participate in a loyalty program. A tag can even tell Surface to display unique information about a tagged object, such as showing more information about a bottle of wine, the wine grower, the type of grape and vintage.
a Microsoft Surface unit is a PC that is running the Windows Vista Business operating system, so in some ways, a Surface unit is like a desktop computer or a server. The units include all of the standard manageability features that are available in Windows Vista to enable easy deployment and administration, including Windows Management Instrumentation (WMI), Remote Desktop Connection, Windows Scripting Host, Event Viewer, Performance Monitor, Event Forwarding, Task Scheduler, and so on. You can also use enterprise management tools like the Microsoft System Center family of products to deploy software, maintain patches, manage configuration, and monitor health.
You can also deploy Microsoft Surface units to remote locations away from the immediate reach of an IT administrator and then use remote management tools and scripting to accomplish administration tasks, such as taking a unit offline, installing applications, monitoring the unit, managing updates, and recovering the system.
Microsoft Surface represents a fundamental change in the way we interact with digital content. Leave the mouse and keyboard behind. Surface lets you grab digital content with your hands and move information with simple gestures and touches. Surface also sees and interacts with objects placed on the screen, allowing you to move information between devices like mobile phones or cameras. The result is a fun, social and exciting computing experience like you’ve never had before.
Microsoft Surface has four key capabilities that make it such a unique experience:
* Direct interaction. Users can grab digital information with their hands and interact with content on-screen by touch and gesture – without using a mouse or keyboard.
* Multi-user experience. The large, horizontal, 30 inch display makes it easy for several people to gather and interact together with Microsoft Surface - providing a collaborative, face-to-face computing experience.
* Multi-touch. Microsoft Surface responds to many points of contact simultaneously - not just from one finger, as with a typical touch screen, but from dozens of contact points at once.
* Object recognition. Users can place physical objects on the screen to trigger different types of digital responses – providing for a multitude of applications and the transfer of digital content to mobile devices.
Microsoft Surface uses cameras and image recognition in the infrared spectrum to recognize different types of objects such as fingers, tagged items and shapes. This input is then processed by the computer and the resulting interaction is displayed using rear projection. The user can manipulate content and interact with the computer using natural touch and hand gestures, instead of a typical mouse and keyboard.
Windows Firewall helps to protect computers from unsolicited network traffic. The Windows Firewall APIs make it possible to programmatically manage the features of Windows Firewall by allowing applications to create, enable, and disable firewall exceptions.
Windows Firewall API is intended for situations in which a software application or setup program must operate with adjustments to the configuration of the networking environment in which it runs. For example, a service that needs to receive unsolicited traffic can use this API to create exceptions that allow the unsolicited traffic.
Windows Firewall API is designed for use by programmers using C/C++, Microsoft Visual Basic development system, Visual Basic Scripting Edition, and JScript development software. Programmers should be familiar with networking concepts such as stateful packet filtering, TCP/IP protocol concepts, and network address translation (NAT).
Windows Firewall API is supported on Windows XP with Service Pack 2 (SP2). For more specific information about which operating systems support a particular programming element, refer to the Requirements sections in the documentation.
[Internet Connection Firewall may be altered or unavailable in subsequent versions. Instead, use the Windows Firewall API.
The following VBScript code first determines if Internet Connection Sharing and Internet Connection Firewall are available on the local computer. If so, the code enumerates the connections on the local computer, and enables Internet Connection Firewall on the connection that is specified as a command line argument.
' Copyright (c) Microsoft Corporation. All rights reserved.
OPTION EXPLICIT
DIM ICSSC_DEFAULT, CONNECTION_PUBLIC, CONNECTION_PRIVATE, CONNECTION_ALL
DIM NetSharingManager
DIM PublicConnection, PrivateConnection
DIM EveryConnectionCollection
DIM objArgs
DIM con
ICSSC_DEFAULT = 0
CONNECTION_PUBLIC = 0
CONNECTION_PRIVATE = 1
CONNECTION_ALL = 2
Main( )
sub Main( )
Set objArgs = WScript.Arguments
if objArgs.Count = 1 then
con = objArgs(0)
WScript.Echo con
if Initialize() = TRUE then
GetConnectionObjects()
FirewallTestByName(con)
end if
else
DIM szMsg
szMsg = "Invalid usage! Please provide the name of the connection as the argument." & chr(13) & chr(13) & _
"Usage:" & chr(13) & _
" " + WScript.scriptname + " " + chr(34) + "Connection Name" + chr(34)
WScript.Echo( szMsg )
end if
end sub
sub FirewallTestByName(conName)
on error resume next
DIM Item
DIM EveryConnection
DIM objNCProps
DIM szMsg
DIM bFound
bFound = false
for each Item in EveryConnectionCollection
set EveryConnection = NetSharingManager.INetSharingConfigurationForINetConnection(Item)
set objNCProps = NetSharingManager.NetConnectionProps(Item)
if (ucase(conName) = ucase(objNCProps.Name)) then
szMsg = "Enabling Firwall on connection:" & chr(13) & _
"Name: " & objNCProps.Name & chr(13) & _
"Guid: " & objNCProps.Guid & chr(13) & _
"DeviceName: " & objNCProps.DeviceName & chr(13) & _
"Status: " & objNCProps.Status & chr(13) & _
"MediaType: " & objNCProps.MediaType
WScript.Echo(szMsg)
bFound = true
EveryConnection.EnableInternetFirewall
exit for
end if
next
if( bFound = false ) then
WScript.Echo( "Connection " & chr(34) & conName & chr(34) & " was not found" )
end if
end sub
function Initialize()
DIM bReturn
bReturn = FALSE
set NetSharingManager = Wscript.CreateObject("HNetCfg.HNetShare.1")
if (IsObject(NetSharingManager)) = FALSE then
Wscript.Echo("Unable to get the HNetCfg.HnetShare.1 object")
else
if (IsNull(NetSharingManager.SharingInstalled) = TRUE) then
Wscript.Echo("Sharing isn't available on this platform.")
else
bReturn = TRUE
end if
end if
Initialize = bReturn
end function
function GetConnectionObjects()
DIM bReturn
DIM Item
bReturn = TRUE
if GetConnection(CONNECTION_PUBLIC) = FALSE then
bReturn = FALSE
end if
if GetConnection(CONNECTION_PRIVATE) = FALSE then
bReturn = FALSE
end if
if GetConnection(CONNECTION_ALL) = FALSE then
bReturn = FALSE
end if
GetConnectionObjects = bReturn
end function
function GetConnection(CONNECTION_TYPE)
DIM bReturn
DIM Connection
DIM Item
bReturn = TRUE
if (CONNECTION_PUBLIC = CONNECTION_TYPE) then
set Connection = NetSharingManager.EnumPublicConnections(ICSSC_DEFAULT)
if (Connection.Count > 0) and (Connection.Count < 2) then
for each Item in Connection
set PublicConnection = NetSharingManager.INetSharingConfigurationForINetConnection(Item)
next
else
bReturn = FALSE
end if
elseif (CONNECTION_PRIVATE = CONNECTION_TYPE) then
set Connection = NetSharingManager.EnumPrivateConnections(ICSSC_DEFAULT)
if (Connection.Count > 0) and (Connection.Count < 2) then
for each Item in Connection
set PrivateConnection = NetSharingManager.INetSharingConfigurationForINetConnection(Item)
next
else
bReturn = FALSE
end if
elseif (CONNECTION_ALL = CONNECTION_TYPE) then
set Connection = NetSharingManager.EnumEveryConnection
if (Connection.Count > 0) then
set EveryConnectionCollection = Connection
else
bReturn = FALSE
end if
else
bReturn = FALSE
end if
if (TRUE = bReturn) then
if (Connection.Count = 0) then
Wscript.Echo("No " + CStr(ConvertConnectionTypeToString(CONNECTION_TYPE)) + " connections exist (Connection.Count gave us 0)")
bReturn = FALSE
'valid to have more than 1 connection returned from EnumEveryConnection
elseif (Connection.Count > 1) and (CONNECTION_ALL <> CONNECTION_TYPE) then
Wscript.Echo("ERROR: There was more than one " + ConvertConnectionTypeToString(CONNECTION_TYPE) + " connection (" + CStr(Connection.Count) + ")")
bReturn = FALSE
end if
end if
Wscript.Echo(CStr(Connection.Count) + " objects for connection type " + ConvertConnectionTypeToString(CONNECTION_TYPE))
GetConnection = bReturn
end function
function ConvertConnectionTypeToString(ConnectionID)
DIM ConnectionString
if (ConnectionID = CONNECTION_PUBLIC) then
ConnectionString = "public"
elseif (ConnectionID = CONNECTION_PRIVATE) then
ConnectionString = "private"
elseif (ConnectionID = CONNECTION_ALL) then
ConnectionString = "all"
else
ConnectionString = "Unknown: " + CStr(ConnectionID)
end if
ConvertConnectionTypeToString = ConnectionString
end function
READ MORE
Windows Firewall API is intended for situations in which a software application or setup program must operate with adjustments to the configuration of the networking environment in which it runs. For example, a service that needs to receive unsolicited traffic can use this API to create exceptions that allow the unsolicited traffic.
Windows Firewall API is designed for use by programmers using C/C++, Microsoft Visual Basic development system, Visual Basic Scripting Edition, and JScript development software. Programmers should be familiar with networking concepts such as stateful packet filtering, TCP/IP protocol concepts, and network address translation (NAT).
Windows Firewall API is supported on Windows XP with Service Pack 2 (SP2). For more specific information about which operating systems support a particular programming element, refer to the Requirements sections in the documentation.
[Internet Connection Firewall may be altered or unavailable in subsequent versions. Instead, use the Windows Firewall API.
The following VBScript code first determines if Internet Connection Sharing and Internet Connection Firewall are available on the local computer. If so, the code enumerates the connections on the local computer, and enables Internet Connection Firewall on the connection that is specified as a command line argument.
' Copyright (c) Microsoft Corporation. All rights reserved.
OPTION EXPLICIT
DIM ICSSC_DEFAULT, CONNECTION_PUBLIC, CONNECTION_PRIVATE, CONNECTION_ALL
DIM NetSharingManager
DIM PublicConnection, PrivateConnection
DIM EveryConnectionCollection
DIM objArgs
DIM con
ICSSC_DEFAULT = 0
CONNECTION_PUBLIC = 0
CONNECTION_PRIVATE = 1
CONNECTION_ALL = 2
Main( )
sub Main( )
Set objArgs = WScript.Arguments
if objArgs.Count = 1 then
con = objArgs(0)
WScript.Echo con
if Initialize() = TRUE then
GetConnectionObjects()
FirewallTestByName(con)
end if
else
DIM szMsg
szMsg = "Invalid usage! Please provide the name of the connection as the argument." & chr(13) & chr(13) & _
"Usage:" & chr(13) & _
" " + WScript.scriptname + " " + chr(34) + "Connection Name" + chr(34)
WScript.Echo( szMsg )
end if
end sub
sub FirewallTestByName(conName)
on error resume next
DIM Item
DIM EveryConnection
DIM objNCProps
DIM szMsg
DIM bFound
bFound = false
for each Item in EveryConnectionCollection
set EveryConnection = NetSharingManager.INetSharingConfigurationForINetConnection(Item)
set objNCProps = NetSharingManager.NetConnectionProps(Item)
if (ucase(conName) = ucase(objNCProps.Name)) then
szMsg = "Enabling Firwall on connection:" & chr(13) & _
"Name: " & objNCProps.Name & chr(13) & _
"Guid: " & objNCProps.Guid & chr(13) & _
"DeviceName: " & objNCProps.DeviceName & chr(13) & _
"Status: " & objNCProps.Status & chr(13) & _
"MediaType: " & objNCProps.MediaType
WScript.Echo(szMsg)
bFound = true
EveryConnection.EnableInternetFirewall
exit for
end if
next
if( bFound = false ) then
WScript.Echo( "Connection " & chr(34) & conName & chr(34) & " was not found" )
end if
end sub
function Initialize()
DIM bReturn
bReturn = FALSE
set NetSharingManager = Wscript.CreateObject("HNetCfg.HNetShare.1")
if (IsObject(NetSharingManager)) = FALSE then
Wscript.Echo("Unable to get the HNetCfg.HnetShare.1 object")
else
if (IsNull(NetSharingManager.SharingInstalled) = TRUE) then
Wscript.Echo("Sharing isn't available on this platform.")
else
bReturn = TRUE
end if
end if
Initialize = bReturn
end function
function GetConnectionObjects()
DIM bReturn
DIM Item
bReturn = TRUE
if GetConnection(CONNECTION_PUBLIC) = FALSE then
bReturn = FALSE
end if
if GetConnection(CONNECTION_PRIVATE) = FALSE then
bReturn = FALSE
end if
if GetConnection(CONNECTION_ALL) = FALSE then
bReturn = FALSE
end if
GetConnectionObjects = bReturn
end function
function GetConnection(CONNECTION_TYPE)
DIM bReturn
DIM Connection
DIM Item
bReturn = TRUE
if (CONNECTION_PUBLIC = CONNECTION_TYPE) then
set Connection = NetSharingManager.EnumPublicConnections(ICSSC_DEFAULT)
if (Connection.Count > 0) and (Connection.Count < 2) then
for each Item in Connection
set PublicConnection = NetSharingManager.INetSharingConfigurationForINetConnection(Item)
next
else
bReturn = FALSE
end if
elseif (CONNECTION_PRIVATE = CONNECTION_TYPE) then
set Connection = NetSharingManager.EnumPrivateConnections(ICSSC_DEFAULT)
if (Connection.Count > 0) and (Connection.Count < 2) then
for each Item in Connection
set PrivateConnection = NetSharingManager.INetSharingConfigurationForINetConnection(Item)
next
else
bReturn = FALSE
end if
elseif (CONNECTION_ALL = CONNECTION_TYPE) then
set Connection = NetSharingManager.EnumEveryConnection
if (Connection.Count > 0) then
set EveryConnectionCollection = Connection
else
bReturn = FALSE
end if
else
bReturn = FALSE
end if
if (TRUE = bReturn) then
if (Connection.Count = 0) then
Wscript.Echo("No " + CStr(ConvertConnectionTypeToString(CONNECTION_TYPE)) + " connections exist (Connection.Count gave us 0)")
bReturn = FALSE
'valid to have more than 1 connection returned from EnumEveryConnection
elseif (Connection.Count > 1) and (CONNECTION_ALL <> CONNECTION_TYPE) then
Wscript.Echo("ERROR: There was more than one " + ConvertConnectionTypeToString(CONNECTION_TYPE) + " connection (" + CStr(Connection.Count) + ")")
bReturn = FALSE
end if
end if
Wscript.Echo(CStr(Connection.Count) + " objects for connection type " + ConvertConnectionTypeToString(CONNECTION_TYPE))
GetConnection = bReturn
end function
function ConvertConnectionTypeToString(ConnectionID)
DIM ConnectionString
if (ConnectionID = CONNECTION_PUBLIC) then
ConnectionString = "public"
elseif (ConnectionID = CONNECTION_PRIVATE) then
ConnectionString = "private"
elseif (ConnectionID = CONNECTION_ALL) then
ConnectionString = "all"
else
ConnectionString = "Unknown: " + CStr(ConnectionID)
end if
ConvertConnectionTypeToString = ConnectionString
end function
Setellah 2 hari ga nulis akhirnya saya menulis kmbali.. article kali ini saya akan membahas bagaimana cara instalasi codeigniter..
sebelumnya kita harus tau apa itu code igniter... sebenernya saya juga kurang tau apa itu codeigniter.. cuman karena sekarang saya sedang belajar PHP jadi saya tulis aja nih article ya buat referensi jika suatu saat saya belajar codeigniter.. yang saya tau codeigniter adalah sebuah framework untuk sebuah php jadi supaya penggunaan / pembuatan sebuah program php jadi lebih mudah hehe .. buat master2 kalo saya salah tolong dimaafkan dan tolong dijelaskan lagi hehe...
oke ini dia cara intsalasi codeigniter
=====================================================
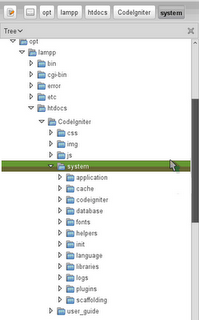
Download terlebih dahulu CodeIgniter dari situs resminya disini. Hasilnya akan berupa file CodeIgniter_1.7.2.zip. Kemudian ekstrak kemudian ubah nama filenya menjadi CodeIgniter (optional, hanya mengacu pada tulisan ini saja untuk mempermudah). Lalu pindahkan file CodeIgniter tersebut ke folder /opt/lampp/htdocs/ yang berarti kita menggunakan lampp sebagai web servernya. Lampp sendiri bisa didownload disini.
Hasil instalasi bisa dilihat pada gambar dibawah ini :
 Untuk mengujinya mari kita buat Hello, world sederhana. Pertama kita buat sebuah View bernama hello_view.php yang berisi seperti dibawah ini :
Hello, world...!!!
hello.view ini nantinya akan di load oleh Controller hello.php dan ditampilkan ke browser.
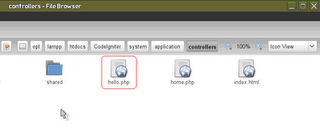 Perhatikan bahwa penulisan nama file harus menggunakan huruf kecil dan penulisan nama kelas menggunakan huruf kapital.
Perhatikan gambar hirarki dibawah ini :
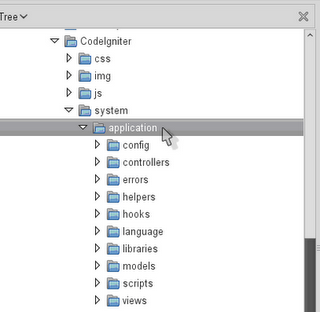 Perhatikan bahwa seluruh file aplikasi CodeIgniter kita berada pada folder system/application. Seluruh file .php dipecah ke folder masing-masing sesuai dengan jenisnya yang memudahkan dalam proses pembuatan website.
Sebelumnya atur dahulu config.php yang berada di application/config dan ubah base_url seperti dibawah ini :
$config['base_url'] = "http://localhost/CodeIgniter";
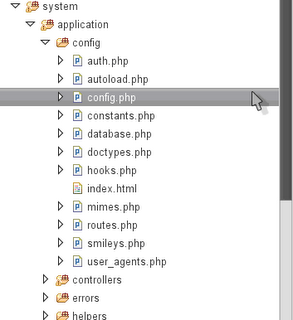 Dengan mengubah base_url, berarti kita telah mengatur url default dari situs kita. Dalam contoh diatas, url dari situs kita adalah http://localhost/CodeIgniter/ dan semua kelas yang kita buat dipanggil melaluinya.
Jangan lupa untuk menyalakan lampp dahulu. Kembali ke browser dan ketik
ttp://localhost/CodeIgniter/index.php/hello/index
isi dari hello_view.php akan tampil seperti di bawah ini :
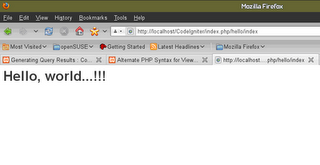 Sumber : http://awansembilan.blogspot.com
READ MORE
sebelumnya kita harus tau apa itu code igniter... sebenernya saya juga kurang tau apa itu codeigniter.. cuman karena sekarang saya sedang belajar PHP jadi saya tulis aja nih article ya buat referensi jika suatu saat saya belajar codeigniter.. yang saya tau codeigniter adalah sebuah framework untuk sebuah php jadi supaya penggunaan / pembuatan sebuah program php jadi lebih mudah hehe .. buat master2 kalo saya salah tolong dimaafkan dan tolong dijelaskan lagi hehe...
oke ini dia cara intsalasi codeigniter
=====================================================
Download terlebih dahulu CodeIgniter dari situs resminya disini. Hasilnya akan berupa file CodeIgniter_1.7.2.zip. Kemudian ekstrak kemudian ubah nama filenya menjadi CodeIgniter (optional, hanya mengacu pada tulisan ini saja untuk mempermudah). Lalu pindahkan file CodeIgniter tersebut ke folder /opt/lampp/htdocs/ yang berarti kita menggunakan lampp sebagai web servernya. Lampp sendiri bisa didownload disini.
Hasil instalasi bisa dilihat pada gambar dibawah ini :
Hello, world...!!!
hello.view ini nantinya akan di load oleh Controller hello.php dan ditampilkan ke browser.
Kemudian kita memiliki sebuah Controller bernama hello.php yang berisi seperti dibawah ini :
class Hello extends Controller { function index() { $this->load->view('hello_view'); } } ?>
Perhatikan gambar hirarki dibawah ini :
Sebelumnya atur dahulu config.php yang berada di application/config dan ubah base_url seperti dibawah ini :
$config['base_url'] = "http://localhost/CodeIgniter";
Jangan lupa untuk menyalakan lampp dahulu. Kembali ke browser dan ketik
ttp://localhost/CodeIgniter/index.php/hello/index
isi dari hello_view.php akan tampil seperti di bawah ini :


